
代码链接:
https://github.com/watersink/enet-as-linux
本代码可以在模拟器下进行跑。
环境:
Android studio 3.6
Sdk:android10 api 29
Ndk:r15c
Ncnn:20200226
Opencv:Opencv3.4.1 android sdk
Linux下的代码测试:
mkdir build
cd build
cmake ..
make
./enet
运行效果,

Android开始:
(1)新建工程,
New->New Project->选择Native c++ ->工程名enet->c++11
(2)app/src/cpp下面增加opencv和ncnn的头文件,include

(3)app/src/main下面增加ncnn 和opencv的静态库文件和动态库文件,

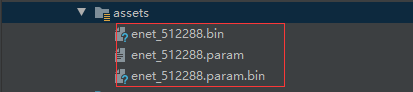
(4)app/src/main下面增加模型文件assets
(5)修改布局文件,app/src/main/res/layout/ activity_main.xml
<?xml version="1.0" encoding="utf-8"?>
<RelativeLayout xmlns:android="http://schemas.android.com/apk/res/android"
 xmlns:app="http://schemas.android.com/apk/res-auto"
 xmlns:tools="http://schemas.android.com/tools"
 android:layout_width="match_parent"
 android:layout_height="match_parent"
 tools:context=".MainActivity">
 <LinearLayout
  android:id="@+id/btn_ll"
  android:layout_alignParentBottom="true"
  android:layout_width="match_parent"
  android:layout_height="wrap_content"
  android:orientation="horizontal">
  <Button
   android:id="@+id/use_photo"
   android:layout_weight="1"
   android:layout_width="0dp"
   android:layout_height="wrap_content"
   android:text="选图"/>
  <Button
   android:id="@+id/detect_photo"
   android:layout_weight="1"
   android:layout_width="0dp"
   android:layout_height="wrap_content"
   android:text="分割"/>
 </LinearLayout>

 <ImageView
  android:id="@+id/show_image"
  android:layout_width="match_parent"
  android:layout_height="match_parent"
  android:layout_above="@id/btn_ll"
  android:layout_alignParentTop="true"
  android:layout_marginTop="1dp"
  android:layout_marginBottom="-1dp" />
</RelativeLayout>
(6) app/src/main/java/com/example/enet增加ENET类,
public class ENET {
 public native boolean Init(byte[] param, byte[] bin);
 public native float[] Process(Bitmap bitmap);
 // Used to load the 'native-lib' library on application startup.

 static {
  System.loadLibrary("ENET");
 }
}
(7) app/src/main/cpp/enet-jni.cpp实现其jni方法,
extern "C"
JNIEXPORT jboolean JNICALL
Java_com_example_enet_ENET_Init(JNIEnv *env, jobject thiz, jbyteArray param, jbyteArray bin) {
 // TODO: implement Init()
 ncnn::Mat ncnn_param;
 ncnn::Mat ncnn_bin;
 // init param
 {
  int len = env->GetArrayLength(param);
  ncnn_param.create(len, (size_t) 1u);
  env->GetByteArrayRegion(param, 0, len, (jbyte *) ncnn_param);
 }
 // init bin
 {
  int len = env->GetArrayLength(bin);
  ncnn_bin.create(len, (size_t) 1u);
  env->GetByteArrayRegion(bin, 0, len, (jbyte *) ncnn_bin);
 }
 ncnn_net = new ENET(ncnn_param,ncnn_bin);
 return JNI_TRUE;
}
extern "C"
JNIEXPORT jfloatArray JNICALL
Java_com_example_enet_ENET_Process(JNIEnv *env, jobject thiz, jobject bitmap) {
 // TODO: implement Process()
 // ncnn from bitmap
 ncnn::Mat in;
 {
  AndroidBitmapInfo info;
  AndroidBitmap_getInfo(env, bitmap, &info);
  int width = info.width;
  int height = info.height;
  if (info.format != ANDROID_BITMAP_FORMAT_RGBA_8888)
   return NULL;
  void* indata;
  AndroidBitmap_lockPixels(env, bitmap, &indata);
  // 把像素转换成data,并指定通道顺序
  // 因为图像预处理每个网络层输入的数据格式不一样一般为300*300 128*128等等所以这类需要一个resize的操作可以在cpp中写,也可以是java读入图片时有个resize操作
  //in = ncnn::Mat::from_pixels_resize((const unsigned char*)indata, ncnn::Mat::PIXEL_RGBA2RGB, width, height,300,300);
  in = ncnn::Mat::from_pixels(static_cast<const unsigned char *>(indata), ncnn::Mat::PIXEL_RGBA2BGR, width, height);
  // 下面一行为debug代码
  __android_log_print(ANDROID_LOG_DEBUG, "ENetJniIn", "enet_process_has_input1, in.w: %d; in.h: %d in.c:%d ", in.w, in.h,in.c);
  //AndroidBitmap_unlockPixels(env, bitmap);
 }
 {
  ncnn::Mat out = ncnn_net->process(in);
  __android_log_print(ANDROID_LOG_DEBUG, "ENetJniIn", "enet_process_has_output, in.w: %d; in.h: %d in.c:%d ", out.w, out.h,out.c);
  int output_wsize = out.w;
  int output_hsize = out.h;
  //输出整理
  float *output[output_wsize * output_hsize]; // float类型
  for(int i = 0; i< out.h; i++) {
   for (int j = 0; j < out.w; j++) {
    output[i*output_wsize + j] = &out.row(
      i)[j];
   }
  }
  //建立float数组 长度为 output_wsize * output_hsize,如果只是ouput_size相当于只有一行的out的数据那就是一个object检测数据
  jfloatArray jOutputData = env->NewFloatArray(output_wsize * output_hsize);
  if (jOutputData == nullptr) return nullptr;
  env->SetFloatArrayRegion(jOutputData, 0, output_wsize * output_hsize,
        reinterpret_cast<const jfloat *>(*output));
  return jOutputData;
 }
}
(8) app/src/main/java/com/example/enet中MainActivity做具体的调用实现,
public class MainActivity extends AppCompatActivity {
private ENET enet = new ENET(); //java接口实例化 下面直接利用java函数调用NDK c++函数
private Bitmap yourSelectedImage = null;
private static final int SELECT_IMAGE = 1;
private static final String TAG = MainActivity.class.getName();
private ImageView show_image;
private boolean load_result = false;
private int[] ddims = {1, 3, 512, 288}; //这里的维度的值要和train model的input 一一对应
@Override
protected void onCreate(Bundle savedInstanceState) {
super.onCreate(savedInstanceState);
setContentView(R.layout.activity_main);
try
{
initENet();//初始化模型
Log.e("MainActivity", "initENet ok");
} catch (IOException e) {
Log.e("MainActivity", "initENet error");
}
init_view();//检测+view画图
}
// initialize view
private void init_view() {
show_image = (ImageView) findViewById(R.id.show_image);
Button use_photo = (Button) findViewById(R.id.use_photo);
use_photo.setOnClickListener(new View.OnClickListener() {
@Override
public void onClick(View arg0) {
Intent i = new Intent(Intent.ACTION_PICK);
i.setType("image/*");
startActivityForResult(i, SELECT_IMAGE);
}
});
Button detect_photo = (Button) findViewById(R.id.detect_photo);
detect_photo.setOnClickListener(new View.OnClickListener() {
@Override
public void onClick(View arg0) {
if (yourSelectedImage == null)
return;
predict_image(yourSelectedImage);
}
});
}
private void initENet() throws IOException {
byte[] param = null;
byte[] bin = null;
{
//用io流读取二进制文件,最后存入到byte[]数组中
InputStream assetsInputStream = getAssets().open("enet_512288.param.bin");// param: 网络结构文件
int available = assetsInputStream.available();
param = new byte[available];
int byteCode = assetsInputStream.read(param);
assetsInputStream.close();
}
{
//用io流读取二进制文件,最后存入到byte上,转换为int型
InputStream assetsInputStream = getAssets().open("enet_512288.bin");//bin: model文件
int available = assetsInputStream.available();
bin = new byte[available];
int byteCode = assetsInputStream.read(bin);
assetsInputStream.close();
}
load_result = enet.Init(param, bin);// 再将文件传入java的NDK接口(c++ 代码中的init接口 )
Log.d("load model", "ENet_load_model_result:" + load_result);
}
@Override
protected void onActivityResult(int requestCode, int resultCode, Intent data)
{
super.onActivityResult(requestCode, resultCode, data);
if (resultCode == RESULT_OK && null != data) {
Uri selectedImage = data.getData();
try
{
if (requestCode == SELECT_IMAGE) {
Bitmap bitmap = decodeUri(selectedImage);
Bitmap rgba = bitmap.copy(Bitmap.Config.ARGB_8888, true);
// resize to 512x288
yourSelectedImage = Bitmap.createScaledBitmap(rgba, ddims[2], ddims[3], false);
show_image.setImageBitmap(yourSelectedImage);
}
}
catch (FileNotFoundException e)
{
Log.e("MainActivity", "FileNotFoundException");
return;
}
}
}
private Bitmap decodeUri(Uri selectedImage) throws FileNotFoundException
{
// Decode image size
BitmapFactory.Options o = new BitmapFactory.Options();
o.inJustDecodeBounds = true;
BitmapFactory.decodeStream(getContentResolver().openInputStream(selectedImage), null, o);
// The new size we want to scale to
final int REQUIRED_SIZE = 600;
// Find the correct scale value. It should be the power of 2.
int width_tmp = o.outWidth, height_tmp = o.outHeight;
int scale = 1;
while (true) {
if (width_tmp / 2 < REQUIRED_SIZE
|| height_tmp / 2 < REQUIRED_SIZE) {
break;
}
width_tmp /= 2;
height_tmp /= 2;
scale *= 2;
}
// Decode with inSampleSize
BitmapFactory.Options o2 = new BitmapFactory.Options();
o2.inSampleSize = scale;
return BitmapFactory.decodeStream(getContentResolver().openInputStream(selectedImage), null, o2);
}
// predict image
private void predict_image(Bitmap bmp) {
// picture to float array
Bitmap rgba = bmp.copy(Bitmap.Config.ARGB_8888, true);
// resize
Bitmap input_bmp = Bitmap.createScaledBitmap(rgba, ddims[2], ddims[3], false);
try {
// Data format conversion takes too long
// Log.d("inputData", Arrays.toString(inputData));
long start = System.currentTimeMillis();
// get predict result
float[] result = enet.Process(input_bmp);
// time end
long end = System.currentTimeMillis();
Log.d(TAG, "origin predict result:" + Arrays.toString(result));
long time = end - start;
Log.d("result length", "length of result: " + String.valueOf(result.length));
// 画布配置
Canvas canvas = new Canvas(input_bmp);
//图像上画矩形
Paint paint = new Paint();
//continue to draw rect
Log.d(TAG, "result :" + result.length);
Log.d(TAG, "result :" + Arrays.toString(result));
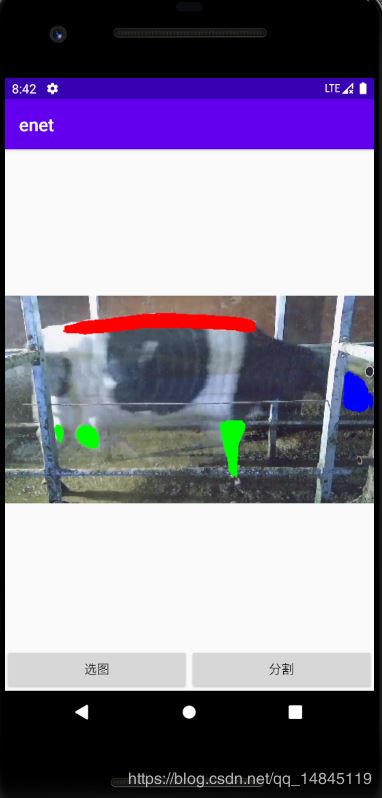
for(int num = 0; num < result.length; num++){
// 画框
int row =num%ddims[2];
int col = num/ddims[2];
if (result[num]==1){
paint.setColor(Color.RED);
paint.setStyle(Paint.Style.STROKE);//不填充
canvas.drawCircle(row, col, 1, paint);
}
if (result[num]==2){
paint.setColor(Color.BLUE);
paint.setStyle(Paint.Style.STROKE);//不填充
canvas.drawCircle(row, col, 1, paint);
}
if (result[num]==3){
paint.setColor(Color.GREEN);
paint.setStyle(Paint.Style.STROKE);//不填充
canvas.drawCircle(row, col, 1, paint);
}
}
show_image.setImageBitmap(input_bmp);
} catch (Exception e) {
e.printStackTrace();
}
}
}
(9) app/src/main/cpp下面修改CMakeLists
cmake_minimum_required(VERSION 3.4.1)
include_directories(include)
file(GLOB ENET_SRC *.h
  *.cpp)
set(ENET_COMPILE_CODE ${ENET_SRC})
add_library(libopencv_java3 SHARED IMPORTED)
set_target_properties(libopencv_java3 PROPERTIES IMPORTED_LOCATION
  ${CMAKE_SOURCE_DIR}/../jniLibs/${ANDROID_ABI}/libopencv_java3.so)

add_library(libncnn STATIC IMPORTED )
set_target_properties(libncnn
  PROPERTIES IMPORTED_LOCATION
  ${CMAKE_SOURCE_DIR}/../jniLibs/${ANDROID_ABI}/libncnn.a)
add_library( # Sets the name of the library.
  ENET ## 为生成.so的文字最好直接和.c名字一样,需要更改
  # Sets the library as a shared library.
  SHARED
  # Provides a relative path to your source file(s).
  ${ENET_COMPILE_CODE})##cpp文件的name
find_library( # Sets the name of the path variable.
    log-lib

    # Specifies the name of the NDK library that
    # you want CMake to locate.
    log )
target_link_libraries( # Specifies the target library.
      ENET
      libncnn
      libopencv_java3
      jnigraphics
      android
      # Links the target library to the log library
      # included in the NDK.
      ${log-lib} )
(10) app/src/下面修改build.gradle,增加下面的设置,
externalNativeBuild {
   cmake {
    arguments "-DANDROID_TOOLCHAIN=clang"
    cFlags "-fopenmp -O2 -fvisibility=hidden -fomit-frame-pointer -fstrict-aliasing -ffunction-sections -fdata-sections -ffast-math "
    cppFlags "-fopenmp -O2 -fvisibility=hidden -fvisibility-inlines-hidden -fomit-frame-pointer -fstrict-aliasing -ffunction-sections -fdata-sections -ffast-math "
    arguments "-DANDROID_STL=c++_shared", "-DANDROID_CPP_FEATURES=rtti exceptions"
    cppFlags ""
    cppFlags "-std=c++11"
    cppFlags "-frtti"
    cppFlags "-fexceptions"
   }
  }
  ndk {
   abiFilters 'armeabi-v7a'// , 'arm64-v8a' //,'x86', 'x86_64', 'armeabi'
   stl "gnustl_static"
  }
整体目录结构:

最终效果:
总结
到此这篇关于基于Android studio3.6的JNI教程之ncnn之语义分割ENet的文章就介绍到这了,更多相关android studio 语义分割enet内容请搜索自学编程网以前的文章或继续浏览下面的相关文章希望大家以后多多支持自学编程网!

- 本文固定链接: https://zxbcw.cn/post/183796/
- 转载请注明:必须在正文中标注并保留原文链接
- QQ群: PHP高手阵营官方总群(344148542)
- QQ群: Yii2.0开发(304864863)