前言
由于业务需要,需要在封装的弹窗组件中引入定时器实现倒计时效果,但是如果同时触发两个弹窗,就会导致计时器bug,前一个弹窗的定时器没有被清除,倒计时就会错乱,此时想到的解决办法就是采用队列模式,将每一个需要的弹窗存到队列中,依次的将弹窗展示出来,同时清除定时器
什么是队列
队列(Queue)是先进先出(FIFO, First-In-First-Out)的线性表。在具体应用中通常用链表或者数组来实现。队列只允许在尾部进行插入操作(入队 enqueue),在头部进行删除操作(出队 dequeue)。队列的操作方式和堆栈类似,唯一的区别在于队列只允许新数据在后端进行添加。
JavaScript实现队列的效果
function ArrayQueue(){
  var arr = [];
    //入队操作
  this.push = function(element){
    arr.push(element);
    return true;
  }
    //出队操作
  this.pop = function(){
    return arr.shift();
  }
    //获取队首
  this.getFront = function(){
    return arr[0];
  }
    //获取队尾
  this.getRear = function(){
    return arr[arr.length - 1]
  }
    //清空队列
  this.clear = function(){
    arr = [];
  }
    //获取队长
  this.size = function(){
    return length;
  }
}
和vue封装的弹窗组件使用
首先要配合组件封装队列要进行修改
class Queue {
 dataStore = []
 constructor(){
  this.dataStore=[]
 }
 enqueue(e) {
  this.dataStore.push(e)
  console.warn('入队',this.dataStore);
 }

 dequeue() {
  this.dataStore.shift()
  console.warn('出队',this.dataStore);
 }

 front() {
  console.log(this.dataStore,'front')
  return this.dataStore[0]()
 }
 select(){
  return this.dataStore[0]
 }

 back() {
  return this.dataStore[this.dataStore.length - 1]
 }

 isEmpty() {
  if (this.dataStore.length == 0) {
   return true
  }
  return false
 }

 toString() {
  return this.dataStore.join(',')
 }
}

export default Queue
在弹出第一个队列的时候需要自执行。
在你的封装组件的函数中引入这个队列,同时实例化这个队列,写入两个方法.
const pushDialog = (eventName) => {
 if (queue.isEmpty()) {
  queue.enqueue(eventName);
  openDialog();
 } else {
  queue.enqueue(eventName);
 }
}
const openDialog = () => {
 // 打开弹窗
 queue.front();
}
在安装的方法中将每一个弹窗加入队列中

需要注意的是,每个弹窗是要被销毁的,不然会导致方法重复。
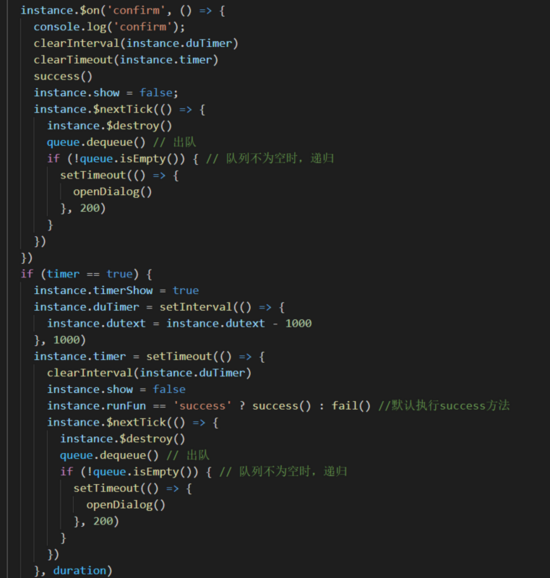
举例在确认方法和定时器后怎么出队列和清空定时器

到此这篇关于在vue中封装的弹窗组件使用队列模式实现的文章就介绍到这了,更多相关vue 封装的弹窗组件队列模式内容请搜索自学编程网以前的文章或继续浏览下面的相关文章希望大家以后多多支持自学编程网!

- 本文固定链接: https://zxbcw.cn/post/191540/
- 转载请注明:必须在正文中标注并保留原文链接
- QQ群: PHP高手阵营官方总群(344148542)
- QQ群: Yii2.0开发(304864863)
