这篇博客将介绍如何使用OpenCV和深度学习应用全面嵌套的边缘检测。并将对图像和视频流应用全面嵌套边缘检测,然后将结果与OpenCV的标准Canny边缘检测器进行比较。
1. 效果图
愤怒的小鸟——原始图 VS Canny边缘检测图 VS HED边缘检测图

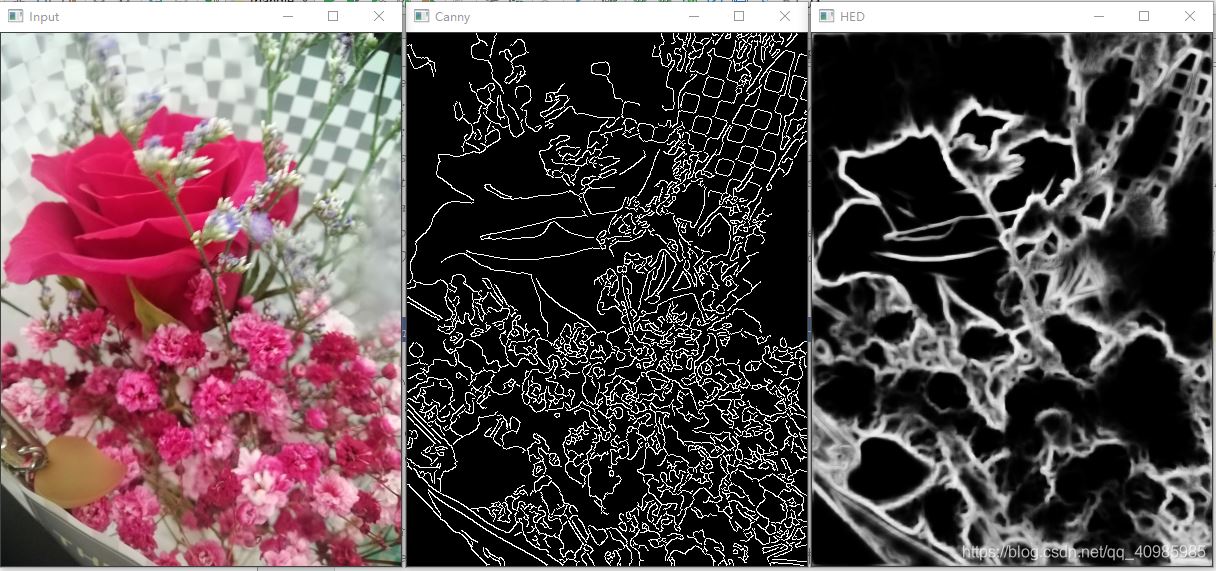
花朵——原始图 VS Canny边缘检测图 VS HED边缘检测图

视频效果图GIF 如下

2. 全面嵌套边缘检测与Canny边缘检测
2.1 Hed与Canny边缘检测对比
Holistically-Nested Edge Detection (HED) 全面嵌套边缘检测
Canny Edge Detection Canny边缘检测
OpenCV 利用Canny边缘检测能够找到图像中对象的边界。但是Canny边缘检测器存在一些问题,即:
- 需要手动验证(将下部和上值设置为滞后阈值,是一种需要实验和视觉验证的手动过程);
- 不具备通用性(对不同照明条件下捕获的相同图像,适用于一个图像,却不适用于另一个图像);
- 通常需要许多预处理步骤(即转换为灰度,模糊/平滑等),以获得良好的边缘图。
整体嵌套边缘检测(HED)试图通过端到端深神经网络解决Canny边缘检测器的局限性。
该网络接受RGB图像作为输入,然后将边缘图作为输出产生。而且通过HED产生的边缘图在图像中很好的保留了对象边界。
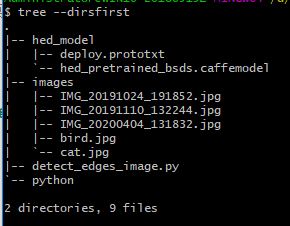
2.2. 项目结构

2.3 deploy.prototxt, hed_pretrained_bsds.caffemodel下载
执行代码的关键是获取deploy.prototxt, hed_pretrained_bsds.caffemodel
https://github.com/opencv/opencv/blob/master/samples/dnn/edge_detection.py
https://github.com/seminar2012/hed
- This sample shows how to define custom OpenCV deep learning layers in Python.
- Holistically-Nested Edge Detection (https://arxiv.org/abs/1504.06375) neural network is used as an example model.
- Find a pre-trained model at https://github.com/s9xie/hed. We provide the pretrained model and training/testing code for the edge detection framework Holistically-Nested Edge Detection (HED).
- Please see the Arxiv or ICCV paper for technical details. The pretrained model (fusion-output) gives ODS=.790 and OIS=.808 result on BSDS benchmark dataset.
- Download the pretrained model (56MB) from (http://vcl.ucsd.edu/hed/hed_pretrained_bsds.caffemodel) and place it in examples/hed/ folder.
3. 源码
3.1 对图像进行HED检测
# USAGE
# python detect_edges_image.py --edge-detector hed_model --image images/bird.jpg

# 导入必要的包
import argparse
import cv2
import os
import imutils

# 构建命令行参数及解析
# --edge-detector Holistically-Nested Edge Detection检测器模型路径
# --image 图片路径
ap = argparse.ArgumentParser()
ap.add_argument("-d", "--edge-detector", type=str, required=True,
                help="path to OpenCV's deep learning edge detector")
ap.add_argument("-i", "--image", type=str, required=True,
                help="path to input image")
args = vars(ap.parse_args())


class CropLayer(object):
    def __init__(self, params, blobs):
        # 初始化剪切区域开始和结束点的坐标
        self.xstart = 0
        self.ystart = 0
        self.xend = 0
        self.yend = 0

    # 计算输入图像的体积
    def getMemoryShapes(self, inputs):
        # 剪切类将接收俩个参数
        # 剪切第一个输入blob以匹配第二个blob,保持批次和通道数
        # 输出输入容积的形状及目标形状
        # 提取批量大小及通道数
        # 分别提取目标形状的高和宽
        (inputShape, targetShape) = (inputs[0], inputs[1])
        (batchSize, numChannels) = (inputShape[0], inputShape[1])
        (H, W) = (targetShape[2], targetShape[3])

        # 计算开始和结束剪切坐标的值
        self.xstart = int((inputShape[3] - targetShape[3]) // 2)
        self.ystart = int((inputShape[2] - targetShape[2]) // 2)
        self.xend = self.xstart + W
        self.yend = self.ystart + H

        # 返回体积,接下来进行实际裁剪
        return [[batchSize, numChannels, H, W]]

    def forward(self, inputs):
        return [inputs[0][:, :, self.ystart:self.yend, self.xstart:self.xend]]


# 从磁盘加载序列化的边缘检测器模型
print("[INFO] loading edge detector...")
protoPath = os.path.sep.join([args["edge_detector"],
                              "deploy.prototxt"])
modelPath = os.path.sep.join([args["edge_detector"],
                              "hed_pretrained_bsds.caffemodel"])
net = cv2.dnn.readNetFromCaffe(protoPath, modelPath)

# 绑定剪裁类到模型
cv2.dnn_registerLayer("Crop", CropLayer)

# 加载输入图像,获取其维度
image = cv2.imread(args["image"])
image = imutils.resize(image, width=400)
(H, W) = image.shape[:2]

# 转换图像为灰度图,高斯平滑,执行Canny边缘检测
print("[INFO] performing Canny edge detection...")
gray = cv2.cvtColor(image, cv2.COLOR_BGR2GRAY)
blurred = cv2.GaussianBlur(gray, (5, 5), 0)
canny = cv2.Canny(blurred, 30, 150)

# 根据输入图像为全面的嵌套边缘检测器(Holistically-Nested Edge Detector)构建一个输出blob
blob = cv2.dnn.blobFromImage(image, scalefactor=1.0, size=(W, H),
                             mean=(104.00698793, 116.66876762, 122.67891434),
                             swapRB=False, crop=False)

# # 设置blob作为网络的输入并执行算法以计算边缘图
print("[INFO] performing holistically-nested edge detection...")
net.setInput(blob)
hed = net.forward()
# 调整输出为原始图像尺寸的大小
hed = cv2.resize(hed[0, 0], (W, H))
# 将图像像素缩回到范围[0,255]并确保类型为“UINT8”
hed = (255 * hed).astype("uint8")

# 展示HED边缘检测的结果及Canny边缘检测的结果
cv2.imshow("Input", image)
cv2.imshow("Canny", canny)
cv2.imshow("HED", hed)
cv2.waitKey(0)
3.2 对视频进行HED检测
# USAGE 默认使用电脑自带的摄像头
# python detect_edges_video.py --edge-detector hed_model
# 使用视频文件流
# python detect_edges_video.py --edge-detector hed_model --input xl.mp4

# 导入必要的包
from imutils.video import VideoStream
import argparse
import imutils
import time  # 此模块允许放置睡眠命令以允许视频流建立和“热身”。
import cv2
import os

# 构建命令行参数及解析
# --edge-detector Holistically-Nested Edge Detection检测器模型路径
# --input 视频源:网络摄像头,视频文件或其他源。
ap = argparse.ArgumentParser()
ap.add_argument("-d", "--edge-detector", type=str, required=True,
                help="path to OpenCV's deep learning edge detector")
ap.add_argument("-i", "--input", type=str,
                help="path to optional input video (webcam will be used otherwise)")
args = vars(ap.parse_args())


class CropLayer(object):
    def __init__(self, params, blobs):
        # 初始化剪切区域开始和结束点的坐标
        self.xstart = 0
        self.ystart = 0
        self.xend = 0
        self.yend = 0

    # 计算输入图像的体积
    def getMemoryShapes(self, inputs):
        # 剪切类将接收俩个参数
        # 剪切第一个输入blob以匹配第二个blob,保持批次和通道数
        # 输出输入容积的形状及目标形状
        # 提取批量大小及通道数
        # 分别提取目标形状的高和宽
        (inputShape, targetShape) = (inputs[0], inputs[1])
        (batchSize, numChannels) = (inputShape[0], inputShape[1])
        (H, W) = (targetShape[2], targetShape[3])

        # 计算开始和结束剪切坐标的值
        self.xstart = int((inputShape[3] - targetShape[3]) // 2)
        self.ystart = int((inputShape[2] - targetShape[2]) // 2)
        self.xend = self.xstart + W
        self.yend = self.ystart + H

        # 返回体积,接下来进行实际裁剪
        return [[batchSize, numChannels, H, W]]

    def forward(self, inputs):
        # 使用派生(x,y)-oordinate来执行裁剪
        return [inputs[0][:, :, self.ystart:self.yend, self.xstart:self.xend]]


# 初始化视频流,脚本将动态选取使用视频文件流还是网络摄像头流
webcam = not args.get("input", False)

# 如果未提供视频文件路径,则使用电脑自带摄像头
if webcam:
    print("[INFO] starting video stream...")
    vs = VideoStream(src=0).start()
    time.sleep(2.0)
# 否则,获取视频文件流指针
else:
    print("[INFO] opening video file...")
    vs = cv2.VideoCapture(args["input"])

# 从磁盘加载序列化的HED检测器模型
print("[INFO] loading edge detector...")
protoPath = os.path.sep.join([args["edge_detector"],
                              "deploy.prototxt"])
modelPath = os.path.sep.join([args["edge_detector"],
                              "hed_pretrained_bsds.caffemodel"])
net = cv2.dnn.readNetFromCaffe(protoPath, modelPath)

# 将剪裁类注册到模型
cv2.dnn_registerLayer("Crop", CropLayer)

# 遍历视频流的帧
while True:
    # 获取每一帧,如果使用网络摄像头,获取下一帧
    frame = vs.read()
    frame = frame if webcam else frame[1]

    # 如果在处理视频文件流,没有获取到帧则代表已经到了文件尾部,则跳出循环
    if not webcam and frame is None:
        break

    # 等比例缩放帧为宽度500,并获取其维度
    frame = imutils.resize(frame, width=300)
    (H, W) = frame.shape[:2]

    # 转换灰度图,高斯模糊并执行Canny边缘检测
    gray = cv2.cvtColor(frame, cv2.COLOR_BGR2GRAY)
    blurred = cv2.GaussianBlur(gray, (5, 5), 0)
    canny = cv2.Canny(blurred, 30, 150)

    # 为HED边缘检测器构建输入帧的blob,设置blob,并执行检测以计算边缘图
    blob = cv2.dnn.blobFromImage(frame, scalefactor=1.0, size=(W, H),
                                 mean=(104.00698793, 116.66876762, 122.67891434),
                                 swapRB=False, crop=False)
    net.setInput(blob)
    hed = net.forward()
    hed = cv2.resize(hed[0, 0], (W, H))
    hed = (255 * hed).astype("uint8")

    # 展示Canny、HED的检测结果
    cv2.imshow("Frame", frame)
    cv2.imshow("Canny", canny)
    cv2.imshow("HED", hed)
    key = cv2.waitKey(1) & 0xFF
    # 按下‘q'键表示退出循环
    if key == ord("q"):
        break

# 如果在使用网络摄像头流,则终止相机视频流
if webcam:
    vs.stop()
# 否则,释放视频文件流指针
else:
    vs.release()

# 关闭所有打开的window
cv2.destroyAllWindows()
参考
到此这篇关于使用Python中OpenCV和深度学习进行全面嵌套边缘检测的文章就介绍到这了,更多相关OpenCV和深度学习全面嵌套边缘检测内容请搜索自学编程网以前的文章或继续浏览下面的相关文章希望大家以后多多支持自学编程网!

- 本文固定链接: https://zxbcw.cn/post/211740/
- 转载请注明:必须在正文中标注并保留原文链接
- QQ群: PHP高手阵营官方总群(344148542)
- QQ群: Yii2.0开发(304864863)
