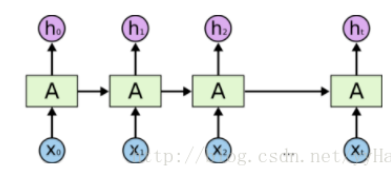
默认只返回最后一个state,所以一次输入一个step的input
# coding=UTF-8
import torch
import torch.autograd as autograd  # torch中自动计算梯度模块
import torch.nn as nn  # 神经网络模块
torch.manual_seed(1)
# lstm单元输入和输出维度都是3
lstm = nn.LSTM(input_size=3, hidden_size=3)
# 生成一个长度为5,每一个元素为1*3的序列作为输入,这里的数字3对应于上句中第一个3
inputs = [autograd.Variable(torch.randn((1, 3)))
          for _ in range(5)]
# 设置隐藏层维度,初始化隐藏层的数据
hidden = (autograd.Variable(torch.randn(1, 1, 3)),
          autograd.Variable(torch.randn((1, 1, 3))))
for i in inputs:
  out, hidden = lstm(i.view(1, 1, -1), hidden)
  print(out.size())
  print(hidden[0].size())
  print("--------")
print("-----------------------------------------------")
# 下面是一次输入多个step的样子
inputs_stack = torch.stack(inputs)
out,hidden = lstm(inputs_stack,hidden)
print(out.size())
print(hidden[0].size())
print结果:
(1L, 1L, 3L)
(1L, 1L, 3L)
--------
(1L, 1L, 3L)
(1L, 1L, 3L)
--------
(1L, 1L, 3L)
(1L, 1L, 3L)
--------
(1L, 1L, 3L)
(1L, 1L, 3L)
--------
(1L, 1L, 3L)
(1L, 1L, 3L)
--------
----------------------------------------------
(5L, 1L, 3L)
(1L, 1L, 3L)
可见LSTM的定义都是不用变的,根据input的step数目,一次输入多少step,就一次输出多少output,但只输出最后一个state
补充:pytorch中实现循环神经网络的基本单元RNN、LSTM、GRU的输入、输出、参数详细理解
前言:这篇文章是对已经较为深入理解了RNN、LSTM、GRU的数学原理以及运算过程的人而言的,如果不理解它的基本思想和过程,可能理解起来不是很简单。
一、先从一个实例看起
这是官网上面的一个例子,本次以LSTM作为例子而言,实际上,GRU、LSTM、RNN的运算过程是很类似的。
import torch
import torch.nn as nn

lstm = nn.LSTM(10, 20, 2)

# 序列长度seq_len=5, batch_size=3, 数据向量维数=10
input = torch.randn(5, 3, 10)

# 初始化的隐藏元和记忆元,通常它们的维度是一样的
# 2个LSTM层,batch_size=3,隐藏元维度20
h0 = torch.randn(2, 3, 20)
c0 = torch.randn(2, 3, 20)

# 这里有2层lstm,output是最后一层lstm的每个词向量对应隐藏层的输出,其与层数无关,只与序列长度相关
# hn,cn是所有层最后一个隐藏元和记忆元的输出
output, (hn, cn) = lstm(input, (h0, c0))

print(output.size(),hn.size(),cn.size())

# 分别是:
# torch.Size([5, 3, 20])
# torch.Size([2, 3, 20])
# torch.Size([2, 3, 20]))
后面我会详细解释上面的运算过程,我们先看一下LSTM的定义,它是一个类
二、LSTM类的定义
class LSTM(RNNBase):

    '''参数Args:
        input_size: 输入数据的特征维度,比如我对时间序列建模,特征为1,我对一个句子建模,每一个单词的嵌入向量为10,则它为10

        hidden_size: 即循环神经网络中隐藏节点的个数,这个是自己定义的,多少都可以,后面会详说

        num_layers: 堆叠的LSTM的层数,默认是一层,也可以自己定义 Default: 1
        bias: LSTM层是否使用偏置矩阵 偏置权值为 `b_ih` and `b_hh`.
            Default: ``True``(默认是使用的)

        batch_first: 如果设置 ``True``, then the input and output tensors are provided
            as (batch, seq, feature). Default: ``False``,(seq,batch,features)
        dropout: 是否使用dropout机制,默认是0,表示不使用dropout,如果提供一个非0的数字,则表示在每一个LSTM层之后默认使用dropout,但是最后一个层的LSTM层不使用dropout。

        bidirectional: 是否是双向RNN,默认是否,If ``True``, becomes a bidirectional LSTM. Default: ``False``
#---------------------------------------------------------------------------------------
    类的构造函数的输入为Inputs: input, (h_0, c_0)
        - **input** of shape `(seq_len, batch, input_size)`: tensor containing the features of the input sequence.

        - **h_0** of shape `(num_layers * num_directions, batch, hidden_size)`: tensor
          containing the initial hidden state for each element in the batch.
          If the LSTM is bidirectional, num_directions should be 2, else it should be 1.
        - **c_0** of shape `(num_layers * num_directions, batch, hidden_size)`: tensor
          containing the initial cell state for each element in the batch.
          If `(h_0, c_0)` is not provided, both **h_0** and **c_0** default to zero.
#----------------------------------------------------------------------------------
    输出是什么:Outputs: output, (h_n, c_n)
        - **output** of shape `(seq_len, batch, num_directions * hidden_size)`: tensor
          containing the output features `(h_t)` from the last layer of the LSTM,
          for each `t`. If a :class:`torch.nn.utils.rnn.PackedSequence` has been
          given as the input, the output will also be a packed sequence.
          For the unpacked case, the directions can be separated
          using ``output.view(seq_len, batch, num_directions, hidden_size)``,
          with forward and backward being direction `0` and `1` respectively.
          Similarly, the directions can be separated in the packed case.

        - **h_n** of shape `(num_layers * num_directions, batch, hidden_size)`: tensor
          containing the hidden state for `t = seq_len`.
          Like *output*, the layers can be separated using
          ``h_n.view(num_layers, num_directions, batch, hidden_size)`` and similarly for *c_n*.

        - **c_n** of shape `(num_layers * num_directions, batch, hidden_size)`: tensor
          containing the cell state for `t = seq_len`.
#------------------------------------------------------------------------------------------
    类的属性有Attributes:
        weight_ih_l[k] : the learnable input-hidden weights of the :math:`\text{k}^{th}` layer
            `(W_ii|W_if|W_ig|W_io)`, of shape `(4*hidden_size, input_size)` for `k = 0`.
            Otherwise, the shape is `(4*hidden_size, num_directions * hidden_size)`
        weight_hh_l[k] : the learnable hidden-hidden weights of the :math:`\text{k}^{th}` layer
            `(W_hi|W_hf|W_hg|W_ho)`, of shape `(4*hidden_size, hidden_size)`
        bias_ih_l[k] : the learnable input-hidden bias of the :math:`\text{k}^{th}` layer
            `(b_ii|b_if|b_ig|b_io)`, of shape `(4*hidden_size)`
        bias_hh_l[k] : the learnable hidden-hidden bias of the :math:`\text{k}^{th}` layer
            `(b_hi|b_hf|b_hg|b_ho)`, of shape `(4*hidden_size)`
    '''
上面的参数有点多,我就不一个一个翻译了,其实很好理解,每一个都比较清晰。
三、 必需参数的深入理解
1、RNN、GRU、LSTM的构造函数的三个必须参数理解——第一步:构造循环层对象
在创建循环层的时候,第一步是构造循环层,如下操作:
lstm = nn.LSTM(10, 20, 2)
构造函数的参数列表为如下:
class LSTM(RNNBase):

    '''参数Args:
        input_size:
        hidden_size:
        num_layers:
        bias:
        batch_first:
        dropout:
        bidirectional:
    '''
(1)input_size:指的是每一个单词的特征维度,比如我有一个句子,句子中的每一个单词都用10维向量表示,则input_size就是10;
(2)hidden_size:指的是循环层中每一个LSTM内部单元的隐藏节点数目,这个是自己定义的,随意怎么设置都可以;
(3)num_layers:循环层的层数,默认是一层,这个根据自己的情况来定。
比如下面:


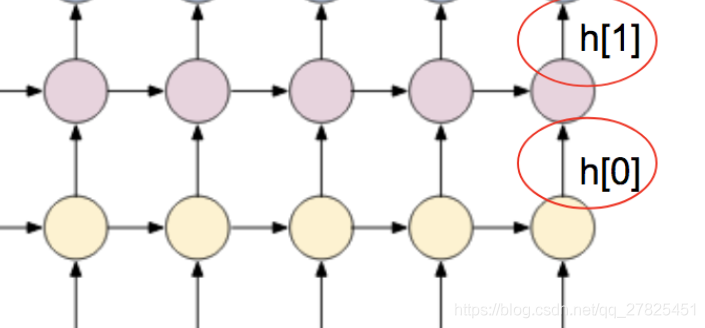
左边的只有一层循环层,右边的有两层循环层。
2、通过第一步构造的对象构造前向传播的过程——第二步:调用循环层对象,传入参数,并得到返回值
一般如下操作:
output, (hn, cn) = lstm(input, (h0, c0))
这里是以LSTM为例子来说的,
(1)输入参数
input:必须是这样的格式(seq,batch,feature)。第一个seq指的是序列的长度,这是根据自己的数据来定的,比如我的一个句子最大的长度是20个单词组成,那这里就是20,上面的例子是假设句子长度为5;第二个是batch,这个好理解,就是一次使用几条样本,比如3组样本;第三个features指的是每一个单词的向量维度,需要注意的是,这个必须要和构造函数的第一个参数input_size保持一样的,上面的例子中是10.
(h0,c0):指的是每一个循环层的初始状态,可以不指定,不指定的情况下全部初始化为0,这里因为是LSTM有两个状态需要传递,所以有两个,像普通的RNN和GRU只有一个状态需要传递,则只需要传递一个h状态即可,如下:
output, hn = rnn(input, h0)  # 普通rnn
output, hn = gru(input, h0)  # gru
这里需要注意的是传入的状态参数的维度,依然以LSTM来说:
h0和c0的数据维度均是(num_layers * num_directions, batch, hidden_size),这是什么意思呢?
第一个num_layer指的是到底有基层循环层,这好理解,几层就应该有几个初始状态;
第二个num_directions指的是这个循环层是否是双向的(在构造函数中通过bidirectional参数指定哦),如果不是双向的,则取值为1,如果是双向的则取值为2;
第三个batch指的是每次数据的batch,和前面的batch保持一致即可;
最后一个hidden_size指的是循环层每一个节点内部的隐藏节点数,这个需要很好地理解循环神经网络的整个运算流程才行哦!
(2)输出结果
其实输出的结果和输入的是相匹配的,分别如下:
output, hn = rnn(input, h0)  # 普通rnn
output, hn = gru(input, h0)  # gru
output, (hn, cn) = lstm(input, (h0, c0)) # lstm
这里依然以lstm而言:
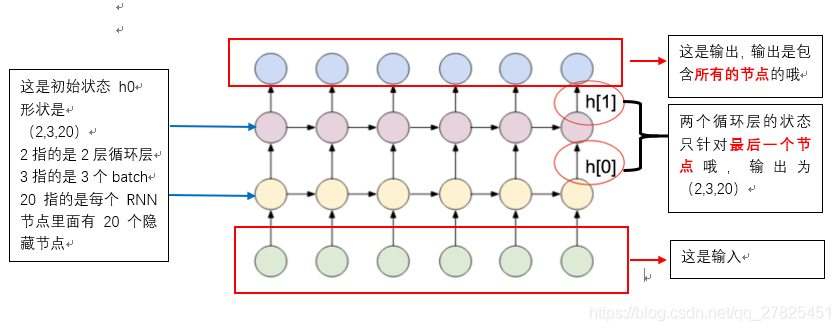
output的输出维度:(seq_len, batch, num_directions * hidden_size),在上面的例子中,应该为(5,3,20),我们通过验证的确如此,需要注意的是,第一个维度是seq_len,也就是说每一个时间点的输出都是作为输出结果的,这和隐藏层是不一样的;
hn、cn的输出维度:为(num_layers * num_directions, batch, hidden_size),在上面的例子中为(2,3,20),也得到了验证,我们发现这个跟序列长度seq_len是没有关系的,为什么呢,输出的状态仅仅是指的是最后一个循环层节点输出的状态。
如下图所示:
下面的例子是以普通的RNN来画的,所以只有一个状态h,没有状态c。

3、几个重要的属性理解
不管是RNN,GRU还是lstm,内部可学习的参数其实就是几个权值矩阵,包括了偏置矩阵,那怎么查看这些学习到的参数呢?就是通过这几个矩阵来实现的
(1)weight_ih_l[k]:这表示的是输入到隐藏层之间的权值矩阵,其中K表示的第几层循环层,
若K=0,表示的是最下面的输入层到第一个循环层之间的矩阵,维度为(hidden_size, input_size),如果k>0则表示第一循环层到第二循环层、第二循环层到第三循环层,以此类推,之间的权值矩阵,形状为(hidden_size, num_directions * hidden_size)。
(2)weight_hh_l[k]: 表示的是循环层内部之间的权值矩阵,这里的K表示的第几层循环层,取值为0,1,2,3,4... ...。形状为(hidden_size, hidden_size)
注意:循环层的层数取值是从0开始,0代表第一个循环层,1代表第二个循环层,以此类推。
(3)bias_ih_l[k]: 第K个循环层的偏置项,表示的是输入到循环层之间的偏置,维度为 (hidden_size)
(4)bias_hh_l[k]:第K个循环层的偏置项,表示的是循环层到循环层内部之间的偏置,维度为 (hidden_size)。
# 首先导入RNN需要的相关模块
import torch
import torch.nn as nn

# 数据向量维数10, 隐藏元维度20, 2个RNN层串联(如果是1,可以省略,默认为1)
rnn = nn.RNN(10, 20, 2)

# 序列长度seq_len=5, batch_size=3, 数据向量维数=10
input = torch.randn(5, 3, 10)

# 初始化的隐藏元和记忆元,通常它们的维度是一样的
# 2个RNN层,batch_size=3,隐藏元维度20
h0 = torch.randn(2, 3, 20)

# 这里有2层RNN,output是最后一层RNN的每个词向量对应隐藏层的输出,其与层数无关,只与序列长度相关
# hn,cn是所有层最后一个隐藏元和记忆元的输出
output, hn = rnn(input, h0)

print(output.size(),hn.size()) # 分别是:torch.Size([5, 3, 20])   torch.Size([2, 3, 20])

# 查看一下那几个重要的属性:
print("------------输入--》隐藏------------------------------")
print(rnn.weight_ih_l0.size())
print(rnn.weight_ih_l1.size())
print(rnn.bias_ih_l0.size())
print(rnn.bias_ih_l1.size())
print("------------隐藏--》隐藏------------------------------")
print(rnn.weight_hh_l0.size())
print(rnn.weight_hh_l1.size())
print(rnn.bias_hh_l0.size())
print(rnn.bias_hh_l1.size())

'''输出结果为:
------------输入--》隐藏------------------------------
torch.Size([20, 10])
torch.Size([20, 20])
torch.Size([20])
torch.Size([20])
------------隐藏--》隐藏------------------------------
torch.Size([20, 20])
torch.Size([20, 20])
torch.Size([20])
torch.Size([20])
'''
通过上面的运算,发现结果和描述的是一模一样的。
以上为个人经验,希望能给大家一个参考,也希望大家多多支持自学编程网。

- 本文固定链接: https://zxbcw.cn/post/213753/
- 转载请注明:必须在正文中标注并保留原文链接
- QQ群: PHP高手阵营官方总群(344148542)
- QQ群: Yii2.0开发(304864863)
