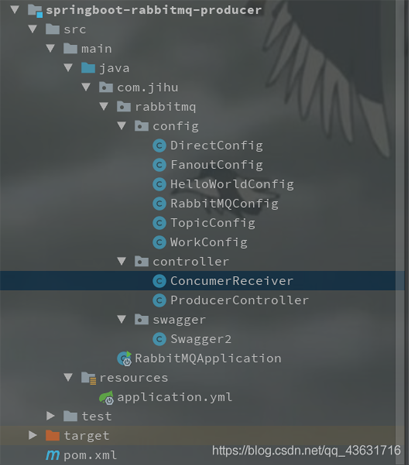
一、环境准备

1、pom依赖
<!-- 父工程依赖 -->
    <parent>
        <groupId>org.springframework.boot</groupId>
        <artifactId>spring-boot-starter-parent</artifactId>
        <version>2.3.6.RELEASE</version>
    </parent>

    <dependencies>
        <dependency>
            <groupId>org.springframework.boot</groupId>
            <artifactId>spring-boot-starter-web</artifactId>
        </dependency>
        <dependency>
            <groupId>org.springframework.boot</groupId>
            <artifactId>spring-boot-starter-amqp</artifactId>
        </dependency>

        <dependency>
            <groupId>org.springframework.boot</groupId>
            <artifactId>spring-boot-starter-test</artifactId>
        </dependency>
        <dependency>
            <groupId>io.springfox</groupId>
            <artifactId>springfox-swagger2</artifactId>
            <version>2.6.0</version>
        </dependency>
        <dependency>
            <groupId>io.springfox</groupId>
            <artifactId>springfox-swagger-ui</artifactId>
            <version>2.6.0</version>
        </dependency>
    </dependencies>
2、配置文件
server:
  port: 8080

spring:
  rabbitmq:
    host: 192.168.131.171
    port: 5672
    username: jihu
    password: jihu
    virtual-host: /jihu
3、启动类
@SpringBootApplication
public class RabbitMQApplication {
   public static void main(String[] args) {
       SpringApplication.run(RabbitMQApplication.class);
   }
}
5、Swagger2类
@Configuration
@EnableSwagger2
public class Swagger2 {
    // http://127.0.0.1:8080/swagger-ui.html
    @Bean
    public Docket createRestApi() {
        return new Docket(DocumentationType.SWAGGER_2)
                .apiInfo(apiInfo())
                .select()
                .apis(RequestHandlerSelectors.basePackage("com.jihu"))
                .paths(PathSelectors.any())
                .build();
    }

    private ApiInfo apiInfo() {
        return new ApiInfoBuilder()
                .title("极狐-Spring Boot中使用spring-boot-starter-amqp集成rabbitmq")
                .description("测试SpringBoot整合进行各种工作模式信息的发送")
/*
	                .termsOfServiceUrl("https://www.jianshu.com/p/c79f6a14f6c9")
*/
                .contact("roykingw")
                .version("1.0")
                .build();
    }
}
6、ProducerController
@RestController
public class ProducerController {

    @Autowired
    private RabbitTemplate rabbitTemplate;

    //helloWorld 直连模式
    @ApiOperation(value = "helloWorld发送接口", notes = "直接发送到队列")
    @GetMapping(value = "/helloWorldSend")
    public Object helloWorldSend(String message) throws AmqpException, UnsupportedEncodingException {
        //设置部分请求参数
        MessageProperties messageProperties = new MessageProperties();
        messageProperties.setContentType(MessageProperties.CONTENT_TYPE_TEXT_PLAIN);

        //发消息
        rabbitTemplate.send("helloWorldqueue", new Message(message.getBytes("UTF-8"), messageProperties));
        return "message sended : " + message;
    }


    //工作队列模式
    @ApiOperation(value = "workqueue发送接口", notes = "发送到所有监听该队列的消费")
    @GetMapping(value = "/workqueueSend")
    public Object workqueueSend(String message) throws AmqpException, UnsupportedEncodingException {
        MessageProperties messageProperties = new MessageProperties();
        messageProperties.setContentType(MessageProperties.CONTENT_TYPE_TEXT_PLAIN);
        //制造多个消息进行发送操作
        for (int i = 0; i < 10; i++) {
            rabbitTemplate.send("work_sb_mq_q", new Message(message.getBytes("UTF-8"), messageProperties));
        }
        return "message sended : " + message;
    }


    // pub/sub 发布订阅模式   交换机类型 fanout
    @ApiOperation(value = "fanout发送接口", notes = "发送到fanoutExchange。消息将往该exchange下的所有queue转发")
    @GetMapping(value = "/fanoutSend")
    public Object fanoutSend(String message) throws AmqpException, UnsupportedEncodingException {
        MessageProperties messageProperties = new MessageProperties();
        messageProperties.setContentType(MessageProperties.CONTENT_TYPE_TEXT_PLAIN);
        //fanout模式只往exchange里发送消息。分发到exchange下的所有queue
        rabbitTemplate.send("fanoutExchange", "", new Message(message.getBytes("UTF-8"), messageProperties));
        return "message sended : " + message;
    }


    //routing路由工作模式  交换机类型 direct
    @ApiOperation(value = "direct发送接口", notes = "发送到directExchange。exchange转发消息时,会往routingKey匹配的queue发送")
    @GetMapping(value = "/directSend")
    public Object routingSend(String routingKey, String message) throws AmqpException, UnsupportedEncodingException {

        if (null == routingKey) {
            routingKey = "china.changsha";
        }
        MessageProperties messageProperties = new MessageProperties();
        messageProperties.setContentType(MessageProperties.CONTENT_TYPE_TEXT_PLAIN);
        //fanout模式只往exchange里发送消息。分发到exchange下的所有queue
        rabbitTemplate.send("directExchange", routingKey, new Message(message.getBytes("UTF-8"), messageProperties));
        return "message sended : routingKey >" + routingKey + ";message > " + message;
    }


    //topic 工作模式   交换机类型 topic
    @ApiOperation(value = "topic发送接口", notes = "发送到topicExchange。exchange转发消息时,会往routingKey匹配的queue发送,*代表一个单词,#代表0个或多个单词。")
    @GetMapping(value = "/topicSend")
    public Object topicSend(String routingKey, String message) throws AmqpException, UnsupportedEncodingException {

        if (null == routingKey) {
            routingKey = "changsha.kf";
        }
        MessageProperties messageProperties = new MessageProperties();
        messageProperties.setContentType(MessageProperties.CONTENT_TYPE_TEXT_PLAIN);
        //fanout模式只往exchange里发送消息。分发到exchange下的所有queue
        rabbitTemplate.send("topicExchange", routingKey, new Message(message.getBytes("UTF-8"), messageProperties));
        return "message sended : routingKey >" + routingKey + ";message > " + message;
    }

}
7、ConcumerReceiver
@Component
public class ConcumerReceiver {


    //直连模式的多个消费者,会分到其中一个消费者进行消费。类似task模式
    //通过注入RabbitContainerFactory对象,来设置一些属性,相当于task里的channel.basicQos
    @RabbitListener(queues = "helloWorldqueue")
    public void helloWorldReceive(String message) {

        System.out.println("helloWorld模式 received message : " + message);
    }

    //工作队列模式
    @RabbitListener(queues = "work_sb_mq_q")
    public void wordQueueReceiveq1(String message) {

        System.out.println("工作队列模式1 received message : " + message);
    }

    @RabbitListener(queues = "work_sb_mq_q")
    public void wordQueueReceiveq2(String message) {

        System.out.println("工作队列模式2 received message : " + message);
    }


    //pub/sub模式进行消息监听
    @RabbitListener(queues = "fanout.q1")
    public void fanoutReceiveq1(String message) {

        System.out.println("发布订阅模式1received message : " + message);
    }

    @RabbitListener(queues = "fanout.q2")
    public void fanoutReceiveq2(String message) {

        System.out.println("发布订阅模式2 received message : " + message);
    }


    //Routing路由模式
    @RabbitListener(queues = "direct_sb_mq_q1")
    public void routingReceiveq1(String message) {

        System.out.println("Routing路由模式routingReceiveq11111 received message : " + message);
    }

    @RabbitListener(queues = "direct_sb_mq_q2")
    public void routingReceiveq2(String message) {

        System.out.println("Routing路由模式routingReceiveq22222 received message : " + message);
    }


    //topic 模式
    //注意这个模式会有优先匹配原则。例如发送routingKey=hunan.IT,那匹配到hunan.*(hunan.IT,hunan.eco),之后就不会再去匹配*.ITd
    @RabbitListener(queues = "topic_sb_mq_q1")
    public void topicReceiveq1(String message) {
        System.out.println("Topic模式 topic_sb_mq_q1 received message : " + message);
    }

    @RabbitListener(queues = "topic_sb_mq_q2")
    public void topicReceiveq2(String message) {
        System.out.println("Topic模式 topic_sb_mq_q2 received  message : " + message);
    }

}
二、简单模式
队列配置:
/**
 * HelloWorld rabbitmq第一个工作模式
 * 直连模式只需要声明队列,所有消息都通过队列转发。
 * 无需设置交换机
 */
@Configuration
public class HelloWorldConfig {

	@Bean
	public Queue setQueue() {
		return new Queue("helloWorldqueue");
	}
}
三、工作队列模式
@Configuration
public class WorkConfig {

    //声明队列
    @Bean
    public Queue workQ1() {
        return new Queue("work_sb_mq_q");
    }
}
四、广播模式(Fanout)
/**
 * Fanout模式需要声明exchange,并绑定queue,由exchange负责转发到queue上。
 * 广播模式 交换机类型设置为:fanout
 */
@Configuration
public class FanoutConfig {

	//声明队列
	@Bean
	public Queue fanoutQ1() {
		return new Queue("fanout.q1");
	}
	@Bean
	public Queue fanoutQ2() {
		return new Queue("fanout.q2");
	}


	//声明exchange
	@Bean
	public FanoutExchange setFanoutExchange() {
		return new FanoutExchange("fanoutExchange");
	}


	//声明Binding,exchange与queue的绑定关系
	@Bean
	public Binding bindQ1() {
		return BindingBuilder.bind(fanoutQ1()).to(setFanoutExchange());
	}
	@Bean
	public Binding bindQ2() {
		return BindingBuilder.bind(fanoutQ2()).to(setFanoutExchange());
	}
}
五、直连模式(Direct)
/*
   路由模式|Routing模式   交换机类型:direct
*/
@Configuration
public class DirectConfig {

	//声明队列
	@Bean
	public Queue directQ1() {
		return new Queue("direct_sb_mq_q1");
	}
	@Bean
	public Queue directQ2() {
		return new Queue("direct_sb_mq_q2");
	}


	//声明exchange
	@Bean
	public DirectExchange setDirectExchange() {
		return new DirectExchange("directExchange");
	}

	//声明binding,需要声明一个routingKey
	@Bean
	public Binding bindDirectBind1() {
		return BindingBuilder.bind(directQ1()).to(setDirectExchange()).with("china.changsha");
	}
	@Bean
	public Binding bindDirectBind2() {
			return BindingBuilder.bind(directQ2()).to(setDirectExchange()).with("china.beijing");
	}

}
六、通配符模式(Topic)
/*
Topics模式  交换机类型 topic
* */
@Configuration
public class TopicConfig {

	//声明队列
	@Bean
	public Queue topicQ1() {
		return new Queue("topic_sb_mq_q1");
	}
	@Bean
	public Queue topicQ2() {
		return new Queue("topic_sb_mq_q2");
	}


	//声明exchange
	@Bean
	public TopicExchange setTopicExchange() {
		return new TopicExchange("topicExchange");
	}

	//声明binding,需要声明一个roytingKey
	@Bean
	public Binding bindTopicHebei1() {
		return BindingBuilder.bind(topicQ1()).to(setTopicExchange()).with("changsha.*");
	}
	@Bean
	public Binding bindTopicHebei2() {
		return BindingBuilder.bind(topicQ2()).to(setTopicExchange()).with("#.beijing");
	}
}
测试
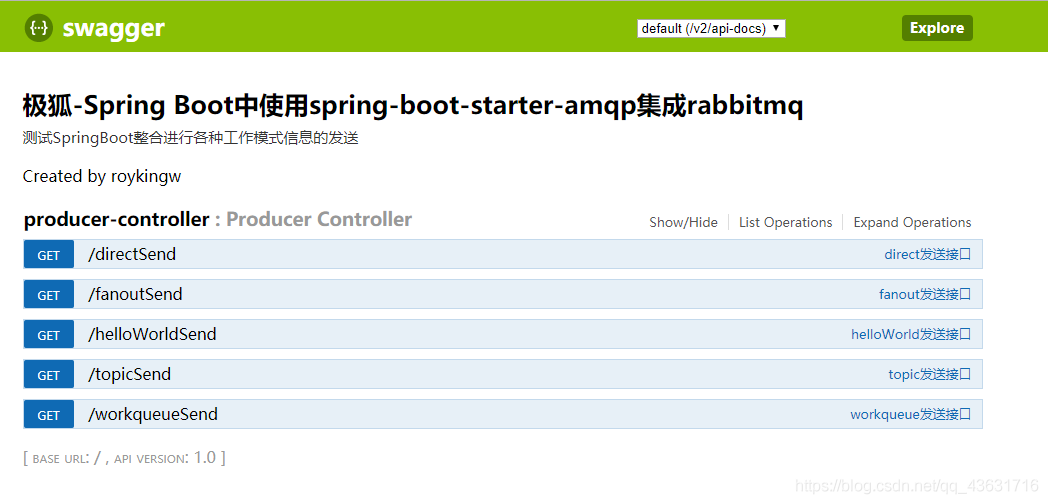
我们启动上面的SpringBoot项目。
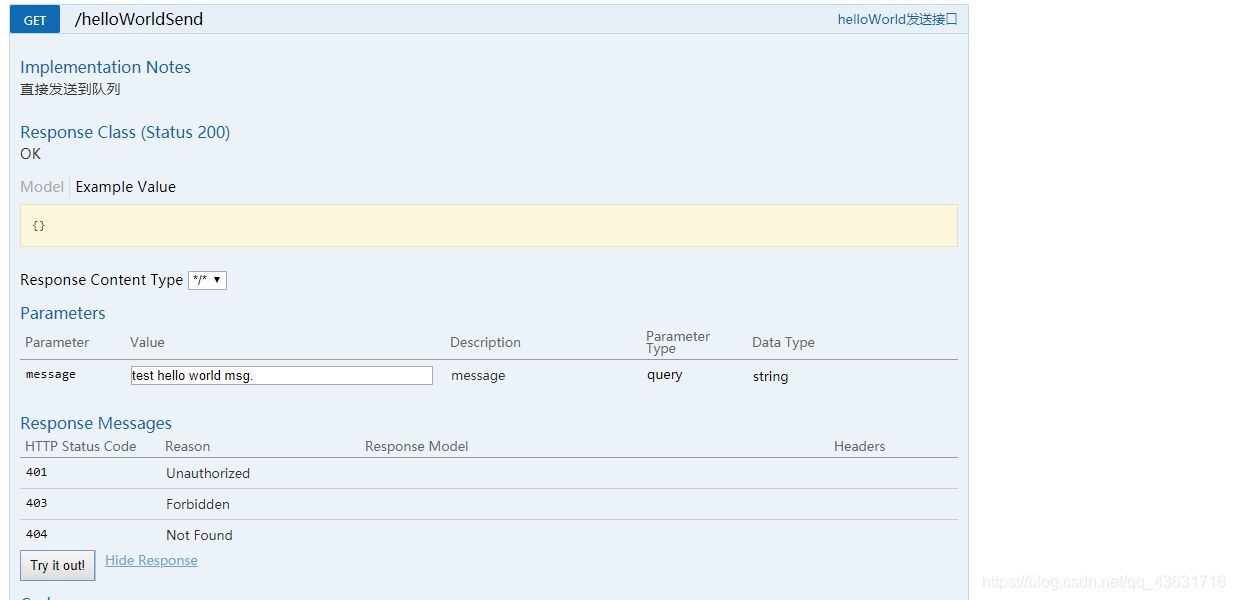
然后我们访问swagger地址:http://127.0.0.1:8080/swagger-ui.html

然后我们就可以使用swagger测试接口了。


或者可以使用postman进行测试。
到此这篇关于SpringBoot整合RabbitMQ的5种模式实战的文章就介绍到这了,更多相关SpringBoot整合RabbitMQ模式内容请搜索自学编程网以前的文章或继续浏览下面的相关文章希望大家以后多多支持自学编程网!

- 本文固定链接: https://www.zxbcw.cn/post/218669/
- 转载请注明:必须在正文中标注并保留原文链接
- QQ群: PHP高手阵营官方总群(344148542)
- QQ群: Yii2.0开发(304864863)
