
简述
上篇 我们通过Java sdk的方式已经将opencv接入到项目中了,如果想使用opencv sdk 提供的 C++ 头文件与 .so动态库,自己封装jni这样使用上篇的方式显然是不能实现的。所以本篇我们介绍通过cmake的方式接入opencv。
接入步骤
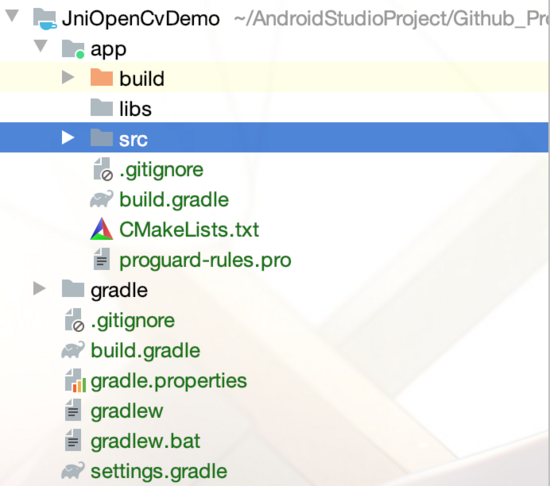
1、新建jni项目
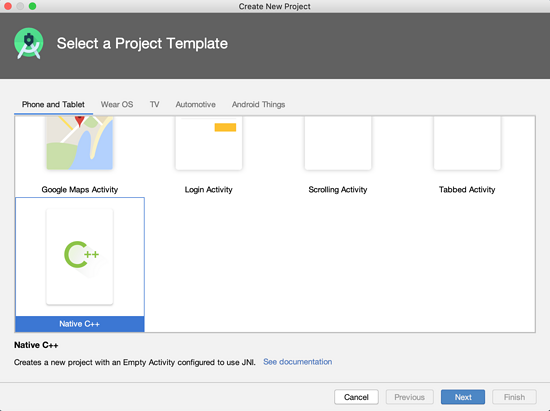
具体创建过程参考上篇:通过Java sdk方式接入opencv 。
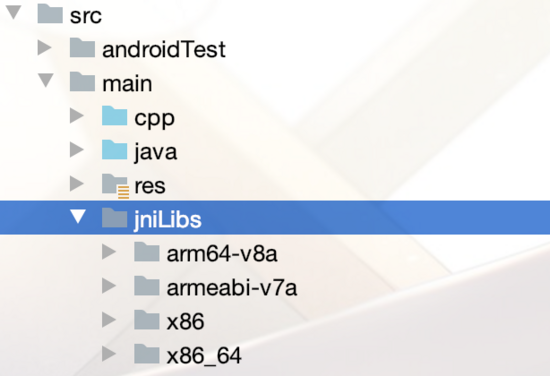
2、导入so库
在项目app/src/main目录下新建jniLibs,并将解压后的opencv sdk 目录下对应的路径 sdk/native/libs 中的文件复制到jniLibs中。

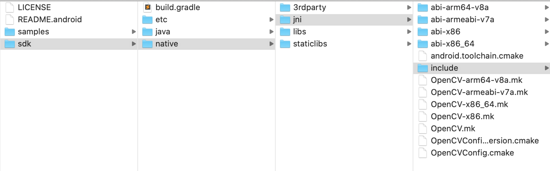
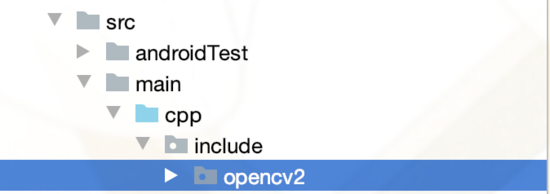
2、导入cpp文件
将opencv sdk 目录下对应的路径 sdk/native/jni/include 中的文件复制到cpp目录中。
3、修改CMakeLists
将src/main/cpp 中的CMakeLists移动到app目录下。
2.修改CMakeLists中的内容
# For more information about using CMake with Android Studio, read the
# documentation: https://d.android.com/studio/projects/add-native-code.html
# 设置CMAKE的版本号
cmake_minimum_required(VERSION 3.4.1)

# 设置include文件夹的地址
include_directories(${CMAKE_SOURCE_DIR}/src/main/cpp/include)

# 设置opencv的动态库
add_library(libopencv_java4 SHARED IMPORTED)
set_target_properties(libopencv_java4 PROPERTIES IMPORTED_LOCATION
    ${CMAKE_SOURCE_DIR}/src/main/jniLibs/${ANDROID_ABI}/libopencv_java4.so)

add_library( # Sets the name of the library.
    native-lib #.so库名 可自定义

    # Sets the library as a shared library.
    SHARED

    # Provides a relative path to your source file(s).
    src/main/cpp/native-lib.cpp)

find_library( # Sets the name of the path variable.
    log-lib

    # Specifies the name of the NDK library that
    # you want CMake to locate.
    log)

target_link_libraries( # Specifies the target library.
    native-lib
    libopencv_java4

    # Links the target library to the log library
    # included in the NDK.
    ${log-lib})
修改app 中的build.gradle文件 defaultConfig 中配置cmake和ndk
externalNativeBuild {
    cmake {
      cppFlags "-std=c++11"
      arguments "-DANDROID_STL=c++_shared"
    }
}
ndk{
   abiFilters "armeabi-v7a","arm64-v8a"
}
android 中配置jniLibs
sourceSets{
   main{
     jniLibs.srcDirs = ['src/main/jniLibs']
   }
}
android 中配置cmake和ndk相关
externalNativeBuild {
    cmake {
      path file('CMakeLists.txt')
      version "3.10.2"
    }
  }

splits {
  abi {
    enable true
    reset()
    include 'x86', 'x86_64', 'armeabi-v7a', 'arm64-v8a' //select ABIs to build APKs for
    universalApk true //generate an additional APK that contains all the ABIs
  }
}
如果是老项目则不必配置splits否则会报错,只需要干掉下面的代码
splits {
  abi {
    enable true
    reset()
    include 'x86', 'x86_64', 'armeabi-v7a', 'arm64-v8a' //select ABIs to build APKs for
    universalApk true //generate an additional APK that contains all the ABIs
  }
}
最终配置完的代码为:
apply plugin: 'com.android.application'
apply plugin: 'kotlin-android'
apply plugin: 'kotlin-android-extensions'

android {
  compileSdkVersion 29

  defaultConfig {
    applicationId "com.jd.opencv"
    minSdkVersion 23
    targetSdkVersion 29
    versionCode 1
    versionName "1.0"

    testInstrumentationRunner "androidx.test.runner.AndroidJUnitRunner"

    externalNativeBuild {
      cmake {
        cppFlags "-std=c++11"
        arguments "-DANDROID_STL=c++_shared"
      }
    }
    ndk{
      abiFilters "armeabi-v7a","arm64-v8a"
    }
  }

  sourceSets{
    main{
      jniLibs.srcDirs = ['src/main/jniLibs']
    }
  }

  buildTypes {
    release {
      minifyEnabled false
      proguardFiles getDefaultProguardFile('proguard-android-optimize.txt'), 'proguard-rules.pro'
    }
  }

  externalNativeBuild {
    cmake {
      path file('CMakeLists.txt')
      version "3.10.2"
    }
  }

  splits {
    abi {
      enable true
      reset()
      include 'x86', 'x86_64', 'armeabi-v7a', 'arm64-v8a' //select ABIs to build APKs for
      universalApk true //generate an additional APK that contains all the ABIs
    }
  }

  project.ext.versionCodes = ['armeabi': 1, 'armeabi-v7a': 2, 'arm64-v8a': 3, 'mips': 5, 'mips64': 6, 'x86': 8, 'x86_64': 9]

  android.applicationVariants.all { variant ->
    variant.outputs.each { output ->
      output.versionCodeOverride =
          project.ext.versionCodes.get(output.getFilter(com.android.build.OutputFile.ABI), 0) * 1000000 + android.defaultConfig.versionCode
    }
  }
}

dependencies {
  implementation fileTree(dir: 'libs', include: ['*.jar'])
  implementation "org.jetbrains.kotlin:kotlin-stdlib-jdk7:$kotlin_version"
  implementation 'androidx.appcompat:appcompat:1.1.0'
  implementation 'androidx.core:core-ktx:1.2.0'
  implementation 'androidx.constraintlayout:constraintlayout:1.1.3'
  testImplementation 'junit:junit:4.12'
  androidTestImplementation 'androidx.test.ext:junit:1.1.1'
  androidTestImplementation 'androidx.test.espresso:espresso-core:3.2.0'
}
使用
我们将一张彩色图片通过 opencv 处理成一张灰色的照片。
1、编写处理照片的代码。
创建native代码
object NativeLibUtils{

  init {
    System.loadLibrary("native-lib")
  }

  external fun bitmap2Grey(pixels: IntArray, w: Int, h: Int): IntArray
}
创建 jni 代码
#include <jni.h>
#include <jni.h>
#include <string>
#include<opencv2/opencv.hpp>
#include<iostream>
#include <opencv2/imgproc/types_c.h>
#include <unistd.h>

using namespace cv;
using namespace std;


extern "C"
JNIEXPORT jintArray JNICALL
Java_com_mp5a5_opencv_NativeLibUtils_bitmap2Gray(JNIEnv *env, jobject instance, jintArray pixels,
                         jint w, jint h) {
  jint *cur_array;

  jboolean isCopy = static_cast<jboolean>(false);

  cur_array = env->GetIntArrayElements(pixels, &isCopy);
  if (cur_array == NULL) {
    return 0;
  }

  Mat img(h, w, CV_8UC4, (unsigned char *) cur_array);

  cvtColor(img, img, CV_BGRA2GRAY);
  cvtColor(img, img, CV_GRAY2BGRA);

  int size = w * h;
  jintArray result = env->NewIntArray(size);
  env->SetIntArrayRegion(result, 0, size, (jint *) img.data);
  env->ReleaseIntArrayElements(pixels, cur_array, 0);
  return result;
}
调用 native 代码来实现彩色图片转换成灰色图片
private fun showGrayImg() {
  val w = bitmap.width
  val h = bitmap.height
  val pixels = IntArray(w * h)
  bitmap.getPixels(pixels, 0, w, 0, 0, w, h)
  val resultData: IntArray = NativeLibUtils.bitmap2Gray(pixels, w, h)
  val resultImage = Bitmap.createBitmap(w, h, Bitmap.Config.ARGB_8888)
  resultImage.setPixels(resultData, 0, w, 0, 0, w, h)
  iv_image.setImageBitmap(resultImage)
}
完整转换的代码
class OpenCvActivity : AppCompatActivity(), View.OnClickListener {

  private lateinit var bitmap: Bitmap

  override fun onCreate(savedInstanceState: Bundle?) {
    super.onCreate(savedInstanceState)
    setContentView(R.layout.activity_opencv)
    bitmap = BitmapFactory.decodeResource(resources, R.mipmap.person)
    iv_image.setImageBitmap(bitmap)
    btn_btn1.setOnClickListener(this)
    btn_btn2.setOnClickListener(this)
  }

  override fun onClick(v: View?) {
    v?.id?.let {
      when (it) {
        R.id.btn_btn1 -> {
          showGrayImg()
        }
        R.id.btn_btn2 -> {
          showRgbImg()
        }
      }
    }
  }

  private fun showRgbImg() {
    bitmap = BitmapFactory.decodeResource(resources, R.mipmap.person)
    iv_image.setImageBitmap(bitmap)
  }

  private fun showGrayImg() {
    val w = bitmap.width
    val h = bitmap.height
    val pixels = IntArray(w * h)
    bitmap.getPixels(pixels, 0, w, 0, 0, w, h)
    val resultData: IntArray = NativeLibUtils.bitmap2Gray(pixels, w, h)
    val resultImage = Bitmap.createBitmap(w, h, Bitmap.Config.ARGB_8888)
    resultImage.setPixels(resultData, 0, w, 0, 0, w, h)
    iv_image.setImageBitmap(resultImage)
  }
}
<?xml version="1.0" encoding="utf-8"?>
<RelativeLayout xmlns:android="http://schemas.android.com/apk/res/android"
  xmlns:app="http://schemas.android.com/apk/res-auto"
  xmlns:tools="http://schemas.android.com/tools"
  android:layout_width="match_parent"
  android:layout_height="match_parent"
  android:orientation="vertical"
  tools:context=".MainActivity">

  <ImageView
    android:id="@+id/iv_image"
    android:layout_width="match_parent"
    android:layout_height="match_parent"
    android:layout_above="@id/ll_location"
    app:srcCompat="@mipmap/person" />

  <LinearLayout
    android:id="@+id/ll_location"
    android:layout_width="match_parent"
    android:layout_height="wrap_content"
    android:layout_alignParentBottom="true"
    android:orientation="horizontal">

    <Button
      android:id="@+id/btn_btn1"
      android:layout_width="match_parent"
      android:layout_height="wrap_content"
      android:layout_weight="1"
      android:text="灰度图" />

    <Button
      android:id="@+id/btn_btn2"
      android:layout_width="match_parent"
      android:layout_height="wrap_content"
      android:layout_weight="1"
      android:text="色图" />
  </LinearLayout>

</RelativeLayout>
显示效果:

效果图
Demo 的 Github 地址 https://github.com/Mp5A5/AndroidOpenCv
到此这篇关于Android 通过cmake的方式接入opencv的方法步骤的文章就介绍到这了,更多相关Android cmake接入opencv内容请搜索自学编程网以前的文章或继续浏览下面的相关文章希望大家以后多多支持自学编程网!

- 本文固定链接: https://zxbcw.cn/post/184599/
- 转载请注明:必须在正文中标注并保留原文链接
- QQ群: PHP高手阵营官方总群(344148542)
- QQ群: Yii2.0开发(304864863)