
前言
众所周知我们在进行网络连接的时候,建立套接字连接是一个非常消耗性能的事情,特别是在分布式的情况下,用线程池去保持多个客户端连接,是一种非常消耗线程的行为。那么我们该通过什么技术去解决上述的问题呢,那么就不得不提一个网络连接的利器——Netty.
正文 Netty
Netty是一个NIO客户端服务器框架:
- 它可快速轻松地开发网络应用程序,例如协议服务器和客户端。
- 它极大地简化和简化了网络编程,例如
TCP和UDP套接字服务器。
NIO是一种非阻塞IO ,它具有以下的特点
- 单线程可以连接多个客户端。
- 选择器可以实现但线程管理多个
Channel,新建的通道都要向选择器注册。 - 一个
SelectionKey键表示了一个特定的通道对象和一个特定的选择器对象之间的注册关系。 selector进行select()操作可能会产生阻塞,但是可以设置阻塞时间,并且可以用wakeup()唤醒selector,所以NIO是非阻塞IO。
Netty模型selector模式
它相对普通NIO的在性能上有了提升,采用了:
NIO采用多线程的方式可以同时使用多个selector- 通过绑定多个端口的方式,使得一个
selector可以同时注册多个ServerSocketServer - 单个线程下只能有一个
selector,用来实现Channel的匹配及复用

半包问题
TCP/IP在发送消息的时候,可能会拆包,这就导致接收端无法知道什么时候收到的数据是一个完整的数据。在传统的BIO中在读取不到数据时会发生阻塞,但是NIO不会。为了解决NIO的半包问题,Netty在Selector模型的基础上,提出了reactor模式,从而解决客户端请求在服务端不完整的问题。
netty模型reactor模式
在selector的基础上解决了半包问题。
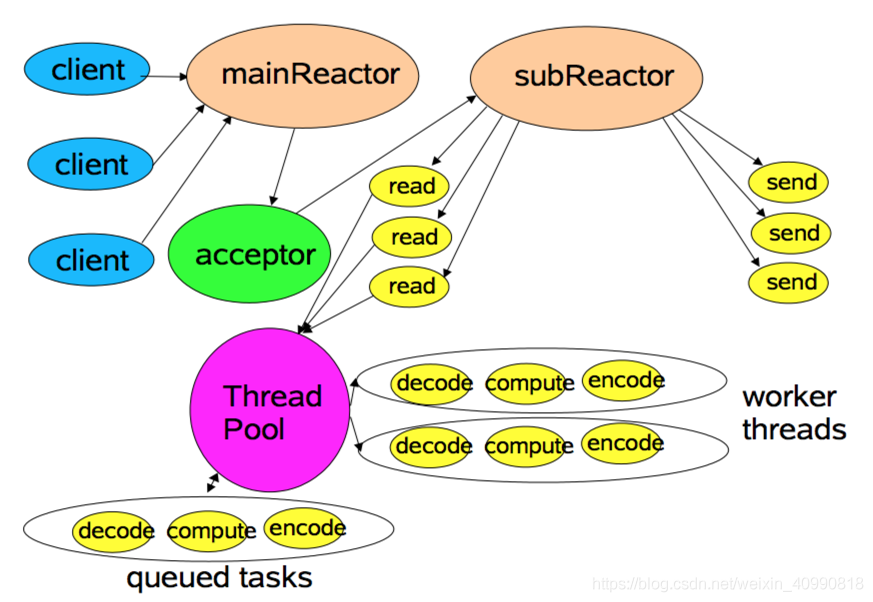
上图,简单地可以描述为"boss接活,让work干":manReactor用来接收请求(会与客户端进行握手验证),而subReactor用来处理请求(不与客户端直接连接)。
SpringBoot使用Netty实现远程调用
maven依赖
<!--lombok-->
<dependency>
 <groupId>org.projectlombok</groupId>
 <artifactId>lombok</artifactId>
 <version>1.18.2</version>
 <optional>true</optional>
</dependency>

<!--netty-->
<dependency>
 <groupId>io.netty</groupId>
 <artifactId>netty-all</artifactId>
 <version>4.1.17.Final</version>
</dependency>
服务端部分
NettyServer.java:服务启动监听器
@Slf4j
public class NettyServer {
  public void start() {
    InetSocketAddress socketAddress = new InetSocketAddress("127.0.0.1", 8082);
    //new 一个主线程组
    EventLoopGroup bossGroup = new NioEventLoopGroup(1);
    //new 一个工作线程组
    EventLoopGroup workGroup = new NioEventLoopGroup(200);
    ServerBootstrap bootstrap = new ServerBootstrap()
        .group(bossGroup, workGroup)
        .channel(NioServerSocketChannel.class)
        .childHandler(new ServerChannelInitializer())
        .localAddress(socketAddress)
        //设置队列大小
        .option(ChannelOption.SO_BACKLOG, 1024)
        // 两小时内没有数据的通信时,TCP会自动发送一个活动探测数据报文
        .childOption(ChannelOption.SO_KEEPALIVE, true);
    //绑定端口,开始接收进来的连接
    try {
      ChannelFuture future = bootstrap.bind(socketAddress).sync();
      log.info("服务器启动开始监听端口: {}", socketAddress.getPort());
      future.channel().closeFuture().sync();
    } catch (InterruptedException e) {
      log.error("服务器开启失败", e);
    } finally {
      //关闭主线程组
      bossGroup.shutdownGracefully();
      //关闭工作线程组
      workGroup.shutdownGracefully();
    }
  }
}
ServerChannelInitializer.java:netty服务初始化器
/**
* netty服务初始化器
**/
public class ServerChannelInitializer extends ChannelInitializer<SocketChannel> {
  @Override
  protected void initChannel(SocketChannel socketChannel) throws Exception {
    //添加编解码
    socketChannel.pipeline().addLast("decoder", new StringDecoder(CharsetUtil.UTF_8));
    socketChannel.pipeline().addLast("encoder", new StringEncoder(CharsetUtil.UTF_8));
    socketChannel.pipeline().addLast(new NettyServerHandler());
  }
}
NettyServerHandler.java:netty服务端处理器
/**
* netty服务端处理器
**/
@Slf4j
public class NettyServerHandler extends ChannelInboundHandlerAdapter {
  /**
   * 客户端连接会触发
   */
  @Override
  public void channelActive(ChannelHandlerContext ctx) throws Exception {
    log.info("Channel active......");
  }

  /**
   * 客户端发消息会触发
   */
  @Override
  public void channelRead(ChannelHandlerContext ctx, Object msg) throws Exception {
    log.info("服务器收到消息: {}", msg.toString());
    ctx.write("你也好哦");
    ctx.flush();
  }


  /**
   * 发生异常触发
   */
  @Override
  public void exceptionCaught(ChannelHandlerContext ctx, Throwable cause) throws Exception {
    cause.printStackTrace();
    ctx.close();
  }
}
RpcServerApp.java:SpringBoot启动类
/**
* 启动类
*
*/
@Slf4j
@SpringBootApplication(exclude = {DataSourceAutoConfiguration.class})
public class RpcServerApp extends SpringBootServletInitializer {
  @Override
  protected SpringApplicationBuilder configure(SpringApplicationBuilder application) {
    return application.sources(RpcServerApp.class);
  }

  /**
   * 项目的启动方法
   *
   * @param args
   */
  public static void main(String[] args) {
    SpringApplication.run(RpcServerApp.class, args);
    //开启Netty服务
    NettyServer nettyServer =new NettyServer ();
    nettyServer.start();
    log.info("======服务已经启动========");
  }
}
客户端部分
NettyClientUtil.java:NettyClient工具类
/**
* Netty客户端
**/
@Slf4j
public class NettyClientUtil {

  public static ResponseResult helloNetty(String msg) {
    NettyClientHandler nettyClientHandler = new NettyClientHandler();
    EventLoopGroup group = new NioEventLoopGroup();
    Bootstrap bootstrap = new Bootstrap()
        .group(group)
        //该参数的作用就是禁止使用Nagle算法,使用于小数据即时传输
        .option(ChannelOption.TCP_NODELAY, true)
        .channel(NioSocketChannel.class)
        .handler(new ChannelInitializer<SocketChannel>() {
          @Override
          protected void initChannel(SocketChannel socketChannel) throws Exception {
            socketChannel.pipeline().addLast("decoder", new StringDecoder());
            socketChannel.pipeline().addLast("encoder", new StringEncoder());
            socketChannel.pipeline().addLast(nettyClientHandler);
          }
        });
    try {
      ChannelFuture future = bootstrap.connect("127.0.0.1", 8082).sync();
      log.info("客户端发送成功....");
      //发送消息
      future.channel().writeAndFlush(msg);
      // 等待连接被关闭
      future.channel().closeFuture().sync();
      return nettyClientHandler.getResponseResult();
    } catch (Exception e) {
      log.error("客户端Netty失败", e);
      throw new BusinessException(CouponTypeEnum.OPERATE_ERROR);
    } finally {
      //以一种优雅的方式进行线程退出
      group.shutdownGracefully();
    }
  }
}
NettyClientHandler.java:客户端处理器
/**
* 客户端处理器
**/
@Slf4j
@Setter
@Getter
public class NettyClientHandler extends ChannelInboundHandlerAdapter {

  private ResponseResult responseResult;

  @Override
  public void channelActive(ChannelHandlerContext ctx) throws Exception {
    log.info("客户端Active .....");
  }

  @Override
  public void channelRead(ChannelHandlerContext ctx, Object msg) throws Exception {
    log.info("客户端收到消息: {}", msg.toString());
    this.responseResult = ResponseResult.success(msg.toString(), CouponTypeEnum.OPERATE_SUCCESS.getCouponTypeDesc());
    ctx.close();
  }

  @Override
  public void exceptionCaught(ChannelHandlerContext ctx, Throwable cause) throws Exception {
    cause.printStackTrace();
    ctx.close();
  }
}
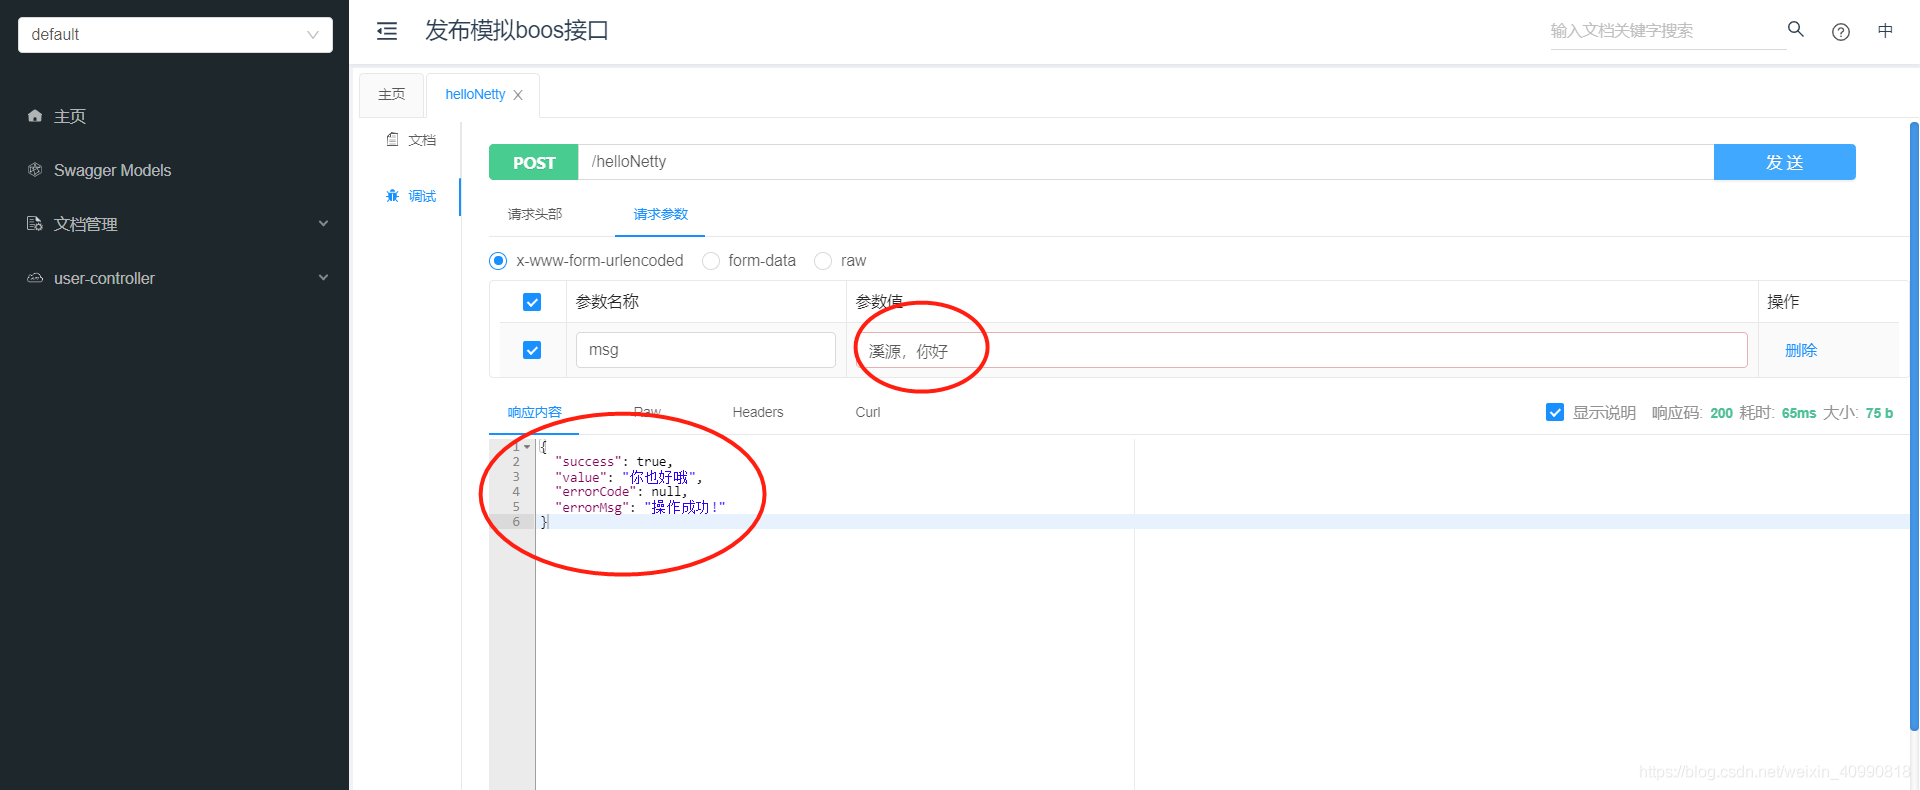
验证
测试接口
@RestController
@Slf4j
public class UserController {

  @PostMapping("/helloNetty")
  @MethodLogPrint
  public ResponseResult helloNetty(@RequestParam String msg) {
    return NettyClientUtil.helloNetty(msg);
  }
}
访问测试接口
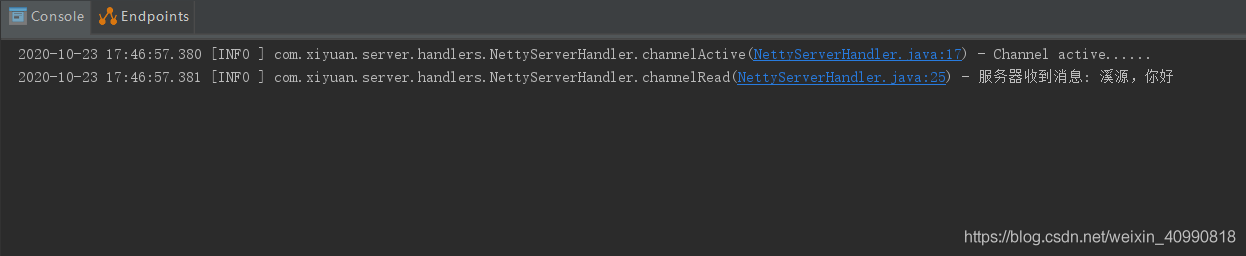
服务端打印信息
客户端打印信息

源码
项目源码可从的我的github中获取:github源码地址
到此这篇关于SpringBoot使用Netty实现远程调用的示例的文章就介绍到这了,更多相关SpringBoot Netty远程调用内容请搜索自学编程网以前的文章或继续浏览下面的相关文章希望大家以后多多支持自学编程网!

- 本文固定链接: https://zxbcw.cn/post/198194/
- 转载请注明:必须在正文中标注并保留原文链接
- QQ群: PHP高手阵营官方总群(344148542)
- QQ群: Yii2.0开发(304864863)