本文实例讲述了YII2框架中验证码的简单使用方法。分享给大家供大家参考,具体如下:
验证码的使用是比较频繁的。YII2中已经帮我们做好了封装。
首先我们在控制器里创建一个actions方法,用于使用yii\captcha\CaptchaAction
<?php

namespace app\controllers;

use YII;
use yii\web\Controller;

class IndexController extends Controller
{
  public function actionIndex()
  {
    if (YII::$app->request->isPost) {
      //获取post过来的验证码
      $verify = YII::$app->request->post('verify');

      //我们手动进行验证,第二个参数表示是否区分大小写
      if ($this->createAction('captcha')->validate($verify, false)) {
        echo '成功';
      } else {
        echo '失败';
      }

    } else {
      return $this->renderPartial('index');
    }
  }

  //actions的作用主要是共用功能相同的方法
  //当用户访问index/captcha时,actions就会调用yii\captcha\CaptchaAction方法
  public function actions()
  {
    return [
      'captcha' => [
        'class' => 'yii\captcha\CaptchaAction',
        'fixedVerifyCode' => null,
        //背景颜色
        'backColor' => 0x000000,
        //最大显示个数
        'maxLength' => 4,
        //最少显示个数
        'minLength' => 4,
        //间距
        'padding' => 2,
        //高度
        'height' => 30,
        //宽度
        'width' => 85,
        //字体颜色
        'foreColor' => 0xffffff,
        //设置字符偏移量
        'offset' => 4,
      ],
    ];
  }
}
显示页面代码如下:
<?php
use yii\helpers\Url;
use yii\helpers\Html;
?>
<!doctype html>
<html lang="zh-CN">
<head>
  <meta charset="UTF-8">
  <title>分页显示</title>
</head>
<body>
  <form action="<?php echo Url::toRoute('index/index'); ?>" method="post">
    验证码:<input type="text" name="verify"><br>
    <img id="verifyImg" src="<?php echo Url::toRoute('index/captcha'); ?>"><br>
    <input type="submit" value="提交">
    <input name="_csrf" type="hidden" value="<?php echo \Yii::$app->request->csrfToken; ?>">
  </form>

  <?php echo Html::jsFile('@web/js/jquery-3.3.1.min.js'); ?>
  <script type="text/javascript">
    $(function () {
      //处理点击刷新验证码
      $("#verifyImg").on("click", function () {
        $.get("<?php echo Url::toRoute('index/captcha') ?>?refresh", function (data) {
          $("#verifyImg").attr("src", data["url"]);
        }, "json");
      });
    });
  </script>
</body>
</html>
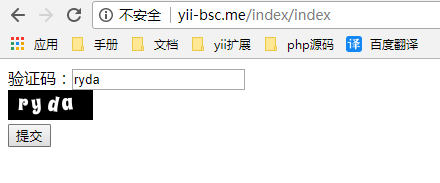
演示结果如下:

上面控制器中验证码的验证方式是我们手动的。我们也可以创建一个模型配置rules()来自动完成。
<?php

namespace app\models;

use yii\base\Model;

class VerifyForm extends Model
{

  //变量名为你表单中输入验证码控件的name
  public $verify;

  public function rules()
  {
    return [
      ['verify', 'required', 'message' => '请填写验证码'],
      //注意captchaAction的设置,指向你显示验证码的action,这里我们的是index/captcha
      ['verify', 'captcha', 'captchaAction' => 'index/captcha', 'caseSensitive' => false, 'message' => '验证码错误'],
    ];
  }
}
控制器代码修改如下:
<?php

namespace app\controllers;

use YII;
use app\models\VerifyForm;
use yii\web\Controller;

class IndexController extends Controller
{
  public function actionIndex()
  {
    if (YII::$app->request->isPost) {
      $verify = new VerifyForm();
      $verify->load(YII::$app->request->post(), '');

      //自动验证
      if ($verify->validate()) {
        echo '成功';
      } else {
        var_dump($verify->errors);
      }

    } else {
      return $this->renderPartial('index');
    }
  }

  //actions的作用主要是共用功能相同的方法
  //当用户访问index/captcha时,actions就会调用yii\captcha\CaptchaAction方法
  public function actions()
  {
    return [
      'captcha' => [
        'class' => 'yii\captcha\CaptchaAction',
        'fixedVerifyCode' => null,
        //背景颜色
        'backColor' => 0x000000,
        //最大显示个数
        'maxLength' => 4,
        //最少显示个数
        'minLength' => 4,
        //间距
        'padding' => 2,
        //高度
        'height' => 30,
        //宽度
        'width' => 85,
        //字体颜色
        'foreColor' => 0xffffff,
        //设置字符偏移量
        'offset' => 4,
      ],
    ];
  }
}
更多关于Yii相关内容感兴趣的读者可查看本站专题:《Yii框架入门及常用技巧总结》、《php优秀开发框架总结》、《smarty模板入门基础教程》、《php面向对象程序设计入门教程》、《php字符串(string)用法总结》、《php+mysql数据库操作入门教程》及《php常见数据库操作技巧汇总》
希望本文所述对大家基于Yii框架的PHP程序设计有所帮助。

- 本文固定链接: https://zxbcw.cn/post/182544/
- 转载请注明:必须在正文中标注并保留原文链接
- QQ群: PHP高手阵营官方总群(344148542)
- QQ群: Yii2.0开发(304864863)
