命令行工具(CLI)
命令行工具(CLI)是在图形用户界面得到普及之前使用最为广泛的用户界面,它通常不支持鼠标,用户通过键盘输入指令,计算机接收到指令后,予以执行。
通常认为,命令行工具(CLI)没有图形用户界面(GUI)那么方便用户操作。因为,命令行工具的软件通常需要用户记忆操作的命令,但是,由于其本身的特点,命令行工具要较图形用户界面节约计算机系统的资源。在熟记命令的前提下,使用命令行工具往往要较使用图形用户界面的操作速度要快。所以,图形用户界面的操作系统中,都保留着可选的命令行工具。
另外,命令行工具(CLI)应该是一个开箱即用的工具,不需要安装任何依赖。
一些熟悉的CLI工具如下:
1. dotnet cli
2. vue cli
4. aws cli
指令设计
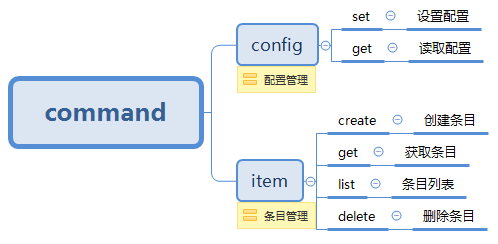
本文将使用.Net Core(版本3.1.102)编写一个CLI工具,实现配置管理以及条目(item)管理(调用WebApi实现),详情如下:

框架说明
编写CLI使用的主要框架是CommandLineUtils,它主要有以下优势:
1. 良好的语法设计
2. 支持依赖注入
3. 支持generic host
WebApi
提供api让cli调用,实现条目(item)的增删改查:
[Route("api/items")]
[ApiController]
public class ItemsController : ControllerBase
{
  private readonly IMemoryCache _cache;
  private readonly string _key = "items";

  public ItemsController(IMemoryCache memoryCache)
  {
    _cache = memoryCache;
  }

  [HttpGet]
  public IActionResult List()
  {
    var items = _cache.Get<List<Item>>(_key);
    return Ok(items);
  }

  [HttpGet("{id}")]
  public IActionResult Get(string id)
  {
    var item = _cache.Get<List<Item>>(_key).FirstOrDefault(n => n.Id == id);
    return Ok(item);
  }

  [HttpPost]
  public IActionResult Create(ItemForm form)
  {
    var items = _cache.Get<List<Item>>(_key) ?? new List<Item>();

    var item = new Item
    {
      Id = Guid.NewGuid().ToString("N"),
      Name = form.Name,
      Age = form.Age
    };

    items.Add(item);

    _cache.Set(_key, items);

    return Ok(item);
  }

  [HttpDelete("{id}")]
  public IActionResult Delete(string id)
  {
    var items = _cache.Get<List<Item>>(_key);

    var item = items?.SingleOrDefault(n => n.Id == id);
    if (item == null)
    {
      return NotFound();
    }

    items.Remove(item);
    _cache.Set(_key, items);

    return Ok();
  }
}
CLI
1. Program - 函数入口
[HelpOption(Inherited = true)] //显示指令帮助,并且让子指令也继承此设置
[Command(Description = "A tool to communicate with web api"), //指令描述
 Subcommand(typeof(ConfigCommand), typeof(ItemCommand))] //子指令
class Program
{
  public static int Main(string[] args)
  {
    //配置依赖注入
    var serviceCollection = new ServiceCollection();

    serviceCollection.AddSingleton(PhysicalConsole.Singleton);
    serviceCollection.AddSingleton<IConfigService, ConfigService>();
    serviceCollection.AddHttpClient<IItemClient, ItemClient>();

    var services = serviceCollection.BuildServiceProvider();

    var app = new CommandLineApplication<Program>();
    app.Conventions
      .UseDefaultConventions()
      .UseConstructorInjection(services);

    var console = (IConsole)services.GetService(typeof(IConsole));

    try
    {
      return app.Execute(args);
    }
    catch (UnrecognizedCommandParsingException ex) //处理未定义指令
    {
      console.WriteLine(ex.Message);
      return -1;
    }
  }

  //指令逻辑
  private int OnExecute(CommandLineApplication app, IConsole console)
  {
    console.WriteLine("Please specify a command.");
    app.ShowHelp();
    return 1;
  }
}
2. ConfigCommand和ItemCommand - 实现的功能比较简单,主要是指令描述以及指定对应的子指令
[Command("config", Description = "Manage config"),
 Subcommand(typeof(GetCommand), typeof(SetCommand))]
public class ConfigCommand
{
  private int OnExecute(CommandLineApplication app, IConsole console)
  {
    console.Error.WriteLine("Please submit a sub command.");
    app.ShowHelp();
    return 1;
  }
}

[Command("item", Description = "Manage item"),
 Subcommand(typeof(CreateCommand), typeof(GetCommand), typeof(ListCommand), typeof(DeleteCommand))]
public class ItemCommand
{
  private int OnExecute(CommandLineApplication app, IConsole console)
  {
    console.Error.WriteLine("Please submit a sub command.");
    app.ShowHelp();
    return 1;
  }
}
3.ConfigService - 配置管理的具体实现,主要是文件读写
public interface IConfigService
{
  void Set();

  Config Get();
}

public class ConfigService: IConfigService
{
  private readonly IConsole _console;
  private readonly string _directoryName;
  private readonly string _fileName;

  public ConfigService(IConsole console)
  {
    _console = console;
    _directoryName = ".api-cli";
    _fileName = "config.json";
  }

  public void Set()
  {
    var directory = Path.Combine(Environment.GetFolderPath(Environment.SpecialFolder.UserProfile), _directoryName);
    if (!Directory.Exists(directory))
    {
      Directory.CreateDirectory(directory);
    }

    var config = new Config
    {
      //弹出交互框,让用户输入,设置默认值为http://localhost:5000/
      Endpoint = Prompt.GetString("Specify the endpoint:", "http://localhost:5000/")
    };

    if (!config.Endpoint.EndsWith("/"))
    {
      config.Endpoint += "/";
    }

    var filePath = Path.Combine(directory, _fileName);

    using (var outputFile = new StreamWriter(filePath, false, Encoding.UTF8))
    {
      outputFile.WriteLine(JsonConvert.SerializeObject(config, Formatting.Indented));
    }
    _console.WriteLine($"Config saved in {filePath}.");
  }

  public Config Get()
  {
    var filePath = Path.Combine(Environment.GetFolderPath(Environment.SpecialFolder.UserProfile), _directoryName, _fileName);

    if (File.Exists(filePath))
    {
      var content = File.ReadAllText(filePath);
      try
      {
        var config = JsonConvert.DeserializeObject<Config>(content);
        return config;
      }
      catch
      {
        _console.WriteLine("The config is invalid, please use 'config set' command to reset one.");
      }
    }
    else
    {
      _console.WriteLine("Config is not existed, please use 'config set' command to set one.");
    }

    return null;
  }
}
4.ItemClient - 调用Web Api的具体实现,使用HttpClientFactory的方式
public interface IItemClient
{
  Task<string> Create(ItemForm form);

  Task<string> Get(string id);

  Task<string> List();

  Task<string> Delete(string id);
}

public class ItemClient : IItemClient
{
  public HttpClient Client { get; }

  public ItemClient(HttpClient client, IConfigService configService)
  {
    var config = configService.Get();
    if (config == null)
    {
      return;
    }

    client.BaseAddress = new Uri(config.Endpoint);

    Client = client;
  }

  public async Task<string> Create(ItemForm form)
  {
    var content = new StringContent(JsonConvert.SerializeObject(form), Encoding.UTF8, "application/json");
    var result = await Client.PostAsync("/api/items", content);

    if (result.IsSuccessStatusCode)
    {
      var stream = await result.Content.ReadAsStreamAsync();
      var item = Deserialize<Item>(stream);
      return $"Item created, info:{item}";
    }

    return "Error occur, please again later.";
  }

  public async Task<string> Get(string id)
  {
    var result = await Client.GetAsync($"/api/items/{id}");

    if (result.IsSuccessStatusCode)
    {
      var stream = await result.Content.ReadAsStreamAsync();
      var item = Deserialize<Item>(stream);

      var response = new StringBuilder();
      response.AppendLine($"{"Id".PadRight(40, ' ')}{"Name".PadRight(20, ' ')}Age");
      response.AppendLine($"{item.Id.PadRight(40, ' ')}{item.Name.PadRight(20, ' ')}{item.Age}");
      return response.ToString();
    }

    return "Error occur, please again later.";
  }

  public async Task<string> List()
  {
    var result = await Client.GetAsync($"/api/items");

    if (result.IsSuccessStatusCode)
    {
      var stream = await result.Content.ReadAsStreamAsync();
      var items = Deserialize<List<Item>>(stream);

      var response = new StringBuilder();
      response.AppendLine($"{"Id".PadRight(40, ' ')}{"Name".PadRight(20, ' ')}Age");

      if (items != null && items.Count > 0)
      {
        foreach (var item in items)
        {
          response.AppendLine($"{item.Id.PadRight(40, ' ')}{item.Name.PadRight(20, ' ')}{item.Age}");
        }
      }

      return response.ToString();
    }

    return "Error occur, please again later.";
  }

  public async Task<string> Delete(string id)
  {
    var result = await Client.DeleteAsync($"/api/items/{id}");

    if (result.IsSuccessStatusCode)
    {
      return $"Item {id} deleted.";
    }

    if (result.StatusCode == HttpStatusCode.NotFound)
    {
      return $"Item {id} not found.";
    }

    return "Error occur, please again later.";
  }

  private static T Deserialize<T>(Stream stream)
  {
    using var reader = new JsonTextReader(new StreamReader(stream));
    var serializer = new JsonSerializer();
    return (T)serializer.Deserialize(reader, typeof(T));
  }
}
如何发布
在项目文件中设置发布程序的名称(AssemblyName):
 <PropertyGroup>
   <OutputType>Exe</OutputType>
   <TargetFramework>netcoreapp3.1</TargetFramework>
   <AssemblyName>api-cli</AssemblyName>
  </PropertyGroup>
进入控制台程序目录:
cd src/NetCoreCLI
发布Linux使用版本:
dotnet publish -c Release -r linux-x64 /p:PublishSingleFile=true
发布Windows使用版本:
dotnet publish -c Release -r win-x64 /p:PublishSingleFile=true
发布MAC使用版本:
dotnet publish -c Release -r osx-x64 /p:PublishSingleFile=true
使用示例
这里使用Linux作为示例环境。
1. 以docker的方式启动web api

2. 虚拟机上没有安装.net core的环境

3. 把编译好的CLI工具拷贝到虚拟机上,授权并移动到PATH中(如果不移动,可以通过./api-cli的方式调用)
sudo chmod +x api-cli #授权
sudo mv ./api-cli /usr/local/bin/api-cli #移动到PATH
4. 设置配置文件:api-cli config set

5. 查看配置文件:api-cli config get

6. 创建条目:api-cli item create

7. 条目列表:api-cli item list

8. 获取条目:api-cli item get

9. 删除条目:api-cli item delete

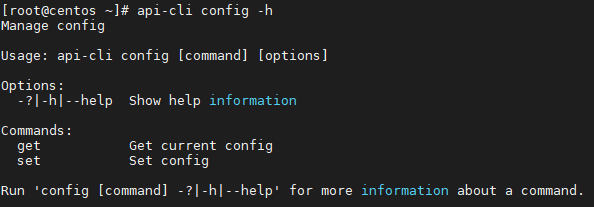
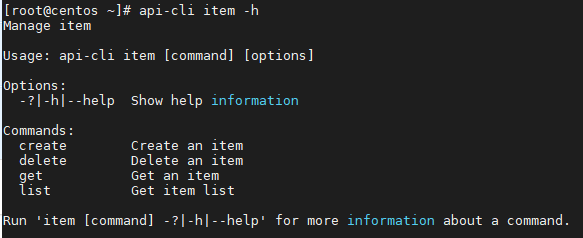
10. 指令帮助:api-cli -h, api-cli config -h, api-cli item -h


11. 错误指令:api-cli xxx

源码地址
https://github.com/ErikXu/NetCoreCLI
参考资料
https://docs.microsoft.com/en-us/dotnet/core/rid-catalog
https://medium.com/swlh/build-a-command-line-interface-cli-program-with-net-core-428c4c85221
到此这篇关于使用.Net Core编写命令行工具(CLI)的方法的文章就介绍到这了,更多相关.Net Core 命令行工具内容请搜索自学编程网以前的文章或继续浏览下面的相关文章希望大家以后多多支持自学编程网!

- 本文固定链接: https://zxbcw.cn/post/182779/
- 转载请注明:必须在正文中标注并保留原文链接
- QQ群: PHP高手阵营官方总群(344148542)
- QQ群: Yii2.0开发(304864863)
