jupyter notebook的安装在这里都不赘述
可以参考jupyter官网的步骤
http://jupyter-notebook.readthedocs.io/en/latest/public_server.html
这里讨论下jupyter notebook里面的远程访问配置以及SSL加密
1. 远程访问配置
jupyter notebook --generate-config
这个命令会在当前用户的 ~/.jupyter/ 文件夹下面生成一个 jupyter_notebook_config.py 文件
jupyter notebook password
可以生成你需要的远程密码,自己填一下就好,密码会直接输出到 jupyter_notebook_config.json 文件
接下来编辑 jupyter_notebook_config.py 文件中的以下几个部分:
# Set ip to '*' to bind on all interfaces (ips) for the public server
c.NotebookApp.ip = '*'
c.NotebookApp.open_browser = False# It is a good idea to set a known, fixed port for server access
c.NotebookApp.port = 9999
最后一个端口号根据自己的实际情况进行设置
2. SSL加密配置
自己建一个文件夹或者干脆在~/.jupyter/ 文件夹下面执行下面命令:
openssl req -x509 -nodes -days 365 -newkey rsa:2048 -keyout mycert.pem -out mycert.pem
同时编辑 jupyter_notebook_config.py
# browser auto-opening
c.NotebookApp.certfile = u'路径名/mycert.pem'
接下来启动
jupyter notebook
注意在访问时要使用https协议
补充知识:jupyter notebook 中打开ipynb文件时报错 NameError: name 'true' is not defined
在jupyter notebook 中打开ipynb文件时报错:
File "e:\python36\lib\site-packages\traitlets\config\loader.py", line 457, in load_config
 self._read_file_as_dict()
 File "e:\python36\lib\site-packages\traitlets\config\loader.py", line 489, in _read_file_as_dict
 py3compat.execfile(conf_filename, namespace)
 File "e:\python36\lib\site-packages\ipython_genutils\py3compat.py", line 198, in execfile
 exec(compiler(f.read(), fname, 'exec'), glob, loc)
 File "C:\Users\xiaoqiu\.ipython\profile_default\ipython_config.py", line 513, in <module>
 c.Completer.greedy = true
NameError: name 'true' is not defined
resolution:
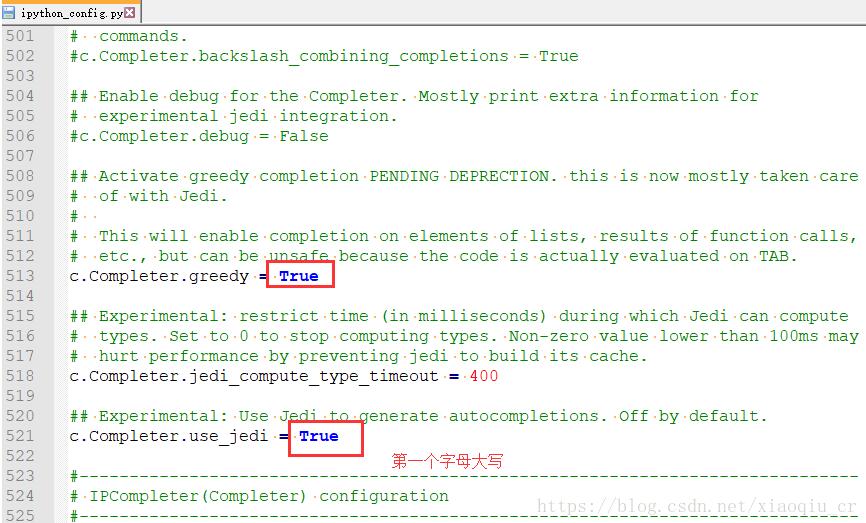
在执行了ipython profile create 命令(激活自动补全的功能)之后 C:\Users\xiaoqiu\.ipython\profile_default生成了两个文件

需要修改ipython_config.py文件修改如下三个参数

以上这篇Jupyter notebook 远程配置及SSL加密教程就是小编分享给大家的全部内容了,希望能给大家一个参考,也希望大家多多支持自学编程网。

- 本文固定链接: https://zxbcw.cn/post/184664/
- 转载请注明:必须在正文中标注并保留原文链接
- QQ群: PHP高手阵营官方总群(344148542)
- QQ群: Yii2.0开发(304864863)
