写这个博客的关键Bug: Value passed to parameter 'input' has DataType uint8 not in list of allowed values: float16, bfloat16, float32, float64。本博客将围绕 加载图片 和 保存图片到本地 来详细解释和解决上述的Bug及其引出来的一系列Bug。
加载图片
首先,造成上述Bug的代码如下所示
image_path = "data/test.jpg" # 本地的测试图片

image_raw = tf.gfile.GFile(image_path, 'rb').read()
# 一定要tf.float(),否则会报错
image_decoded = tf.image.decode_jpeg(image_raw)

# 扩展图片的维度,从三维变成四维,符合Vgg19的输入接口
image_expand_dim = tf.expand_dims(image_decoded, 0)

# 定义Vgg19模型
vgg19 = VGG19(data_path)
net = vgg19.feed_forward(image_expand_dim, 'vgg19')
print(net)
上述代码是加载Vgg19预训练模型,并传入图片得到所有层的特征图,具体的代码实现和原理讲解可参考我的另一篇博客:Tensorflow加载Vgg预训练模型。那么,为什么代码会出现: Value passed to parameter 'input' has DataType uint8 not in list of allowed values: float16, bfloat16, float32, float64,这个Bug呢?
这句英文翻译过来是指:传递的值类型是uint8,但是接受的参数类型必须是float的那几种。故原因就是传入值的数据类型错了,那么如何解决这个Bug呢,很简单
image_path = "data/test.jpg" # 本地的测试图片

image_raw = tf.gfile.GFile(image_path, 'rb').read()
# 一定要tf.float(),否则会报错
image_decoded = tf.to_float(tf.image.decode_jpeg(image_raw))

# 扩展图片的维度,从三维变成四维,符合Vgg19的输入接口
image_expand_dim = tf.expand_dims(image_decoded, 0)

# 定义Vgg19模型
vgg19 = VGG19(data_path)
net = vgg19.feed_forward(image_expand_dim, 'vgg19')
print(net)
这两个代码块唯一的变动就是:image_decoded结果在输出前加了一个tf.float(),将其转换为float类型。
在tensorflow API中,tf.image.decode_jpeg()默认读取的图片数据格式为unit8,而不是float。uint8数据的范围在(0, 255)中,正好符合图片的像素范围(0, 255)。但是,保存在本地的Vgg19预训练模型的数据接口为float,所以才造成了本文开头的Bug。
这里还要提一点,若是使用PIL的方法来加载图片,则不会出现上述的Bug,因为通过PIL得到的图片格式是float,而不是uint8,故不需要转换。
很多同学可能会疑惑,若是强行改变了原图片的数据格式,从uint8类型转变成float,会不会导致数据改变或者出错?故我做了下面这个实验:
image_path = "data/3.jpg"
image_raw = tf.gfile.GFile(image_path, 'rb').read()
image_unit8 = tf.image.decode_jpeg(image_raw)
image_float = tf.to_float(image_unit8)

with tf.Session() as sess:
 image_unit8_, image_float_ = sess.run([image_unit8, image_float])

print("image_unit8_", image_unit8_)
print("image_float_ ", image_float_ )
代码结果如下:
 image_unit8_
 [180, 192, 204],
 [183, 195, 207],
 [186, 198, 210],
 ...,
 [191, 205, 218],
 [191, 205, 218],
 [190, 204, 217]],

 image_float_
 [180., 192., 204.],
 [183., 195., 207.],
 [186., 198., 210.],
 ...,
 [191., 205., 218.],
 [191., 205., 218.],
 [190., 204., 217.]],
可以看到,数据根本没有变化,只是后面多加了个小数点,变得只有类型,而没有强制改变值,故同学们不需要过度担心。
保存图片到本地
在加载图片的时候,为了使用保存在本地的预训练Vgg19模型,我们需要将读取的图片由uint8格式转换成float格式。那若是我们想将已经转换为float格式的图片再保存到本地,该怎么做呢?
首先,我们根据上述的文字的意思读取图片,并且将其转换为float格式,在将读取的图片再次保存到本地之前,我们首先可视化一下转换格式后的图片,代码如下:
import tensorflow as tf
from matplotlib import pyplot as plt
image_path = "data/boat.jpg"

image_raw = tf.gfile.GFile(image_path, 'rb').read()
image_decoded = tf.image.decode_jpeg(image_raw)
image_decoded = tf.to_float(image_decoded)

with tf.Session() as sess:
 image_decoded_ = sess.run(image_decoded)
 plt.imshow(image_decoded_)
 plt.show()
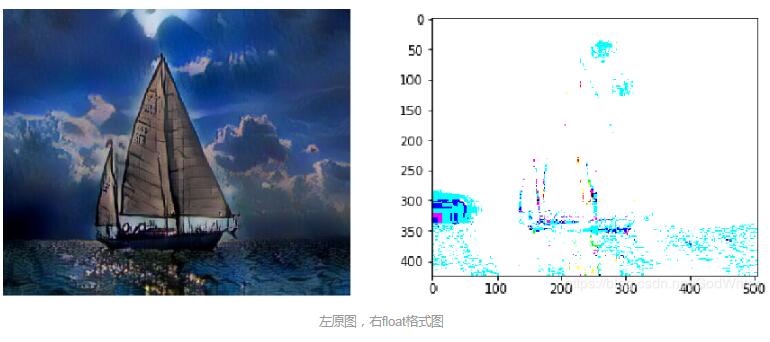
生成的图片如下图所示:

左边是原图,右边是转换为float格式的图片,可见将图片转换为float格式,虽然数值没有造成太大影响,但是若想将图片保存到本地就会出现问题。
说了这么多,只为了说一点,在保存图片到本地之前,需要将其格式从float转回uint8,否则会造成一系列错误:图片显示异常,API报错等。正确的保存代码如下:
save_path = "data/boat_copy.jpg"
image_uint = tf.cast(image_decoded, tf.uint8)
with tf.Session() as sess:
 with open(save_path, 'wb') as img:
 image_saved = sess.run(tf.image.encode_jpeg(image_uint))
 img.write(image_saved)
其中只有一句话最关键,即 tf.cast(image_decoded, tf.uint8)。
以上这篇浅谈Tensorflow加载Vgg预训练模型的几个注意事项就是小编分享给大家的全部内容了,希望能给大家一个参考,也希望大家多多支持自学编程网。

- 本文固定链接: https://zxbcw.cn/post/187355/
- 转载请注明:必须在正文中标注并保留原文链接
- QQ群: PHP高手阵营官方总群(344148542)
- QQ群: Yii2.0开发(304864863)
