来源 | OpenCV学堂
作者 | gloomyfish
基本思路选择
以前我用过Caffe,用过tensorflow,最近一直在用pytorch感觉特别好用。所以打算写点我学习的过程跟经验,如果你是一个pytorch的高手自然可以忽略,如果你也打算学习pytorch框架,那就跟我一起学习吧,所谓独学而无友,孤陋而寡闻!
pytorch安装
01
演示系统环境
- Windows10
- Pytorch1.4
- CUDA10.0
- VS2015
- Python3.6.5
CPU版本
install pytorch torchvision cpuonly -c pytorch
GPU版本
install pytorch torchvision cudatoolkit=10.0 -c pytorch
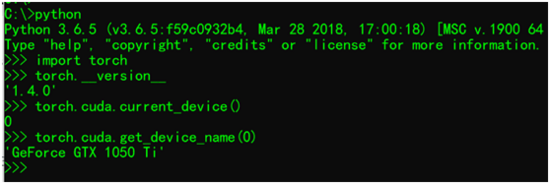
测试安装是否正常, CUDA支持正常

测试结果一切正常!
安装的时候你还可以更直接点
pip install pytorch torchvision
就好啦!我知道很多人喜欢用各种python的工具跟IDE做开发,那些都是个人爱好,喜欢就好,但是千万别强迫别人跟你一样!有IDE强迫症!我从开始学习python就一直用pycharm!千万别问我好用不好用,方便不方便!觉得适合自己即可。
Pytorch基本语法演示
02
演示了pytorch中基本常量、变量、矩阵操作、CUDA调用,numpy与tensor转化,维度转化,自动梯度等基本知识。代码如下:
from __future__ import print_function
import torch
import numpy as np

print(torch.__version__)

# 定义矩阵
x = torch.empty(2, 2)
print(x)

# 定义随机初始化矩阵
x = torch.randn(2, 2)
print(x)

# 定义初始化为零
x = torch.zeros(3, 3)
print(x)

# 定义数据为tensor
x = torch.tensor([5.1, 2., 3., 1.])
print(x)

# 操作
a = torch.tensor([1.,2.,3.,4.,5.,6.,7.,8.])
b = torch.tensor([11.,12.,13.,14.,15.,16.,17.,18.])
c = a.add(b)
print(c)

# 维度变换 2x4
a = a.view(-1, 4)
b = b.view(-1, 4)
c = torch.add(a, b)
print(c, a.size(), b.size())

# torch to numpy and visa
na = a.numpy()
nb = b.numpy()
print("\na =",na,"\nb =", nb)

# 操作
d = np.array([21.,22.,23.,24.,25.,26.,27.,28.], dtype=np.float32)
print(d.reshape(2, 4))
d = torch.from_numpy(d.reshape(2, 4))
sum = torch.sub(c, d)
print(sum, "\n sum = ", sum.size())

# using CUDA
if torch.cuda.is_available():
 result = d.cuda() + c.cuda()
 print("\n result = ", result)

# 自动梯度
x = torch.randn(1, 5, requires_grad=True)
y = torch.randn(5, 3, requires_grad=True)
z = torch.randn(3, 1, requires_grad=True)
print("\nx=",x, "\ny=",y, "\nz=",z)
xy = torch.matmul(x, y)
xyz = torch.matmul(xy, z)
xyz.backward()
print(x.grad, y.grad, z.grad)
运行输出结果:
1.4.0
tensor([[0., 0.],
[0., 0.]])
tensor([[-0.4624, -1.1495],
[ 1.9408, -0.1796]])
tensor([[0., 0., 0.],
[0., 0., 0.],
[0., 0., 0.]])
tensor([5.1000, 2.0000, 3.0000, 1.0000])
tensor([12., 14., 16., 18., 20., 22., 24., 26.])
tensor([[12., 14., 16., 18.],
[20., 22., 24., 26.]]) torch.Size([2, 4]) torch.Size([2, 4])a = [[1. 2. 3. 4.]
[5. 6. 7. 8.]]
b = [[11. 12. 13. 14.]
[15. 16. 17. 18.]]
[[21. 22. 23. 24.]
[25. 26. 27. 28.]]
tensor([[-9., -8., -7., -6.],
[-5., -4., -3., -2.]])
sum = torch.Size([2, 4])result = tensor([[33., 36., 39., 42.],
[45., 48., 51., 54.]], device='cuda:0')x= tensor([[ 0.3029, -0.4030, -0.9148, -0.9237, 0.7549]], requires_grad=True)
y= tensor([[-0.9032, -0.4092, -0.0682],
[ 0.3689, -0.9655, -0.1346],
[ 1.5101, 1.4418, 0.1058],
[ 1.0259, -1.6011, 0.4881],
[-0.3989, 0.9156, -1.6290]], requires_grad=True)
z= tensor([[ 1.4343],
[ 2.2974],
[-0.0864]], requires_grad=True)
tensor([[-2.2298, -1.6776, 5.4691, -2.2492, 1.6721]]) tensor([[ 0.4344, 0.6959, -0.0262],
[-0.5781, -0.9260, 0.0348],
[-1.3121, -2.1017, 0.0790],
[-1.3249, -2.1222, 0.0798],
[ 1.0827, 1.7342, -0.0652]]) tensor([[-3.0524],
[ 1.1164],
[-1.7437]])
总结
到此这篇关于Pytorch?环境搭建与基本语法的文章就介绍到这了,更多相关Pytorch?环境搭建与基本语法内容请搜索自学编程网以前的文章或继续浏览下面的相关文章希望大家以后多多支持自学编程网!

- 本文固定链接: https://zxbcw.cn/post/187887/
- 转载请注明:必须在正文中标注并保留原文链接
- QQ群: PHP高手阵营官方总群(344148542)
- QQ群: Yii2.0开发(304864863)
