
1.项目文件目录一栏
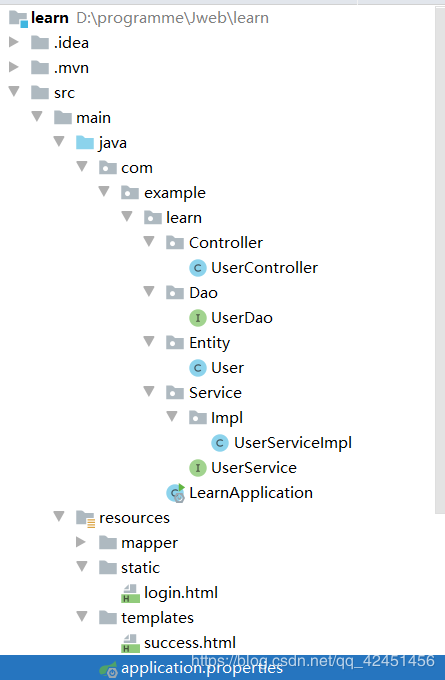
2.开始工作
先按照上图建立好相应的controller,mapper等文件。
接着进行一个配置
首先是application.properties
server.port=8080#启动端口
#加载Mybatis配置文件
mybatis.mapper-locations = classpath:mapper/*.xml

#数据源必填项
spring.datasource.driver-class-name= com.mysql.cj.jdbc.Driver
spring.datasource.url = jdbc:mysql://localhost:3306/studentmanage?useUnicode=true&characterEncoding=utf-8&serverTimezone=GMT
spring.datasource.username = root
spring.datasource.password = 123456
接着是spring启动主函数java文件
/*扫描mapper,防止找不到dao层文件,就写上*/
@MapperScan(basePackages = {"com.example.learn.Dao"})
@SpringBootApplication
public class LearnApplication {

  public static void main(String[] args) {
    SpringApplication.run(LearnApplication.class, args);
  }

}
配置好以后开始从数据库出发
用户表结构(表名:user_info)

根据用户表,在entity建立实体类User.java,编译器都有相应的操作可以一键生成getter,setter,toString,只需定义好变量即可。
public class User {
  private String username;
  private String password;

  public String getUsername() {
    return username;
  }

  public void setUsername(String username) {
    this.username = username;
  }

  public String getPassword() {
    return password;
  }

  public void setPassword(String password) {
    this.password = password;
  }

  @Override
  public String toString() {
    return "User{" +
        "username='" + username + '\'' +
        ", password='" + password + '\'' +
        '}';
  }
}
接着是Dao层
import com.example.learn.Entity.User;
import org.apache.ibatis.annotations.Mapper;
import org.apache.ibatis.annotations.Param;
import org.springframework.stereotype.Component;

@Mapper
@Component(value = "userDao")//这些都为配置注释
public interface UserDao {
	//登录
  public User login(@Param("username") String username,@Param("password") String password);
}
dao层写完,在写dao层配套的sql语句(mybatis功能)
mapper包里面建立.xml文件
<?xml version="1.0" encoding="UTF-8"?>

<!DOCTYPE mapper PUBLIC "-//mybatis.org//DTD Mapper 3.0//EN" "http://mybatis.org/dtd/mybatis-3-mapper.dtd">

<mapper namespace="com.example.learn.Dao.UserDao">
  <select id="login" resultType="com.example.learn.Entity.User">
    select * from user_info where username=#{username} and password=#{password}
  </select>
</mapper>
弄完这些接着到service层,包括impl接口实现
首先是service接口
import com.example.learn.Entity.User;

public interface UserService {
  public User login(String username, String password);
}
接着是Impl下的实现类
import com.example.learn.Dao.UserDao;
import com.example.learn.Entity.User;
import com.example.learn.Service.UserService;
import org.springframework.beans.factory.annotation.Autowired;
import org.springframework.stereotype.Service;

@Service("UserService")
public class UserServiceImpl implements UserService {
  @Autowired
  private UserDao userDao;
  @Override
  public User login(String username, String password) {
    return userDao.login(username,password);
  }
}
最后就是Controller
import com.example.learn.Entity.User;
import com.example.learn.Service.UserService;
import org.springframework.beans.factory.annotation.Autowired;
import org.springframework.stereotype.Controller;
import org.springframework.web.bind.annotation.PostMapping;

import javax.servlet.http.HttpServletRequest;

@Controller
public class UserController {
  @Autowired
  private UserService userService;
  @PostMapping("/login")//可以换成@RequestMapping,action那里使用的命名
  public String login(HttpServletRequest request, User u){
    String username=request.getParameter("username");
    String password=request.getParameter("password");
    u=userService.login(username,password);
    if(u!=null){
      return "success";//到success的动态网页
    }
    return "redirect:/login.html";//这里是定向到login.html静态网页
  }
}
3.测试工作
先在表中插入测试数据用户和密码
再建立两个html来测试功能
static/login.html
<!DOCTYPE html>
<html lang="en">
<head>
  <meta charset="UTF-8">
  <title>登陆</title>
</head>
<body>
  <form method="post" action="/login">
    <input type="text" name="username" placeholder="用户名">
    <input type="password" name="password" placeholder="密码">
    <input type="submit" value="登录">
  </form>
</body>
</html>
templates/success
<!DOCTYPE html>
<html lang="en">
<head>
  <meta charset="UTF-8">
  <title>Title</title>
</head>
<body>
成功
</body>
</html>
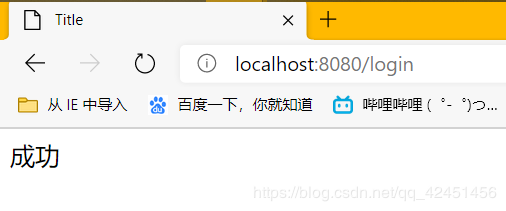
登录测试

到此这篇关于SpringBoot+mybatis+thymeleaf实现登录功能示例的文章就介绍到这了,更多相关SpringBoot+mybatis+thymeleaf登录内容请搜索自学编程网以前的文章或继续浏览下面的相关文章希望大家以后多多支持自学编程网!

- 本文固定链接: https://zxbcw.cn/post/190794/
- 转载请注明:必须在正文中标注并保留原文链接
- QQ群: PHP高手阵营官方总群(344148542)
- QQ群: Yii2.0开发(304864863)