本文重在实现理解,过滤器,业务,逻辑需求,样式请无视。。
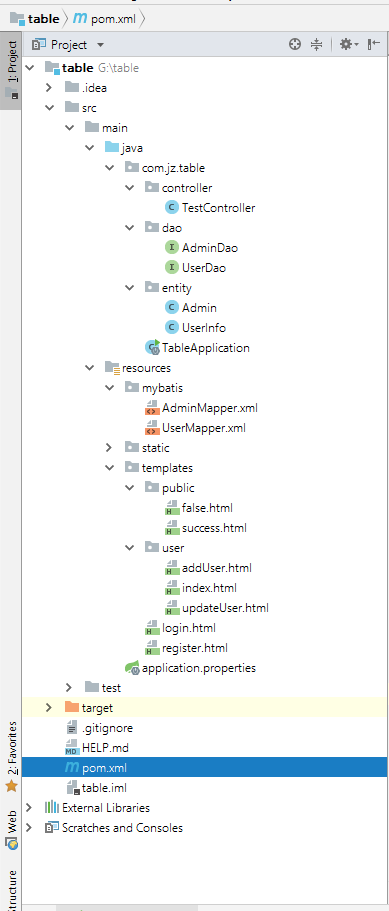
项目结构如下

1.idea新建Spring boot项目,在pom中加上thymeleaf和mybatis支持。pom.xml代码如下
<?xml version="1.0" encoding="UTF-8"?>
<project xmlns="http://maven.apache.org/POM/4.0.0" xmlns:xsi="http://www.w3.org/2001/XMLSchema-instance"
 xsi:schemaLocation="http://maven.apache.org/POM/4.0.0 http://maven.apache.org/xsd/maven-4.0.0.xsd">
 <modelVersion>4.0.0</modelVersion>
 <parent>
 <groupId>org.springframework.boot</groupId>
 <artifactId>spring-boot-starter-parent</artifactId>
 <version>2.1.3.RELEASE</version>
 <relativePath/> <!-- lookup parent from repository -->
 </parent>
 <groupId>com.jz</groupId>
 <artifactId>table</artifactId>
 <version>0.0.1-SNAPSHOT</version>
 <name>table</name>
 <description>Demo project for Spring Boot</description>

 <properties>
 <java.version>1.8</java.version>
 </properties>

 <dependencies>
 <dependency>
 <groupId>org.springframework.boot</groupId>
 <artifactId>spring-boot-starter-web</artifactId>
 </dependency>

 <dependency>
 <groupId>org.springframework.boot</groupId>
 <artifactId>spring-boot-starter-test</artifactId>
 <scope>test</scope>
 </dependency>

 <dependency>
 <groupId>org.springframework.boot</groupId>
 <artifactId>spring-boot-starter-thymeleaf</artifactId>
 </dependency>

 <dependency>
 <groupId>org.mybatis.spring.boot</groupId>
 <artifactId>mybatis-spring-boot-starter</artifactId>
 <version>1.3.1</version>
 </dependency>
 <dependency>
 <groupId>mysql</groupId>
 <artifactId>mysql-connector-java</artifactId>
 <scope>runtime</scope>
 </dependency>

 </dependencies>

 <build>
 <plugins>
 <plugin>
 <groupId>org.springframework.boot</groupId>
 <artifactId>spring-boot-maven-plugin</artifactId>
 </plugin>
 </plugins>
 </build>

</project>
2. 在项目resources目录下新建mybatis文件夹,用于存放mybatis配置文件。 在 application.properties 中配置本地数据源和mybatis配置文件地址, application.properties代码如下
spring.datasource.driverClassName=com.mysql.cj.jdbc.Driver
spring.datasource.url=jdbc:mysql://localhost:3306/student?useUnicode=true&characterEncoding=utf-8&useSSL=false&serverTimezone=UTC
spring.datasource.username=用户名
spring.datasource.password=密码
spring.jpa.showSql=true

mybatis:
mybatis.type-aliases-package=com.jz.table.entity
mybatis.mapper-locations=mybatis/*.xml
com.mysql.cj.jdbc.Driver 是 mysql-connector-java 6中的,需要指定时区serverTimezone
2.2在启动类上加上扫描的Dao包
package com.jz.table;

import org.mybatis.spring.annotation.MapperScan;
import org.springframework.boot.SpringApplication;
import org.springframework.boot.autoconfigure.SpringBootApplication;

@SpringBootApplication
@MapperScan("com.jz.table.dao")
public class TableApplication {

 public static void main(String[] args) {
 SpringApplication.run(TableApplication.class, args);
 }

}
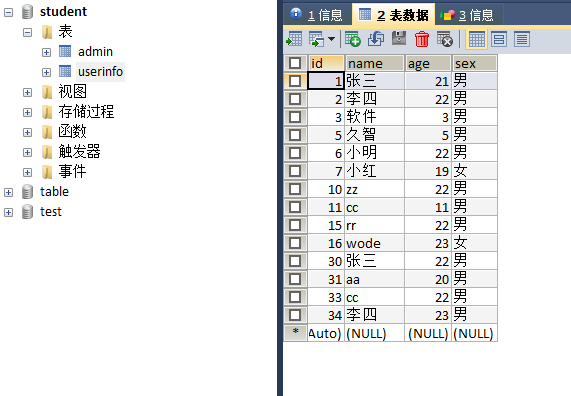
3.数据库建两个表admin和userinfo用于登录和操作用
2019.10.3 现在mysql不能用admin作为表名了,请注意一下


4.开始写代码
entity:实体代码
1.Admin实体类
package com.jz.table.entity;

public class Admin {
 private Integer id;
 private String name;
 private Integer password;
 private String job;

 public Admin() {
 }

 public Admin(Integer id, String name, Integer password, String job) {
 this.id = id;
 this.name = name;
 this.password = password;
 this.job = job;
 }

 public Integer getId() {
 return id;
 }

 public void setId(Integer id) {
 this.id = id;
 }

 public String getName() {
 return name;
 }

 public void setName(String name) {
 this.name = name;
 }

 public Integer getPassword() {
 return password;
 }

 public void setPassword(Integer password) {
 this.password = password;
 }

 public String getJob() {
 return job;
 }

 public void setJob(String job) {
 this.job = job;
 }
}
2.UserInfo实体类
package com.jz.table.entity;

public class UserInfo {
 private Integer id;
 private String name;
 private Integer age;
 private String sex;
 public UserInfo() {
 }
 public UserInfo(Integer id, String name, Integer age, String sex) {
 this.id = id;
 this.name = name;
 this.age = age;
 this.sex = sex;
 }
 public Integer getId() {
 return id;
 }

 public void setId(Integer id) {
 this.id = id;
 }

 public String getName() {
 return name;
 }

 public void setName(String name) {
 this.name = name;
 }

 public Integer getAge() {
 return age;
 }

 public void setAge(Integer age) {
 this.age = age;
 }

 public String getSex() {
 return sex;
 }

 public void setSex(String sex) {
 this.sex = sex;
 }
}
Dao层代码
1.AdminDao
package com.jz.table.dao;

import com.jz.table.entity.Admin;

public interface AdminDao {
 //登录判断
 Admin login(Admin admin);
 //注册
 int addAdmin(Admin admin);
}
2.UserDao
package com.jz.table.dao;

import com.jz.table.entity.UserInfo;

import java.util.List;

public interface UserDao {
 //查
 List<UserInfo> findall();
 //增
 int adduser(UserInfo user);
 //根据Id查,用于修改时页面回显数据
 UserInfo findByid(Integer id);
 //修改
 int updateUser(UserInfo user);
 //删除
 int delUser(Integer id);
}
3.XML文件,因为没有业务逻辑,service省了,controller中直接引入dao
1.AdminMapper.xml
<?xml version="1.0" encoding="UTF-8" ?>
<!DOCTYPE mapper PUBLIC "-//mybatis.org//DTD Mapper 3.0//EN" "http://mybatis.org/dtd/mybatis-3-mapper.dtd" >
<mapper namespace="com.jz.table.dao.AdminDao">
 <select id="login" parameterType="com.jz.table.entity.Admin" resultType="com.jz.table.entity.Admin">
 select name,job FROM admin WHERE name = #{name} AND password = #{password}
 </select>

 <insert id="addAdmin" parameterType="com.jz.table.entity.Admin">
 INSERT INTO admin (name,password,job) VALUES (#{name},#{password},#{job});
 </insert>
</mapper>
2.UserMapper.xml
<?xml version="1.0" encoding="UTF-8" ?>
<!DOCTYPE mapper PUBLIC "-//mybatis.org//DTD Mapper 3.0//EN" "http://mybatis.org/dtd/mybatis-3-mapper.dtd" >
<mapper namespace="com.jz.table.dao.UserDao">
 <select id="findall" resultType="com.jz.table.entity.UserInfo">
 select * from userinfo
 </select>

 <insert id="adduser" parameterType="com.jz.table.entity.UserInfo">
 INSERT INTO userinfo(name,age,sex) VALUES (#{name},#{age},#{sex})
 </insert>

 <select id="findByid" parameterType="java.lang.Integer" resultType="com.jz.table.entity.UserInfo">
 SELECT * FROM userinfo where id = #{id}
 </select>

 <update id="updateUser" parameterType="com.jz.table.entity.UserInfo">
 update userinfo SET name=#{name },age =#{age},sex=#{sex} WHERE id = #{id}
 </update>

 <delete id="delUser" parameterType="java.lang.Integer">
 DELETE from userinfo WHERE id = #{id}
 </delete>
</mapper>
4.页面,在templates文件夹下新建public和user文件夹用来存放公共页面和user操作页面
public文件夹下新建成功、失败提示页
1.success.html
<!DOCTYPE html>
<!--引入thymeleaf-->
<html lang="en" xmlns:th="http://www.thymeleaf.org">
<head>
 <meta charset="UTF-8">
 <title>操作成功提示页</title>

</head>
<body>
<h1>操作成功</h1>

<a href="/index" rel="external nofollow" rel="external nofollow" > 返回首页</a>
</body>
</html>
2.false.html
<!DOCTYPE html>
<html lang="en" xmlns:th="http://www.thymeleaf.org">
<head>
 <meta charset="UTF-8">
 <title>操作失败提示页</title>
 <script th:src="@{/js/jquery-1.8.0.min.js}"></script>

</head>
<body>
<h1>操作失败,请检查数据重试</h1>
<input onclick="history.go(-1)" type="button" value="返回">

</body>
</html>
4.2在templates文件夹下新建login和register页面作为登录和注册页面
1.login.html
<!DOCTYPE html>
<html lang="en">
<head>
 <meta charset="UTF-8">
 <title>首页</title>

 <style>
 /*a标签去下划线和点击不变色,div内容居中*/
 a{
 text-decoration: none;
 color: #333333;
 }
 #idiv{text-align: center;border-radius: 20px;
 width: 300px;
 height: 350px;
 margin: auto;
 position: absolute;
 top: 0;
 left: 0;
 right: 0;
 bottom: 0;}
 </style>
</head>
<body>
<div id="idiv">
 <form action="/gologin" method="post">
 请输入姓名<input id="name" name="name" required="required"><br><br>
 请输入密码<input id="password" name="password" type="password" placeholder="仅支持正整数" required="required"><br><br>
 <input type="submit" value="登录"> <button> <a href="/goregister" rel="external nofollow" >注册</a></button>
 </form>
</div>
</body>
</html>
2.register.html
<!DOCTYPE html>
<html lang="en" xmlns:th="http://www.thymeleaf.org">
<head>
 <meta charset="UTF-8">
 <title>账号注册</title>
 <script th:src="@{/js/jquery-1.8.0.min.js}"></script>
</head>
<body>
<h2>账号注册</h2>
请输入姓名:<input type="text" id="name"/><br><br>
请输入密码:<input type="password" id="password" placeholder="仅支持整数" /><br><br>
请确认密码:<input type="password" id="passwordTwo" placeholder="仅支持整数"/><br><br>
请选择角色:<select id="job" style="width: 173px">
 <option value="管理员">管理员</option>
 </select><br><br>
<button onclick="register()">注册</button>
</body>
<script>
 function register() {
 var name = $("#name").val();
 var password1 = $("#password").val();
 var password2 = $("#passwordTwo").val();
 var job = $("#job").val();
 if (Number(password1) == Number(password2)){
 $.post("/register",{name:name,password:password1,job:job},function (res) {
 if (res ==true){
  alert("注册成功");
  window.location.href ="/login";
 } else {
  alert("注册失败,请检查数据重试");
 }
 })
 }else {
 alert("两次密码不一致!");
 }
 }
</script>
</html>
3.controller中代码
@Controller
public class TestController {
 @Resource
 private AdminDao ad;
 @Resource
 private UserDao ud;

 @RequestMapping("/login")//主页
 public String index(){
 return "login";
 }

 @RequestMapping("/goregister")//去注册页面
 public String goregister(){
 return "register";
 }
 @RequestMapping("/register")//注册
 @ResponseBody
 public boolean register(Admin admin){
 int i = ad.addAdmin(admin);
 if (i>0){
 return true;
 }else {
 return false;
 }
 }

 @RequestMapping("/gologin")//登录获取用户信息存到seccion
 public String gologin(Admin admin,HttpServletRequest request,Model model){
 Admin aa = ad.login(admin);
 if (aa==null){
 return "public/false";
 }
 HttpSession session = request.getSession();
 session.setAttribute("aname",admin.getName());
 session.setAttribute("apassword",admin.getPassword());
 List<UserInfo> userlist = ud.findall();
 model.addAttribute("admin",aa);
 model.addAttribute("alist",userlist);
 return "user/index";
 }

 @RequestMapping("/index")//从其他页面操作后返回列表页面(重复登录)
 public String login(Admin admin,Model model,HttpServletRequest request){
 HttpSession session = request.getSession();
 admin.setName((String) session.getAttribute("aname"));
 admin.setPassword((Integer) session.getAttribute("apassword"));
 Admin aa = ad.login(admin);
 List<UserInfo> userlist = ud.findall();
 model.addAttribute("admin",aa);
 model.addAttribute("alist",userlist);
 return "user/index";
 }
}
4.3user文件夹下新建index,addUser,updateUser页面,作为主页,添加,修改页面
1.index.html
<!DOCTYPE html>
<html lang="en" xmlns:th="http://www.thymeleaf.org">
<head>
 <meta charset="UTF-8">
 <title>首页</title>
 <style>a{text-decoration:none}</style>
 <script th:src="@{/js/jquery-1.8.0.min.js}"></script>
</head>
<body>
欢迎你 :<input th:value="${admin.name}" style="border: none; outline: none"/><br><br><br><br>
<h2>人员信息维护</h2>
<table width="888" border="1">
 <thead>
 <tr>
 <th>id</th>
 <th>姓名</th>
 <th>年龄</th>
 <th>性别</th>
 <th>操作</th>
 </tr>
 <tr th:each="user:${alist}">
 <td align="center" th:text="${user.id}"></td>
 <td align="center" th:text="${user.name}"></td>
 <td align="center" th:text="${user.age}"></td>
 <td align="center" th:text="${user.sex}"></td>
 <td align="center"><a th:href="@{'/goupdate/'+${user.id}}" rel="external nofollow" >修改</a>
  <a th:href="@{'/godel/'+${user.id}}" rel="external nofollow" >删除</a>
 </td>
 </tr>
 </thead>
</table>
<button><a href="/goadd" rel="external nofollow" >添加</a></button>
</body>
</html>
2.addUser.html
<!DOCTYPE html>
<html lang="en" xmlns:th="http://www.thymeleaf.org">
<head>
 <meta charset="UTF-8">
 <title>添加用户</title>
 <script th:src="@{/js/jquery-1.8.0.min.js}"></script>
</head>
<body>
<h2>我是添加页面</h2>

请输入姓名:<input id="name" name="name" type="text" /><br><br>
请输入年龄:<input id="age" name="age" type="text" /><br><br>
请选择性别:<select id="sex" name="sex" style="width: 173px">
 <option value="男">男</option>
 <option value="女">女</option>
 </select><br><br>
<button onclick="goadd()" name="sub" id="sub">添加</button>
<button name="button" onclick="javascript:history.back(-1);">返回</button>
</body>
<script>
 function goadd() {
 var name = $("#name").val();
 var age = $("#age").val();
 var sex = $("#sex").val();
 $.post("/addUser",{name:name,age:age,sex:sex},function (res) {
 if (res==true){
 alert("添加成功")
 window.location.href ="/index";
 }else {
 alert("添加失败,请检查数据重试!");
 }
 })
 }
</script>
</html>
3.updateUser.html
<!DOCTYPE html>
<html lang="en" xmlns:th="http://www.thymeleaf.org">
<head>
 <meta charset="UTF-8">
 <title>修改用户</title>
 <script th:src="@{/js/jquery-1.8.0.min.js}"></script>
</head>
<body>
<h2>这是修改页面</h2>
<input type="hidden" id="id" th:value="${user.id}"><br><br>
请输入姓名:<input id="name" th:value="${user.name}"/><br><br>
请输入年龄:<input id="age" th:value="${user.age}"/><br><br>
请选择性别:<select id="sex" style="width: 173px">
 <option value="男">男</option>
 <option value="女">女</option>
 </select><br><br>
<button onclick="goupdate()">修改</button>
<button name="button" onclick="javascript:history.back(-1);">返回</button>
</body>
<script>
 function goupdate() {
 var id=$("#id").val();
 var name = $("#name").val();
 var age = $("#age").val();
 var sex = $("#sex").val();
 $.post("/update",{id:id,name:name,age:age,sex:sex},function (res) {
 if (res==true) {
 alert("修改成功");
 window.location.href="/index" rel="external nofollow" rel="external nofollow" ;
 }else {
 alert("修改失败,请检查数据重试!");
 }
 })
 }
</script>
</html>
4.controller中代码
@RequestMapping("/goadd")//去添加页面
public String goadd(){
 return "user/addUser";
}
@RequestMapping("/addUser")//添加信息
@ResponseBody
public boolean addUser(UserInfo user){
 int i = ud.adduser(user);
 if (i>0){
 return true;
 }else {
 return false;
 }
}
@RequestMapping("/goupdate/{id}")//去修改页面,回显数据
public String goupdate(@PathVariable("id") int id,Model model){
 UserInfo user = ud.findByid(id);
 model.addAttribute("user",user);
 return "user/updateUser";
}
@RequestMapping("/update")//修改
@ResponseBody
public boolean updateUser(UserInfo user){
 int i = ud.updateUser(user);
 if (i>0){
 return true;
 }else {
 return false;
 }
}
@RequestMapping("/godel/{id}")//删除
public String delUser(@PathVariable("id") Integer id){
 ud.delUser(id);
 return "public/success";
}
5.完整controller代码
package com.jz.table.controller;
import com.jz.table.dao.AdminDao;
import com.jz.table.dao.UserDao;
import com.jz.table.entity.Admin;
import com.jz.table.entity.UserInfo;
import org.springframework.stereotype.Controller;
import org.springframework.ui.Model;
import org.springframework.web.bind.annotation.PathVariable;
import org.springframework.web.bind.annotation.RequestMapping;
import org.springframework.web.bind.annotation.ResponseBody;

import javax.annotation.Resource;
import javax.servlet.http.HttpServletRequest;
import javax.servlet.http.HttpSession;
import java.util.List;

@Controller
public class TestController {
 @Resource
 private AdminDao ad;
 @Resource
 private UserDao ud;

 @RequestMapping("/login")//主页
 public String index(){
 return "login";
 }

 @RequestMapping("/goregister")//去注册页面
 public String goregister(){
 return "register";
 }
 @RequestMapping("/register")//注册
 @ResponseBody
 public boolean register(Admin admin){
 int i = ad.addAdmin(admin);
 if (i>0){
 return true;
 }else {
 return false;
 }
 }

 @RequestMapping("/gologin")//登录获取用户信息存到seccion
 public String gologin(Admin admin,HttpServletRequest request,Model model){
 Admin aa = ad.login(admin);
 if (aa==null){
 return "public/false";
 }
 HttpSession session = request.getSession();
 session.setAttribute("aname",admin.getName());
 session.setAttribute("apassword",admin.getPassword());
 List<UserInfo> userlist = ud.findall();
 model.addAttribute("admin",aa);
 model.addAttribute("alist",userlist);
 return "user/index";
 }

 @RequestMapping("/index")//从其他页面操作后返回列表页面(重复登录)
 public String login(Admin admin,Model model,HttpServletRequest request){
 HttpSession session = request.getSession();
 admin.setName((String) session.getAttribute("aname"));
 admin.setPassword((Integer) session.getAttribute("apassword"));
 Admin aa = ad.login(admin);
 List<UserInfo> userlist = ud.findall();
 model.addAttribute("admin",aa);
 model.addAttribute("alist",userlist);
 return "user/index";
 }


 @RequestMapping("/goadd")//去添加页面
 public String goadd(){
 return "user/addUser";
 }
 @RequestMapping("/addUser")//添加信息
 @ResponseBody
 public boolean addUser(UserInfo user){
 int i = ud.adduser(user);
 if (i>0){
 return true;
 }else {
 return false;
 }
 }
 @RequestMapping("/goupdate/{id}")//去修改页面,回显数据
 public String goupdate(@PathVariable("id") int id,Model model){
 UserInfo user = ud.findByid(id);
 model.addAttribute("user",user);
 return "user/updateUser";
 }
 @RequestMapping("/update")//修改
 @ResponseBody
 public boolean updateUser(UserInfo user){
 int i = ud.updateUser(user);
 if (i>0){
 return true;
 }else {
 return false;
 }
 }
 @RequestMapping("/godel/{id}")//删除
 public String delUser(@PathVariable("id") Integer id){
 ud.delUser(id);
 return "public/success";
 }

}
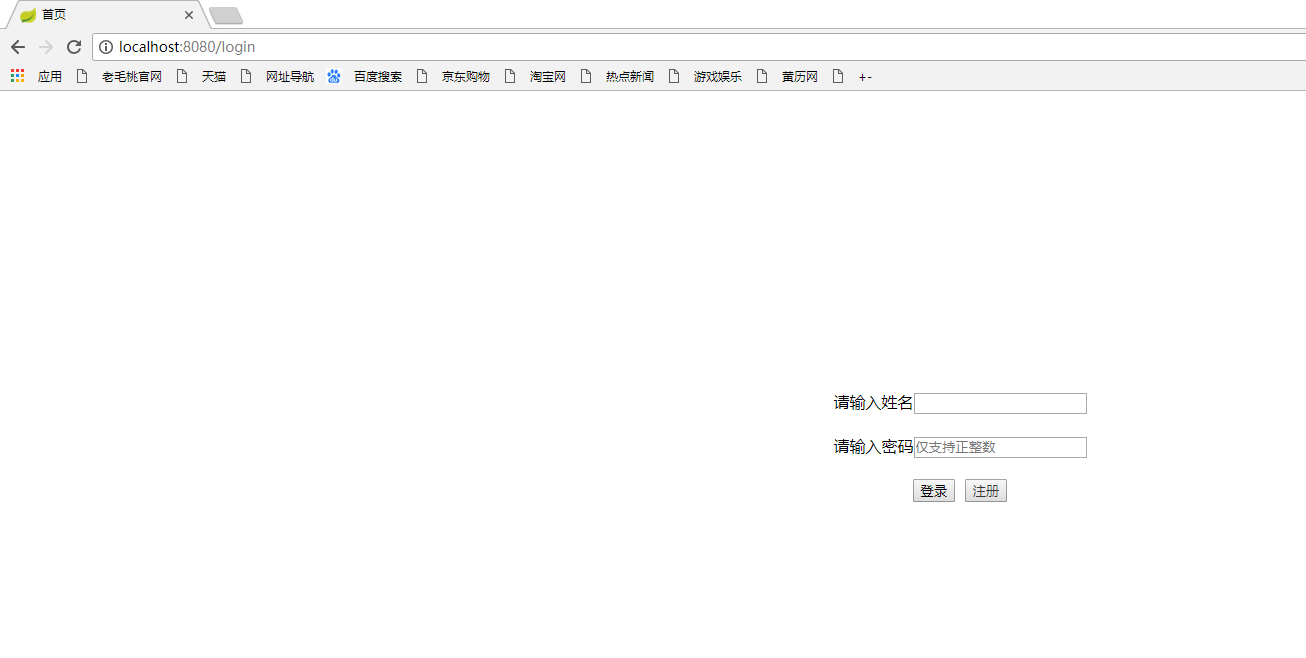
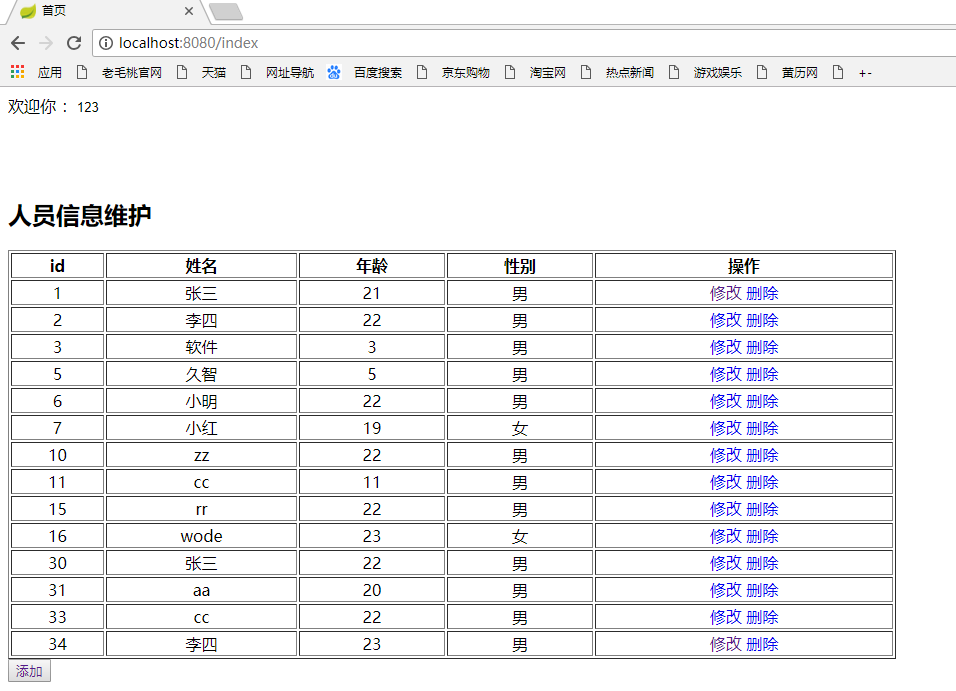
效果如图


到此这篇关于Spring boot+mybatis+thymeleaf 实现登录注册增删改查功能的示例代码的文章就介绍到这了,更多相关Spring boot mybatis thymeleaf 登录注册增删改查内容请搜索自学编程网以前的文章或继续浏览下面的相关文章希望大家以后多多支持自学编程网!

- 本文固定链接: https://zxbcw.cn/post/190796/
- 转载请注明:必须在正文中标注并保留原文链接
- QQ群: PHP高手阵营官方总群(344148542)
- QQ群: Yii2.0开发(304864863)
