
由于开发的需要,需要开发类似直播点赞特效的需求,于是自定义View来实现这种效果
案例图:

1.自定义View
import android.animation.Animator;
import android.animation.AnimatorSet;
import android.animation.ObjectAnimator;
import android.animation.TypeEvaluator;
import android.animation.ValueAnimator;
import android.content.Context;
import android.graphics.PointF;
import android.graphics.drawable.Drawable;
import android.util.AttributeSet;
import android.view.View;
import android.view.animation.AccelerateDecelerateInterpolator;
import android.view.animation.AccelerateInterpolator;
import android.view.animation.DecelerateInterpolator;
import android.view.animation.Interpolator;
import android.view.animation.LinearInterpolator;
import android.widget.ImageView;
import android.widget.RelativeLayout;
import com.xinrui.ndkapp.R;
import java.util.Random;

/**
 * Created by liuyong
 * Data: 2017/8/8
 * Github:https://github.com/MrAllRight
 * 直播点赞view
 */

public class GivePraiseView extends RelativeLayout {
 private RelativeLayout.LayoutParams layoutParams;//图片布局参数
 private PointF mPointF0, mPointF1, mPointF2, mPointF3;//通过3阶贝塞尔曲线控制图片的移动轨迹
 private int mScreenWidth, mScreenHeight;//屏幕宽高
 private Drawable[] mImageDrawables;//加载点赞红心图片,红黄蓝
 private int mDrawableWidth, mDrawableHeight;//图片的宽高
 private Random mRandom = new Random();
 private int count = 0;
 private Interpolator[] interpolators = new Interpolator[4];

 public GivePraiseView(Context context) {
  super(context);
  init();
 }

 public GivePraiseView(Context context, AttributeSet attrs, int defStyleAttr) {
  super(context, attrs, defStyleAttr);
  init();
 }

 public GivePraiseView(Context context, AttributeSet attrs) {
  super(context, attrs);
  init();
 }

 @Override
 protected void onSizeChanged(int w, int h, int oldw, int oldh) {
  super.onSizeChanged(w, h, oldw, oldh);
  mScreenHeight = h;
  mScreenWidth = w;
 }

 //初始化drawable,layoutParams
 private void init() {
  mImageDrawables = new Drawable[4];
  mImageDrawables[0] = getResources().getDrawable(R.drawable.pl_blue);
  mImageDrawables[1] = getResources().getDrawable(R.drawable.pl_red);
  mImageDrawables[2] = getResources().getDrawable(R.drawable.pl_yellow);
  mImageDrawables[3] = getResources().getDrawable(R.drawable.pl_red);
  // 插值器
  interpolators[0] = new AccelerateDecelerateInterpolator(); // 在动画开始与结束的地方速率改变比较慢,在中间的时候加速
  interpolators[1] = new AccelerateInterpolator(); // 在动画开始的地方速率改变比较慢,然后开始加速
  interpolators[2] = new DecelerateInterpolator(); // 在动画开始的地方快然后慢
  interpolators[3] = new LinearInterpolator(); // 以常量速率改变
  mDrawableWidth = mImageDrawables[0].getIntrinsicWidth();
  mDrawableHeight = mImageDrawables[0].getIntrinsicHeight();
  layoutParams = new LayoutParams(50, 50);
  layoutParams.addRule(ALIGN_PARENT_BOTTOM, TRUE);
  layoutParams.addRule(ALIGN_PARENT_RIGHT, TRUE);
  layoutParams.setMargins(0, 0, 60, 60);//放置在屏幕的右下角
  //这里为了演示我们现在布局初始化的时候,放置一个imageview,颜色随机,设置点击屏幕出现点赞效果
  ImageView iv = new ImageView(getContext());
  iv.setLayoutParams(layoutParams);
  iv.setImageDrawable(mImageDrawables[0]);
  addView(iv);
  this.setOnClickListener(new OnClickListener() {
   @Override
   public void onClick(View v) {
    for(int i=0;i<10;i++) {
     addGivePraiseImg(count);
     count++;
     if (count == 4) count = 0;
    }
   }
  });
 }

 //点击图片是添加imageview到布局中,并添加动画
 private void addGivePraiseImg(int count) {
  final ImageView givepraiseImg = new ImageView(getContext());
  givepraiseImg.setLayoutParams(layoutParams);
  givepraiseImg.setImageDrawable(mImageDrawables[count]);
  addView(givepraiseImg);
  addAnimator(givepraiseImg);//添加动画效果,动画分两部分,第一部分是产生图片时缩放和透明度,第二部是移动图片再进行透明度变化
 }

 private void addAnimator(final ImageView imageView) {
  //点击的时候,让图片经过放大,缩放效果,之后再开始沿着贝塞尔曲线的轨迹移动
  ObjectAnimator alpha = ObjectAnimator.ofFloat(imageView, "alpha", 0.3f, 1f);
  ObjectAnimator scaleX = ObjectAnimator.ofFloat(imageView, "scaleX", 0.2f, 1f);
  ObjectAnimator scaleY = ObjectAnimator.ofFloat(imageView, "scaleY", 0.2f, 1f);
  AnimatorSet set = new AnimatorSet();
  set.setDuration(100);
  set.playTogether(alpha, scaleX, scaleY);
  set.setTarget(imageView);
  set.addListener(new Animator.AnimatorListener() {
   @Override
   public void onAnimationStart(Animator animation) {

   }

   @Override
   public void onAnimationEnd(Animator animation) {
    //设置贝塞尔曲线移动效果
    ValueAnimator va = getBzierAnimator(imageView);//第二部分动画
    va.start();
   }

   @Override
   public void onAnimationCancel(Animator animation) {

   }

   @Override
   public void onAnimationRepeat(Animator animation) {

   }
  });
  set.start();
 }

 //初始化贝塞尔曲线的4个点
 private void initPointF() {
  mPointF0 = new PointF(mScreenWidth - 60 - 50, mScreenHeight - 60 - 50);//起点是初始化时的点
  mPointF1 = new PointF(mRandom.nextInt(mScreenWidth), mRandom.nextInt((int) mPointF0.y));//第一个控制点必须要在起始点的上方
  mPointF2 = new PointF(mRandom.nextInt(mScreenWidth), mRandom.nextInt((int) mPointF1.y));//第二个控制点必须在第一个点的上方
  mPointF3 = new PointF(mRandom.nextInt(mScreenWidth), -50);//终点在屏幕的最顶部0-图片的高度
 }


 /**
  * 自定义估值器计算图片移动的轨迹
  * 计算公式参考贝塞尔曲线3阶计算公式
  * 自定义估值器的方法可百度搜索
  * 其中估值器定义返回的结果为PointF
  */
 public class BezierEvaluator implements TypeEvaluator<PointF> {
  private PointF pointF1, pointF2;

  public BezierEvaluator(PointF p1, PointF p2) {
   this.pointF1 = p1;
   this.pointF2 = p2;
  }

  @Override
  public PointF evaluate(float t, PointF p0, PointF p3) {
   PointF point = new PointF();
   point.x = p0.x * (1 - t) * (1 - t) * (1 - t) //
     + 3 * pointF1.x * t * (1 - t) * (1 - t)//
     + 3 * pointF2.x * t * t * (1 - t)//
     + p3.x * t * t * t;//

   point.y = p0.y * (1 - t) * (1 - t) * (1 - t) //
     + 3 * pointF1.y * t * (1 - t) * (1 - t)//
     + 3 * pointF2.y * t * t * (1 - t)//
     + p3.y * t * t * t;//
   return point;
  }
 }

 private ValueAnimator getValueAnimator(final ImageView imageView) {
  initPointF();
  BezierEvaluator bezierEvaluator = new BezierEvaluator(mPointF1, mPointF2);
  ValueAnimator valueAnimator = ValueAnimator.ofObject(bezierEvaluator, mPointF0, mPointF3);
  valueAnimator.setDuration(3000);
  valueAnimator.setTarget(imageView);
  valueAnimator.addUpdateListener(new ValueAnimator.AnimatorUpdateListener() {
   @Override
   public void onAnimationUpdate(ValueAnimator animation) {
    //改变imageview位置实现移动效果
    PointF point = (PointF) animation.getAnimatedValue();
    imageView.setX(point.x);
    imageView.setY(point.y);
    imageView.setAlpha(1 - animation.getAnimatedFraction());
    //动画结束移除imageview
    if (animation.getAnimatedFraction() >= 1) {
     removeView(imageView);
    }
   }
  });
  return valueAnimator;
 }

 /**
  * 贝塞尔动画
  * */
 private ValueAnimator getBzierAnimator(final ImageView iv) {
  // TODO Auto-generated method stub
  PointF[] PointFs = getPointFs(iv); // 4个点的坐标
  BezierEvaluator evaluator = new BezierEvaluator(PointFs[1], PointFs[2]);
  ValueAnimator valueAnim = ValueAnimator.ofObject(evaluator, PointFs[0], PointFs[3]);
  valueAnim.addUpdateListener(new ValueAnimator.AnimatorUpdateListener() {

   @Override
   public void onAnimationUpdate(ValueAnimator animation) {
    // TODO Auto-generated method stub
    PointF p = (PointF) animation.getAnimatedValue();
    iv.setX(p.x);
    iv.setY(p.y);
    iv.setAlpha(1- animation.getAnimatedFraction()); // 透明度
    //动画结束移除imageview
    if (animation.getAnimatedFraction() >= 1) {
     removeView(iv);
    }
   }
  });
  valueAnim.setTarget(iv);
  valueAnim.setDuration(3000);
  valueAnim.setInterpolator(interpolators[new Random().nextInt(4)]);
  return valueAnim;
 }

 private PointF[] getPointFs(ImageView iv) {
  // TODO Auto-generated method stub
  PointF[] PointFs = new PointF[4];
  PointFs[0] = new PointF(); // p0
  PointFs[0].x = (mScreenWidth- layoutParams.width)/ 2;
  PointFs[0].y = mScreenHeight - layoutParams.height;

  PointFs[1] = new PointF(); // p1
  PointFs[1].x = new Random().nextInt(mScreenWidth);
  PointFs[1].y = new Random().nextInt(mScreenHeight /2) + mScreenHeight / 2 + layoutParams.height;

  PointFs[2] = new PointF(); // p2
  PointFs[2].x = new Random().nextInt(mScreenWidth);
  PointFs[2].y = new Random().nextInt(mScreenHeight /2);

  PointFs[3] = new PointF(); // p3
  PointFs[3].x = new Random().nextInt(mScreenWidth);
  PointFs[3].y = 0;
  return PointFs;
 }
}
2.givepraise_layout.xml
<?xml version="1.0" encoding="utf-8"?>
<RelativeLayout xmlns:android="http://schemas.android.com/apk/res/android"
 android:layout_width="match_parent"
 android:layout_height="match_parent"
 android:background="@android:color/darker_gray">
 <com.xinrui.ndkapp.view.GivePraiseView
  android:layout_width="match_parent"
  android:layout_height="match_parent"/>
 <!--<com.xinrui.ndkapp.view.LoveLayout-->
  <!--android:layout_width="match_parent"-->
  <!--android:layout_height="match_parent"/>-->
</RelativeLayout>
3.Activity 部分代码
import android.app.Activity;
import android.os.Bundle;

public class GivePraiseActivity extends Activity {
 @Override
 protected void onCreate(Bundle savedInstanceState) {
  super.onCreate(savedInstanceState);
  setContentView(R.layout.givepraise_layout);
 }
}
4.估值器的运算
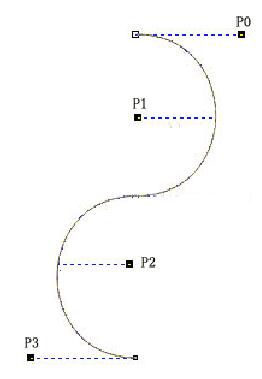
p0坐标:x坐标((布局的宽-心形图片宽)除以2),y坐标(布局的高 -心形图片高),这样获得的是顶部部水平中心点的坐标。
p1坐标:x坐标(横坐标中的随机位置),y坐标(布局一半的高度 加上 0到一半高度范围内的随机坐标+心形的高度的一半)。这样取到的横坐标是在布局宽度之内的随机坐标,纵坐标为整个路径高度中部以上的随机坐标。
p2坐标:与p1类似,横坐标是在布局宽度之内的随机坐标,纵坐标为整个路径高度中部以下的随机坐标。
p3坐标:控件底部中心点
知道4个坐标了,那么就可以开始计算路径
以上就是本文的全部内容,希望对大家的学习有所帮助,也希望大家多多支持自学编程网。

- 本文固定链接: https://zxbcw.cn/post/192071/
- 转载请注明:必须在正文中标注并保留原文链接
- QQ群: PHP高手阵营官方总群(344148542)
- QQ群: Yii2.0开发(304864863)