概述
分布式系统中,有一些需要使用全局唯一ID的场景,这种时候为了防止ID冲突可以使用36位的UUID,但是UUID有一些缺点,首先他相对比较长,另外UUID一般是无序的。
有些时候我们希望能使用一种简单一些的ID,并且希望ID能够按照时间有序生成。
而twitter的snowflake解决了这种需求,最初Twitter把存储系统从MySQL迁移到Cassandra,因为Cassandra没有顺序ID生成机制,所以开发了这样一套全局唯一ID生成服务。
结构
snowflake的结构如下(每部分用-分开):
0 - 0000000000 0000000000 0000000000 0000000000 0 - 00000 - 00000 - 000000000000
第一位为未使用,接下来的41位为毫秒级时间(41位的长度可以使用69年),然后是5位datacenterId和5位workerId(10位的长度最多支持部署1024个节点) ,最后12位是毫秒内的计数(12位的计数顺序号支持每个节点每毫秒产生4096个ID序号)
一共加起来刚好64位,为一个Long型。(转换成字符串后长度最多19)
snowflake生成的ID整体上按照时间自增排序,并且整个分布式系统内不会产生ID碰撞(由datacenter和workerId作区分),并且效率较高。经测试snowflake每秒能够产生26万个ID。
源码
/**
 * Twitter_Snowflake<br>
 * SnowFlake的结构如下(每部分用-分开):<br>
 * 0 - 0000000000 0000000000 0000000000 0000000000 0 - 00000 - 00000 - 000000000000 <br>
 * 1位标识,由于long基本类型在Java中是带符号的,最高位是符号位,正数是0,负数是1,所以id一般是正数,最高位是0<br>
 * 41位时间截(毫秒级),注意,41位时间截不是存储当前时间的时间截,而是存储时间截的差值(当前时间截 - 开始时间截)
 * 得到的值),这里的的开始时间截,一般是我们的id生成器开始使用的时间,由我们程序来指定的(如下下面程序IdWorker类的startTime属性)。41位的时间截,可以使用69年,年T = (1L << 41) / (1000L * 60 * 60 * 24 * 365) = 69<br>
 * 10位的数据机器位,可以部署在1024个节点,包括5位datacenterId和5位workerId<br>
 * 12位序列,毫秒内的计数,12位的计数顺序号支持每个节点每毫秒(同一机器,同一时间截)产生4096个ID序号<br>
 * 加起来刚好64位,为一个Long型。<br>
 * SnowFlake的优点是,整体上按照时间自增排序,并且整个分布式系统内不会产生ID碰撞(由数据中心ID和机器ID作区分),并且效率较高,经测试,SnowFlake每秒能够产生26万ID左右。
 */
public class SnowflakeIdWorker {

 // ==============================Fields===========================================
 /** 开始时间截 (2015-01-01) */
 private final long twepoch = 1420041600000L;

 /** 机器id所占的位数 */
 private final long workerIdBits = 5L;

 /** 数据标识id所占的位数 */
 private final long datacenterIdBits = 5L;

 /** 支持的最大机器id,结果是31 (这个移位算法可以很快的计算出几位二进制数所能表示的最大十进制数) */
 private final long maxWorkerId = -1L ^ (-1L << workerIdBits);

 /** 支持的最大数据标识id,结果是31 */
 private final long maxDatacenterId = -1L ^ (-1L << datacenterIdBits);

 /** 序列在id中占的位数 */
 private final long sequenceBits = 12L;

 /** 机器ID向左移12位 */
 private final long workerIdShift = sequenceBits;

 /** 数据标识id向左移17位(12+5) */
 private final long datacenterIdShift = sequenceBits + workerIdBits;

 /** 时间截向左移22位(5+5+12) */
 private final long timestampLeftShift = sequenceBits + workerIdBits + datacenterIdBits;

 /** 生成序列的掩码,这里为4095 (0b111111111111=0xfff=4095) */
 private final long sequenceMask = -1L ^ (-1L << sequenceBits);

 /** 工作机器ID(0~31) */
 private long workerId;

 /** 数据中心ID(0~31) */
 private long datacenterId;

 /** 毫秒内序列(0~4095) */
 private long sequence = 0L;

 /** 上次生成ID的时间截 */
 private long lastTimestamp = -1L;

 //==============================Constructors=====================================
 /**
  * 构造函数
  * @param workerId 工作ID (0~31)
  * @param datacenterId 数据中心ID (0~31)
  */
 public SnowflakeIdWorker(long workerId, long datacenterId) {
  if (workerId > maxWorkerId || workerId < 0) {
   throw new IllegalArgumentException(String.format("worker Id can't be greater than %d or less than 0", maxWorkerId));
  }
  if (datacenterId > maxDatacenterId || datacenterId < 0) {
   throw new IllegalArgumentException(String.format("datacenter Id can't be greater than %d or less than 0", maxDatacenterId));
  }
  this.workerId = workerId;
  this.datacenterId = datacenterId;
 }

 // ==============================Methods==========================================
 /**
  * 获得下一个ID (该方法是线程安全的)
  * @return SnowflakeId
  */
 public synchronized long nextId() {
  long timestamp = timeGen();

  //如果当前时间小于上一次ID生成的时间戳,说明系统时钟回退过这个时候应当抛出异常
  if (timestamp < lastTimestamp) {
   throw new RuntimeException(
     String.format("Clock moved backwards. Refusing to generate id for %d milliseconds", lastTimestamp - timestamp));
  }

  //如果是同一时间生成的,则进行毫秒内序列
  if (lastTimestamp == timestamp) {
   sequence = (sequence + 1) & sequenceMask;
   //毫秒内序列溢出
   if (sequence == 0) {
    //阻塞到下一个毫秒,获得新的时间戳
    timestamp = tilNextMillis(lastTimestamp);
   }
  }
  //时间戳改变,毫秒内序列重置
  else {
   sequence = 0L;
  }

  //上次生成ID的时间截
  lastTimestamp = timestamp;

  //移位并通过或运算拼到一起组成64位的ID
  return ((timestamp - twepoch) << timestampLeftShift) //
    | (datacenterId << datacenterIdShift) //
    | (workerId << workerIdShift) //
    | sequence;
 }

 /**
  * 阻塞到下一个毫秒,直到获得新的时间戳
  * @param lastTimestamp 上次生成ID的时间截
  * @return 当前时间戳
  */
 protected long tilNextMillis(long lastTimestamp) {
  long timestamp = timeGen();
  while (timestamp <= lastTimestamp) {
   timestamp = timeGen();
  }
  return timestamp;
 }

 /**
  * 返回以毫秒为单位的当前时间
  * @return 当前时间(毫秒)
  */
 protected long timeGen() {
  return System.currentTimeMillis();
 }

 //==============================Test=============================================
 /** 测试 */
 public static void main(String[] args) {
  SnowflakeIdWorker idWorker = new SnowflakeIdWorker(0, 0);
  for (int i = 0; i < 1000; i++) {
   long id = idWorker.nextId();
   System.out.println(Long.toBinaryString(id));
   System.out.println(id);
  }
 }
}
Mybatis-Plus使用雪花id
注意:以下配置是在SpringBoot2.1.4版本以及在mybatis已经可以使用的基础上做的升级配置!
1.引入Mybatis-Plus依赖(3.1.1版本目前有些问题,建议使用3.1.0版本)
<dependency>
   <groupId>com.baomidou</groupId>
   <artifactId>mybatis-plus-boot-starter</artifactId>
   <version>3.1.0</version>
	</dependency>
2.在application.yml配置文件中增加如下配置项
mybatis-plus:
 #mapper-locations: classpath:mybatis/**/*Mapper.xml
 # 在classpath前添加星号可以使项目热加载成功
 mapper-locations: classpath*:mybatis/**/*Mapper.xml
 #实体扫描,多个package用逗号或者分号分隔
 typeAliasesPackage: com.nis.project
 global-config:
 #主键类型 0:"数据库ID自增", 1:"用户输入ID",2:"全局唯一ID (数字类型唯一ID)", 3:"全局唯一ID UUID";
 id-type: 3
 #机器 ID 部分(影响雪花ID)
 workerId: 1
 #数据标识 ID 部分(影响雪花ID)(workerId 和 datacenterId 一起配置才能重新初始化 Sequence)
 datacenterId: 18
 #字段策略 0:"忽略判断",1:"非 NULL 判断"),2:"非空判断"
 field-strategy: 2
 #驼峰下划线转换
 db-column-underline: true
 #刷新mapper 调试神器
 refresh-mapper: true
 #数据库大写下划线转换
 #capital-mode: true
 #序列接口实现类配置
 #key-generator: com.baomidou.springboot.xxx
 #逻辑删除配置(下面3个配置)
 logic-delete-value: 0
 logic-not-delete-value: 1
 #自定义SQL注入器
 #sql-injector: com.baomidou.mybatisplus.mapper.LogicSqlInjector
 #自定义填充策略接口实现
 #meta-object-handler: com.baomidou.springboot.xxx
 configuration:
 map-underscore-to-camel-case: true
 cache-enabled: false
 # 这个配置会将执行的sql打印出来,在开发或测试的时候可以用
 log-impl: org.apache.ibatis.logging.stdout.StdOutImpl
3.原有的mapper接口增加继承BaseMapper接口
public interface UserMapper extends BaseMapper<User>
4.实体类增加注解
在User实体类上添加@TableId的注解用来标识实体类的主键,以便插件在生成主键雪花Id的时候找到哪个是主键。
@TableId
 @JsonFormat(shape = JsonFormat.Shape.STRING)
 private Long userId;
5.分页配置
5.1 添加mybatis的一个配置类(不添加,则分页数据中的page参数会异常)
package com.nis.framework.config;

import com.baomidou.mybatisplus.extension.plugins.PaginationInterceptor;
import org.mybatis.spring.annotation.MapperScan;
import org.springframework.context.annotation.Bean;
import org.springframework.context.annotation.Configuration;
import org.springframework.transaction.annotation.EnableTransactionManagement;

/**
 * Mybatis-Plus插件配置类
 *
 * @author lwj
 */
@EnableTransactionManagement
@Configuration
@MapperScan({"com.nis.project.*.mapper","com.nis.project.*.*.mapper"})
public class MybatisPlusConfig {

 /**
  * 分页插件
  */
 @Bean
 public PaginationInterceptor paginationInterceptor() {
  return new PaginationInterceptor();
 }
}
5.2 java代码示例
Controller类中添加page分页对象。
@GetMapping("/list")
 @ResponseBody
 public Msg list(User user, HttpServletRequest request) {
  Map<String, Object> params = MapDataUtil.convertDataMap(request);
  user.getParams().putAll(params);
  Page<User> page = startMybatisPlusPage(user);
  IPage<User> userIPage = userService.selectUserList(page, user);
  return Msg.success(userIPage);
 }
ServiceImpl中的具体方法
@Override
 @DataScope(tableAlias = "b")
 public IPage<User> selectUserList(Page<User> page, User user) {
  return UserMapper.selectUserList(page, user);
 }
mapper接口中的代码
IPage<User> selectUserList(@Param("pg") Page<User> page, @Param("ps") User user);
mybaits的xml文件中写的sql代码
 <select id="selectUserList" resultType="com.nis.project.system.user.domain.User" parameterType="com.nis.project.system.user.domain.User">
  select
  a.user_id,
  a.dept_id,
  a.login_name,
  a.user_name,
  a.email,
  a.phone_number,
  a.sex,
  a.avatar,
  a.status,
  a.login_ip,
  a.login_date,
  a.order_num,
  b.dept_name
  from sys_user a
  left join sys_dept b on b.dept_id = a.dept_id
  where 1=1
  <if test="ps.loginName != null and ps.loginName != ''">and a.login_name like concat('%', #{ps.loginName}, '%')</if>
  <if test="ps.userName != null and ps.userName != ''">and a.user_name like concat('%', #{ps.userName}, '%')</if>
  <if test="ps.deptId != null and ps.deptId != ''">and b.dept_id = #{ps.deptId}</if>
  <if test="ps.email != null and ps.email != ''">and a.email = #{ps.email}</if>
  <if test="ps.phoneNumber != null and ps.phoneNumber != ''">and a.phone_number like concat('%', #{ps.phoneNumber}, '%')</if>
  <if test="ps.params.deptIds != null and ps.params.deptIds != ''">and find_in_set(a.dept_id,#{ps.params.deptIds})</if>
  <if test="ps.status != null and ps.status != ''">and a.status = #{ps.status}</if>
  <!-- 数据范围过滤 -->
  ${ps.params.dataScope}
  order by b.ancestors,a.order_num
 </select>
生成雪花ID以及解析雪花ID的机器ID和数据中心ID
1.生成雪花ID
这里不再阐述,直接贴上生成的一个雪花ID;1146667501642584065
2.解析雪花ID的机器ID和数据中心ID
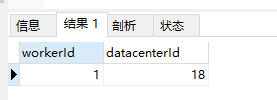
SELECT (1146667501642584065>>12)&0x1f as workerId,(1146667501642584065>>17)&0x1f as datacenterId;
结果图:


到此这篇关于Mybatis-Plus雪花id的使用以及解析机器ID和数据标识ID实现的文章就介绍到这了,更多相关Mybatis-Plus雪花id内容请搜索自学编程网以前的文章或继续浏览下面的相关文章希望大家以后多多支持自学编程网!

- 本文固定链接: https://zxbcw.cn/post/194163/
- 转载请注明:必须在正文中标注并保留原文链接
- QQ群: PHP高手阵营官方总群(344148542)
- QQ群: Yii2.0开发(304864863)
