本文实例为大家分享了Android FlowLayout流式布局的具体代码,供大家参考,具体内容如下
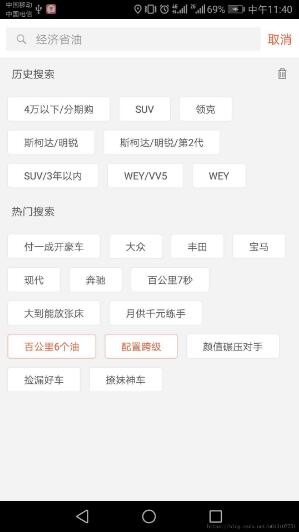
最近使用APP的时候经常看到有

这种流式布局 ,今天我就跟大家一起来动手撸一个这种自定义控件.
首先说一下自定义控件的流程:
自定义控件一般要么继承View要么继承ViewGroup
View的自定义流程:
继承一个View-->重写onMeasure方法-->重写onDraw方法-->定义自定义属性-->处理手势操作
ViewGroup的自定义流程:
继承一个ViewGroup-->重写onMeasure方法-->重写onLayout-->重写onDraw方法->定义自定义属性-->处理手势操作
我们可以看到自定义View和自定义ViewGroup略微有些不同,自定义ViewGroup多了个onlayout方法,那么这些方法都有什么作用呢?这里由于篇幅的问题不做过多的描述,简单的说
onMeasure:用来计算,计算自身显示在页面上的大小
onLayout:用来计算子View摆放的位置,因为View已经是最小单元了,所以没有字View,所以没有onLayout方法
onDraw:用来绘制你想展示的东西
定义自定义属性就是暴露一些属性给外部调用
好了,了解了自定义View的基本自定义流程,我们可以知道我们应该需要自定义一个ViewGroup就可以满足该需求.
首先自定义一个View命名为FlowLayout继承ViewGroup
public class FlowLayout extends ViewGroup {
 public FlowLayout(Context context) {
 this(context,null);
 }

 public FlowLayout(Context context, AttributeSet attrs) {
 this(context, attrs,0);
 }

 public FlowLayout(Context context, AttributeSet attrs, int defStyleAttr) {
 super(context, attrs, defStyleAttr);
 }

 @Override
 protected void onLayout(boolean changed, int l, int t, int r, int b) {
 int count = getChildCount();
 for (int i = 0; i < count; i++) {
 getChildAt(i).layout(l,t,r,b);
 }
 }
}
可以看到onLayout是必须重写的,不然系统不知道你这个ViewGroup的子View摆放的位置.
然后XML中引用
<test.hxy.com.testflowlayout.FlowLayout xmlns:android="http://schemas.android.com/apk/res/android"
 xmlns:app="http://schemas.android.com/apk/res-auto"
 xmlns:tools="http://schemas.android.com/tools"
 android:id="@+id/mFlowLayout"
 android:layout_margin="10dp"
 android:layout_width="match_parent"
 android:layout_height="match_parent" />
Activity中设置数据
protected void onCreate(Bundle savedInstanceState) {
 super.onCreate(savedInstanceState);
 setContentView(R.layout.activity_main);
 FlowLayout mFlowLayout = (FlowLayout) findViewById(R.id.mFlowLayout);
 List<String> list = new ArrayList<>();
 list.add("java");
 list.add("javaEE");
 list.add("javaME");
 list.add("c");
 list.add("php");
 list.add("ios");
 list.add("c++");
 list.add("c#");
 list.add("Android");
 for (int i = 0; i < list.size(); i++) {
 View inflate = LayoutInflater.from(this).inflate(R.layout.item_personal_flow_labels, null);
 TextView label = (TextView) inflate.findViewById(R.id.tv_label_name);
 label.setText(list.get(i));
 mFlowLayout.addView(inflate);
 }
 }
运行一下:

咦!!!这时候发现我们添加的子View竟然没添加进去?这是为什么呢?
这时候就不得不说一下onMeasure方法了,我们重写一下onMeasure然后在看一下:
@Override
 protected void onMeasure(int widthMeasureSpec, int heightMeasureSpec) {
 int totalWidth = MeasureSpec.getSize(widthMeasureSpec);
 int totalHeight = MeasureSpec.getSize(heightMeasureSpec);

 int sizeWidth = MeasureSpec.getSize(widthMeasureSpec) - getPaddingRight() - getPaddingLeft();
 int sizeHeight = MeasureSpec.getSize(heightMeasureSpec) - getPaddingTop() - getPaddingBottom();

 int modeWidth = MeasureSpec.getMode(widthMeasureSpec);
 int modeHeight = MeasureSpec.getMode(heightMeasureSpec);
 final int count = getChildCount();
 for (int i = 0; i < count; i++) {
 final View child = getChildAt(i);
 int childWidthMeasureSpec = MeasureSpec.makeMeasureSpec(sizeWidth, modeWidth == MeasureSpec.EXACTLY ? MeasureSpec.AT_MOST : modeWidth);
 int childHeightMeasureSpec = MeasureSpec.makeMeasureSpec(sizeHeight, modeHeight == MeasureSpec.EXACTLY ? MeasureSpec.AT_MOST : modeHeight);
 // 测量child
 child.measure(childWidthMeasureSpec, childHeightMeasureSpec);
 }
 setMeasuredDimension(totalWidth, resolveSize(totalHeight, heightMeasureSpec));
 }
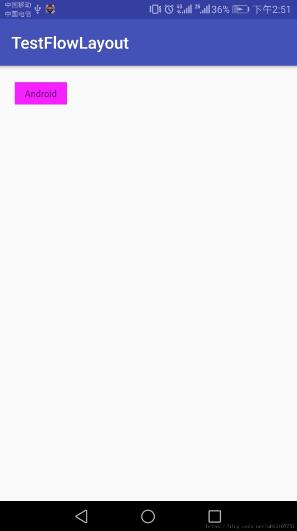
在运行一下:

我们可以看到确实是有View显示出来了,可是为什么只有一个呢?
其实这里显示的不是只有一个,而是所有的子View都盖在一起了,所以看起来就像只有一个View,这是因为我们的onLayout里面getChildAt(i).layout(l,t,r,b);所有的子View摆放的位置都是一样的,所以这边要注意一下,自定义ViewGroup的时候一般onLayout和onMeasure都必须重写,因为这两个方法一个是计算子View的大小,一个是计算子View摆放的位置,缺少一个子View都会显示不出来.
接下来我们在改写一下onLayout方法让子View都显示出来
@Override
 protected void onLayout(boolean changed, int l, int t, int r, int b) {
 int count = getChildCount();
 for (int i = 0; i < count; i++) {
 getChildAt(i).layout(l,t,r,b);
 l+=getChildAt(i).getMeasuredWidth();
 }
 }
这样子View就不会重叠在一起了,可是又发现一个问题,就是子View都在排在同一行了,我们怎么才能让子View计算排满一行就自动换行呢?
接下来我们定义一个行的类Line来保存一行的子View:
class Line{
 int mWidth = 0;// 该行中所有的子View累加的宽度
 int mHeight = 0;// 该行中所有的子View中高度的那个子View的高度
 List<View> views = new ArrayList<View>();

 public void addView(View view) {// 往该行中添加一个
 views.add(view);
 mWidth += view.getMeasuredWidth();
 int childHeight = view.getMeasuredHeight();
 mHeight = mHeight < childHeight ? childHeight : mHeight;//高度等于一行中最高的View
 }
 //摆放行中子View的位置
 public void Layout(int l, int t){

 }

 }
这样我们就可以让FlowLayout专门对Line进行摆放,然后Line专门对本行的View进行摆放
接下来针对Line我们重新写一下onMeasure和onLayout方法
@Override
protected void onMeasure(int widthMeasureSpec, int heightMeasureSpec) {
 int totalWidth = MeasureSpec.getSize(widthMeasureSpec);
 int sizeWidth = MeasureSpec.getSize(widthMeasureSpec) - getPaddingRight() - getPaddingLeft();
 int sizeHeight = MeasureSpec.getSize(heightMeasureSpec) - getPaddingTop() - getPaddingBottom();
 restoreLine();// 还原数据,以便重新记录
 int modeWidth = MeasureSpec.getMode(widthMeasureSpec);
 int modeHeight = MeasureSpec.getMode(heightMeasureSpec);
 final int count = getChildCount();
 for (int i = 0; i < count; i++) {
 final View child = getChildAt(i);
 if (child.getVisibility() == View.GONE) {
 break;
 }
 int childWidthMeasureSpec = MeasureSpec.makeMeasureSpec(sizeWidth, modeWidth == MeasureSpec.EXACTLY ? MeasureSpec.AT_MOST : modeWidth);
 int childHeightMeasureSpec = MeasureSpec.makeMeasureSpec(sizeHeight, modeHeight == MeasureSpec.EXACTLY ? MeasureSpec.AT_MOST : modeHeight);
 // 测量child
 child.measure(childWidthMeasureSpec, childHeightMeasureSpec);
 if (mLine == null) {
 mLine = new Line();
 }
 int measuredWidth = child.getMeasuredWidth();
 mUsedWidth += measuredWidth;// 增加使用的宽度
 if (mUsedWidth < sizeWidth) { //当本行的使用宽度小于行总宽度的时候直接加进line里面
 mLine.addView(child);
 mUsedWidth += mHorizontalSpacing;// 加上间隔
 if (mUsedWidth >= sizeWidth){
 if (!newLine()){
 break;
 }
 }
 }else {// 使用宽度大于总宽度。需要换行
 if (mLine.getViewCount() == 0){//如果这行一个View也没有超过也得加进去,保证一行最少有一个View
 mLine.addView(child);
 if (!newLine()) {// 换行
 break;
 }
 }else {
 if (!newLine()) {// 换行
 break;
 }
 mLine.addView(child);
 mUsedWidth += measuredWidth + mHorizontalSpacing;
 }
 }
 }
 if (mLine !=null && mLine.getViewCount() > 0 && !mLines.contains(mLine)){
 mLines.add(mLine);
 }
 int totalHeight = 0;
 final int linesCount = mLines.size();
 for (int i = 0; i < linesCount; i++) {// 加上所有行的高度
 totalHeight += mLines.get(i).mHeight;
 }
 totalHeight += mVerticalSpacing * (linesCount - 1);// 加上所有间隔的高度
 totalHeight += getPaddingTop() + getPaddingBottom();// 加上padding
 // 设置布局的宽高,宽度直接采用父view传递过来的最大宽度,而不用考虑子view是否填满宽度,因为该布局的特性就是填满一行后,再换行
 // 高度根据设置的模式来决定采用所有子View的高度之和还是采用父view传递过来的高度
 setMeasuredDimension(totalWidth, resolveSize(totalHeight, heightMeasureSpec));
 }
可能有点长,不过注释都写得比较清楚了,简单的说就是遍历计算子View的宽高,动态加入行中,如果View的宽大于剩余的行宽就在取一行放下,接下来我们在重写一些onLayout:
@Override
protected void onLayout(boolean changed, int l, int t, int r, int b) {
 if (!mNeedLayout && changed){
 mNeedLayout = false;
 int left = getPaddingLeft();//获取最初的左上点
 int top = getPaddingTop();
 int count = mLines.size();
 for (int i = 0; i < count; i++) {
 Line line = mLines.get(i);
 line.LayoutView(left,top);//摆放每一行中子View的位置
 top +=line.mHeight+ mVerticalSpacing;//为下一行的top赋值
 }
 }
 }
由于我们把子View的摆放都放在Line中了,所以onLayout比较简单,接下来我们看一下Line的LayoutView方法:
public void LayoutView(int l, int t) {
 int left = l;
 int top = t;
 int count = getViewCount();
 int layoutWidth = getMeasuredWidth() - getPaddingLeft() - getPaddingRight();//行的总宽度
 //剩余的宽度,是除了View和间隙的剩余空间
 int surplusWidth = layoutWidth - mWidth - mHorizontalSpacing * (count - 1);
 if (surplusWidth >= 0) {
 for (int i = 0; i < count; i++) {
 final View view = views.get(i);
 int childWidth = view.getMeasuredWidth();
 int childHeight = view.getMeasuredHeight();
 //计算出每个View的顶点,是由最高的View和该View高度的差值除以2
 int topOffset = (int) ((mHeight - childHeight) / 2.0 + 0.5);
 if (topOffset < 0) {
 topOffset = 0;
 }
 view.layout(left,top+topOffset,left+childWidth,top + topOffset + childHeight);
 left += childWidth + mVerticalSpacing;//为下一个View的left赋值
 }
 }
 }
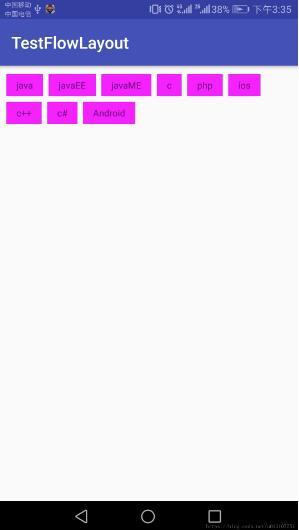
也是比较简单,其实就是根据宽度动态计算而已,我们看看效果吧

可以了吧,看起来是大功告成了,可是我们发现左边和右边的间距好像不相等,能不能让子View居中显示呢?答案当然是可以的,接下来我们提供个方法,让外部可以设置里面子View的对齐方式:
public interface AlienState {
 int RIGHT = 0;
 int LEFT = 1;
 int CENTER = 2;

 @IntDef(value = {RIGHT, LEFT, CENTER})
 @interface Val {}
 }
 public void setAlignByCenter(@AlienState.Val int isAlignByCenter) {
 this.isAlignByCenter = isAlignByCenter;
 requestLayoutInner();
 }

 private void requestLayoutInner() {
 new Handler(Looper.getMainLooper()).post(new Runnable() {
 @Override
 public void run() {
 requestLayout();
 }
 });
 }
提供一个setAlignByCenter的方法,分别有左对齐右对齐和居中对齐,然后我们在Line的layoutView中改写一下:
//布局View
 if (i == 0) {
 switch (isAlignByCenter) {
 case AlienState.CENTER:
 left += surplusWidth / 2;
 break;
 case AlienState.RIGHT:
 left += surplusWidth;
 break;
 default:
 left = 0;
 break;
 }
}
在layoutView中把剩余的宽度按照对齐的类型平分一下就得到我们要的效果了

好了,这样就达到我们要的效果了.可是在回头来看一下我们MainActivity里面的写法会不会感觉很撮呢?对于习惯了ListView,RecyclerView的Adapter写法的我们有没有办法改一下,像写adapter一样来写布局呢?聪明的程序猿是没有什么办不到的,接下来我们就来改写一下:
public void setAdapter(List<?> list, int res, ItemView mItemView) {
 if (list == null) {
 return;
 }
 removeAllViews();
 int layoutPadding = dipToPx(getContext(), 8);
 setHorizontalSpacing(layoutPadding);
 setVerticalSpacing(layoutPadding);
 int size = list.size();
 for (int i = 0; i < size; i++) {
 Object item = list.get(i);
 View inflate = LayoutInflater.from(getContext()).inflate(res, null);
 mItemView.getCover(item, new ViewHolder(inflate), inflate, i);
 addView(inflate);
 }
 }

 public abstract static class ItemView<T> {
 abstract void getCover(T item, ViewHolder holder, View inflate, int position);
 }

 class ViewHolder {
 View mConvertView;

 public ViewHolder(View mConvertView) {
 this.mConvertView = mConvertView;
 mViews = new SparseArray<>();
 }

 public <T extends View> T getView(int viewId) {
 View view = mViews.get(viewId);
 if (view == null) {
 view = mConvertView.findViewById(viewId);
 mViews.put(viewId, view);
 }
 try {
 return (T) view;
 } catch (ClassCastException e) {
 e.printStackTrace();
 }
 return null;
 }

 public void setText(int viewId, String text) {
 TextView view = getView(viewId);
 view.setText(text);
 }
 }
然后我们在MainActivity中在使用一下:
protected void onCreate(Bundle savedInstanceState) {
 super.onCreate(savedInstanceState);
 setContentView(R.layout.activity_main);
 FlowLayout mFlowLayout = (FlowLayout) findViewById(R.id.mFlowLayout);
 List<String> list = new ArrayList<>();
 list.add("java");
 list.add("javaEE");
 list.add("javaME");
 list.add("c");
 list.add("php");
 list.add("ios");
 list.add("c++");
 list.add("c#");
 list.add("Android");
 mFlowLayout.setAlignByCenter(FlowLayout.AlienState.CENTER);
 mFlowLayout.setAdapter(list, R.layout.item, new FlowLayout.ItemView<String>() {
 @Override
 void getCover(String item, FlowLayout.ViewHolder holder, View inflate, int position) {
 holder.setText(R.id.tv_label_name,item);
 }
 });
 }
怎么样,是不是就根绝在跟使用adapter一样了呢.
Demo已放到github,欢迎大家指点
以上就是本文的全部内容,希望对大家的学习有所帮助,也希望大家多多支持自学编程网。

- 本文固定链接: https://zxbcw.cn/post/196231/
- 转载请注明:必须在正文中标注并保留原文链接
- QQ群: PHP高手阵营官方总群(344148542)
- QQ群: Yii2.0开发(304864863)
