
本文实例为大家分享了Android绘图技巧使用的具体代码,供大家参考,具体内容如下
XML绘图
Bitmap
<?xml version="1.0" encoding="utf-8"?>
<bitmap xmlns:android="http://schemas.android.com/apk/res/android"
 android:src="@drawable/giao"/>
Shape
<?xml version="1.0" encoding="utf-8"?>
<shape xmlns:android="http://schemas.android.com/apk/res/android"
 android:shape="rectangle">
 <gradient
 android:startColor="#FF5DA2FF"
 android:endColor="#805FBBEF"
 android:angle="45"/>
 <padding
 android:bottom="7dp"
 android:top="7dp"
 android:left="7dp"
 android:right="7dp"/>
 <corners android:radius="8dp"/>
</shape>
Layer(实现Photoshop中类似图层的概念)
<?xml version="1.0" encoding="utf-8"?>
<layer-list xmlns:android="http://schemas.android.com/apk/res/android">
 <item android:drawable="@drawable/default_head"/>
 <item android:drawable="@drawable/default_head"
 android:left="10dip"
 android:right="10dip"
 android:top="10dip"
 android:bottom="10dip"/>
 <item android:drawable="@drawable/giao"
 android:left="200dp"
 android:right="200dp"
 android:top="200dp"
 android:bottom="200dp"/>
<!-- 图层效果-->
</layer-list>
Selector(帮助开发者实现静态绘图中的时间反馈)
<?xml version="1.0" encoding="utf-8"?>
<selector xmlns:android="http://schemas.android.com/apk/res/android">
 <item android:state_pressed="true">
 <shape android:shape="rectangle">
  <solid android:color="#33FD0000"/>
  <corners android:radius="5dp"/>
  <padding android:left="10dp"
  android:right="10dp"
  android:top="10dp"
  android:bottom="10dp"/>
 </shape>
 </item>
 <item>
 <shape android:shape="rectangle">
  <solid android:color="#ffffffff"/>
  <corners android:radius="5dp"/>
  <padding android:left="10dp"
  android:right="10dp"
  android:top="10dp"
  android:bottom="10dp"/>
 </shape>
 </item>
<!-- 点击反馈效果-->
</selector>
Android绘图技巧
Canvas(作为绘制图形的直接对象)
Canvas.save();
可以理解为保存画布,作用是将之前的所有已经绘制图像保存起来,让后续的操作就好像在一个新的图层上操作一样
Canvas.restore();
可以理解为Photoshop中的合并图层操作,作用是将save()之后绘制的所有的图像与save()之前的图像进行合并
Canvas.translate();
坐标系的平移
Canvas.rotate();
坐标系的旋转
Layer图层
特别注意的是 saveLayerAlpha()与restore()要同时使用,才能够在canvas 画出多个层次,就是花多少层就要有多少对两个函数!
@Override
 protected void onDraw(Canvas canvas) {
 //super.onDraw(canvas);
 drawLayer(canvas);
 //图层同样是基于栈的结构进行管理的
 @SuppressLint("DrawAllocation")
 Paint paint=new Paint();
 canvas.drawColor(Color.WHITE);
 paint.setColor(Color.BLUE);
 canvas.drawCircle(150,150,100,paint);

 canvas.saveLayerAlpha(0,0,400,400,127);//入栈(创建新图层)
 paint.setColor(Color.RED);
 canvas.drawCircle(200,200,100,paint);
 canvas.restore();//出栈
 }
像素点分析
bitmap.getPixels(pixels,offset,stride,x,y,width,height);
参数含义如下:
- pixels:接受位图颜色值的数组
- offset:写入到pixels[]中的第一个索引值
- stride:pixels[]的行间距
- x:从位图中读取的第一个像素的x坐标值
- y:从位图中读取的第一个像素的y坐标值
- width:每一行中读取的像素宽度
- height:读取的行数
画笔特效处理
PorterDuffXfermode

public class FilletView extends View {
 private Bitmap bitmap,out;
 private Paint paint;
 public FilletView(Context context) {
 super(context);
 inView();
 }

 public FilletView(Context context, @Nullable AttributeSet attrs) {
 super(context, attrs);
 inView();
 }

 public FilletView(Context context, @Nullable AttributeSet attrs, int defStyleAttr) {
 super(context, attrs, defStyleAttr);
 inView();
 }
 private void inView(){
 bitmap= BitmapFactory.decodeResource(getResources(), R.drawable.ask);
 out=Bitmap.createBitmap(bitmap.getWidth(),bitmap.getHeight(),Bitmap.Config.ARGB_8888);
 Canvas canvas=new Canvas(out);
 paint=new Paint();
 paint.setAntiAlias(true);
 canvas.drawRoundRect(0,0,bitmap.getWidth(),bitmap.getHeight(),80,80,paint);
 paint.setXfermode(new PorterDuffXfermode(PorterDuff.Mode.SRC_IN));
 canvas.drawBitmap(bitmap,0,0,paint);
 }

 @Override
 protected void onDraw(Canvas canvas) {
 canvas.drawBitmap(out,0,0,null);

 }
}
Shader
- BitmapShader:位图Shader
- LinearGradient:线性Shader
- RadialGradient:光束Shader
- SweepGradient:梯度Shader
- ComposeShader:混合Shader
private void useBitmapShader(Canvas canvas){
 @SuppressLint("DrawAllocation")
 Bitmap bitmap= BitmapFactory.decodeResource(getResources(), R.drawable.default_head);
 @SuppressLint("DrawAllocation")
 BitmapShader shader=new BitmapShader(bitmap, Shader.TileMode.REPEAT,Shader.TileMode.REPEAT);
 @SuppressLint("DrawAllocation")
 Paint paint=new Paint();
 paint.setShader(shader);
 canvas.drawCircle(500,200,200,paint);
}
- Shader.TileMode.REPEAT:重复——横向、纵向不断重复
- Shader.TileMode.CLAMP:拉伸——拉伸的图片最后的那个像素,不断重复
- Shader.TileMode.MIRROR:镜像——横向不断翻转重复,横向不断翻转重复
PathEffect(各种笔触绘制一个路径)
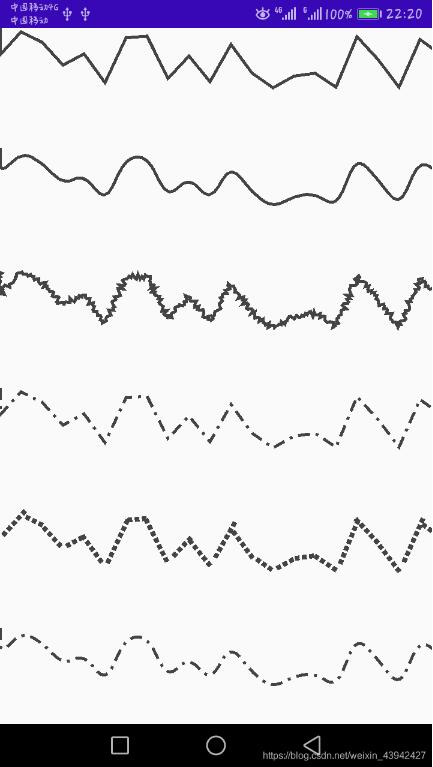
- CornerPathEffect:拐角处变得圆滑
- DiscretePathEffect:线段上会产生许多杂点
- DashPathEffect:绘制虚线
- PathDashPathEffect:比DashPathEffect的功能更加强大,可以设置如方形点的虚线,圆形点的虚线。
- ComposePathEffect:组合任意两种PathEffect路径组合形成新的效果
public class PathEffectView extends View {
 private Paint paint;
 private Path mainPath;
 private PathEffect[] effects;
 public PathEffectView(Context context, @Nullable AttributeSet attrs) {
 super(context, attrs);
 inView();
 }
 private void inView(){
 paint=new Paint();
 paint.setStyle(Paint.Style.STROKE);
 paint.setStrokeWidth(5);
 paint.setColor(Color.DKGRAY);
 mainPath=new Path();
 mainPath.moveTo(0,0);
 for (int i = 0; i <= 30; i++) {
  mainPath.lineTo(i*35, (float) (Math.random()*100));
 }
 effects=new PathEffect[6];
 }

 @SuppressLint("DrawAllocation")
 @Override
 protected void onDraw(Canvas canvas) {
 super.onDraw(canvas);
 effects[0]=null;
 effects[1]=new CornerPathEffect(30);
 effects[2]=new DiscretePathEffect(3,5);
 effects[3]=new DashPathEffect(new float[]{20,10,5,10},0);
 Path path=new Path();
 path.addRect(0,0,8,8,Path.Direction.CCW);
 effects[4]=new PathDashPathEffect(path,12,0,PathDashPathEffect.Style.ROTATE);
 effects[5]=new ComposePathEffect(effects[3],effects[1]);
 for (PathEffect effect : effects) {
  paint.setPathEffect(effect);
  canvas.drawPath(mainPath, paint);
  canvas.translate(0, 200);
 }
 }
}
SurfaceView
SurfaceView与View的区别:
1、View主要适用于主动更新的情况下,而SurfaceView主要适用于被动更新,例如频繁的更新
2、View在主线程中对画面进行更新,而SurfaceView通常会通过一个子线程来进行页面的刷新
3、View在绘图时没有使用双缓冲机制,而SurfaceView在底层机制中就已经实现了双缓冲机制
总结:SurfaceView适合需要频繁刷新,或者刷新时数据处理量比较大
public class SurfaceViewTemplate extends SurfaceView implements SurfaceHolder.Callback ,Runnable{
 //SurfaceHolder
 private SurfaceHolder holder;
 //用于绘画的Canvas
 private Canvas canvas;
 //子线程标志位
 private boolean isDrawing;
 private Paint paint;
 private Path path;
 private int x,y;
 public SurfaceViewTemplate(Context context) {
 super(context);
 inView();
 }

 public SurfaceViewTemplate(Context context, AttributeSet attrs) {
 super(context, attrs);
 inView();
 }

 public SurfaceViewTemplate(Context context, AttributeSet attrs, int defStyleAttr) {
 super(context, attrs, defStyleAttr);
 inView();
 }
 private void inView(){
 holder=getHolder();
 holder.addCallback(this);
 setFocusable(false);//焦点
 setFocusableInTouchMode(true);
 this.setKeepScreenOn(true);
 path=new Path();
 paint=new Paint(Paint.ANTI_ALIAS_FLAG);
 paint.setColor(Color.RED);
 paint.setStyle(Paint.Style.STROKE);
 paint.setStrokeWidth(10);
 paint.setStrokeCap(Paint.Cap.ROUND);
 paint.setStrokeJoin(Paint.Join.ROUND);
 }
 @Override
 public void surfaceCreated(@NonNull SurfaceHolder surfaceHolder) {
 isDrawing=true;
 path.moveTo(0,400);
 new Thread(this).start();
 }

 @Override
 public void surfaceChanged(@NonNull SurfaceHolder surfaceHolder, int i, int i1, int i2) {

 }

 @Override
 public void surfaceDestroyed(@NonNull SurfaceHolder surfaceHolder) {
 isDrawing=false;
 }

 @Override
 public void run() {
 while (isDrawing){
  drawSome();
  x+=1;
  y= (int) (100*Math.sin(x*2*Math.PI/180)+400);
  path.lineTo(x,y);
 }
 }
 private void drawSome(){
 try {
  canvas=holder.lockCanvas();
  //draw something...
  canvas.drawColor(Color.WHITE);
  canvas.drawPath(path,paint);
 } catch (Exception e) {
  e.printStackTrace();
 } finally {
  if (canvas!=null){
  holder.unlockCanvasAndPost(canvas);
  }
 }

 }
}
以上就是本文的全部内容,希望对大家的学习有所帮助,也希望大家多多支持自学编程网。

- 本文固定链接: https://zxbcw.cn/post/196384/
- 转载请注明:必须在正文中标注并保留原文链接
- QQ群: PHP高手阵营官方总群(344148542)
- QQ群: Yii2.0开发(304864863)