Ant Design Pro 官方文档说明 在菜单中使用自定义的 icon
由于 umi 的限制,在 router.config.js 是不能直接只是用组件的,Pro 中暂时支持 使用 ant.design 本身的 icon type,和传入一个 img 的 url。只需要直接在 icon 属性上配置即可,如果是个 url,Pro 会自动处理为一个 img 标签。
如果这样还不能满足需求,可以自定义 getIcon 方法。
如果你想使用 iconfont 的图标,你可以使用ant.desgin的自定义图标.
1. getIcon方法
/* eslint no-useless-escape:0 */
const reg = /(((^https?:(?:\/\/)?)(?:[-;:&=\+\$,\w]+@)?[A-Za-z0-9.-]+(?::\d+)?|(?:www.|[-;:&=\+\$,\w]+@)[A-Za-z0-9.-]+)((?:\/[\+~%\/.\w-_]*)?\??(?:[-\+=&;%@.\w_]*)#?(?:[\w]*))?)$/;
export function isUrl(path) {
 return reg.test(path);
}
import { isUrl } from '../utils/utils';

const getIcon = icon => {
 if (typeof icon === 'string') {
 if (isUrl(icon)) {
 return <Icon component={() => <img src={icon} alt="icon" className={styles.icon} />} />;
 }
 if (icon.startsWith('icon-')) {
 return <IconFont type={icon} />;
 }
 return <Icon type={icon} />;
 }
 return icon;
};
这个getIcon 来自于 AntD Pro 源代码 getIcon 很全面,既可以用 Icon(使用AntD 提供的icon),又可以用 IconFont(使用www.iconfont.cn仓库的icon),还可以用静态资源文件(<img src={....} /> 转换成 icon);
实际项目中很多时候是需要替换成公司设计师设计的icon,因此我将他做了个简单的转换
const MenuIcon = ({imgStyle, imgSrc}) => (
 <Icon
 component={() => (
 <img
 style={{width: '1em', height: '1em', ...imgStyle}}
 src={imgSrc}
 alt="icon"
 />
 )}
 />
);

// example
// imgStyle 是由于UI切图 尺寸经常不够准确 img位置需要微调
const menuData = [
 {
 name: '首页',
 icon: <MenuIcon imgSrc={require('../assets/menu.png')} imgStyle={{marginBottom: 5}} />,
 path: 'home',
 },
]
注意:img width height 设置为 1em ,让它自适应parent组件的大小,实现菜单打开/关闭时,图片的缩放,如果给具体数值则没有缩放效果!!!
2. 使用ant.desgin的自定义图标(使用 svg).
利用 Icon 组件封装一个可复用的自定义图标。可以通过 component 属性传入一个组件来渲染最终的图标,以满足特定的需求。
代码来自于 antd 官方文档 icon 自定义图标
import { Icon } from 'antd';

const HeartSvg = () => (
 <svg width="1em" height="1em" fill="currentColor" viewBox="0 0 1024 1024">
 <path d="M923 283.6c-13.4-31.1-32.6-58.9-56.9-82.8-24.3-23.8-52.5-42.4-84-55.5-32.5-13.5-66.9-20.3-102.4-20.3-49.3 0-97.4 13.5-139.2 39-10 6.1-19.5 12.8-28.5 20.1-9-7.3-18.5-14-28.5-20.1-41.8-25.5-89.9-39-139.2-39-35.5 0-69.9 6.8-102.4 20.3-31.4 13-59.7 31.7-84 55.5-24.4 23.9-43.5 51.7-56.9 82.8-13.9 32.3-21 66.6-21 101.9 0 33.3 6.8 68 20.3 103.3 11.3 29.5 27.5 60.1 48.2 91 32.8 48.9 77.9 99.9 133.9 151.6 92.8 85.7 184.7 144.9 188.6 147.3l23.7 15.2c10.5 6.7 24 6.7 34.5 0l23.7-15.2c3.9-2.5 95.7-61.6 188.6-147.3 56-51.7 101.1-102.7 133.9-151.6 20.7-30.9 37-61.5 48.2-91 13.5-35.3 20.3-70 20.3-103.3 0.1-35.3-7-69.6-20.9-101.9z" />
 </svg>
);

const PandaSvg = () => (
 <svg viewBox="0 0 1024 1024" width="1em" height="1em" fill="currentColor">
 <path
 d="M99.096 315.634s-82.58-64.032-82.58-132.13c0-66.064 33.032-165.162 148.646-148.646 83.37 11.91 99.096 165.162 99.096 165.162l-165.162 115.614zM924.906 315.634s82.58-64.032 82.58-132.13c0-66.064-33.032-165.162-148.646-148.646-83.37 11.91-99.096 165.162-99.096 165.162l165.162 115.614z"
 fill="#6B676E"
 p-id="1143"
 />
 <path
 d="M1024 561.548c0 264.526-229.23 429.42-512.002 429.42S0 826.076 0 561.548 283.96 66.064 512.002 66.064 1024 297.022 1024 561.548z"
 fill="#FFEBD2"
 p-id="1144"
 />
 <path
 d="M330.324 842.126c0 82.096 81.34 148.646 181.678 148.646s181.678-66.55 181.678-148.646H330.324z"
 fill="#E9D7C3"
 p-id="1145"
 />
 <path
 d="M644.13 611.098C594.582 528.516 561.55 512 512.002 512c-49.548 0-82.58 16.516-132.13 99.096-42.488 70.814-78.73 211.264-49.548 247.742 66.064 82.58 165.162 33.032 181.678 33.032 16.516 0 115.614 49.548 181.678-33.032 29.18-36.476-7.064-176.93-49.55-247.74z"
 fill="#FFFFFF"
 p-id="1146"
 />
 <path
 d="M611.098 495.484c0-45.608 36.974-82.58 82.58-82.58 49.548 0 198.194 99.098 198.194 165.162s-79.934 144.904-148.646 99.096c-49.548-33.032-132.128-148.646-132.128-181.678zM412.904 495.484c0-45.608-36.974-82.58-82.58-82.58-49.548 0-198.194 99.098-198.194 165.162s79.934 144.904 148.646 99.096c49.548-33.032 132.128-148.646 132.128-181.678z"
 fill="#6B676E"
 p-id="1147"
 />
 <path
 d="M512.002 726.622c-30.06 0-115.614 5.668-115.614 33.032 0 49.638 105.484 85.24 115.614 82.58 10.128 2.66 115.614-32.944 115.614-82.58-0.002-27.366-85.556-33.032-115.614-33.032z"
 fill="#464655"
 p-id="1148"
 />
 <path
 d="M330.324 495.484m-33.032 0a33.032 33.032 0 1 0 66.064 0 33.032 33.032 0 1 0-66.064 0Z"
 fill="#464655"
 p-id="1149"
 />
 <path
 d="M693.678 495.484m-33.032 0a33.032 33.032 0 1 0 66.064 0 33.032 33.032 0 1 0-66.064 0Z"
 fill="#464655"
 p-id="1150"
 />
 </svg>
);

const HeartIcon = props => <Icon component={HeartSvg} {...props} />;
const PandaIcon = props => <Icon component={PandaSvg} {...props} />;

ReactDOM.render(
 <div className="custom-icons-list">
 <HeartIcon style={{ color: 'hotpink' }} />
 <PandaIcon style={{ fontSize: '32px' }} />
 </div>,
 mountNode,
);
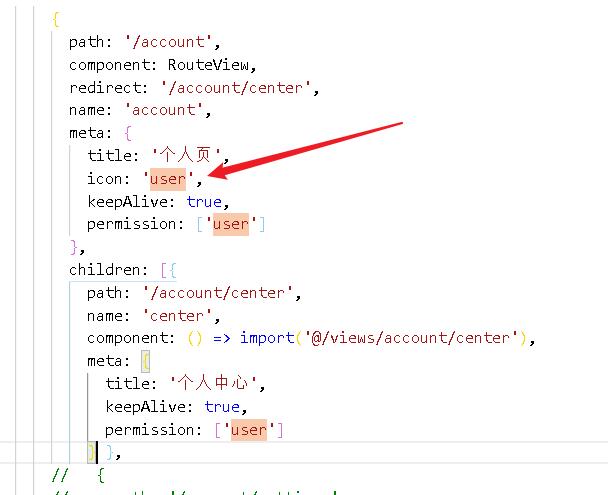
补充知识:Ant Design Pro Of Vue 项目中路由菜单icon 修改或新增
在 config / router.config.js 中修改,直接从 ant-design-vue-icon 取,只要 icon 组件的 type 值即可。
如:
<a-icon type="user" />

以上这篇Ant Design Pro 菜单自定义 icon就是小编分享给大家的全部内容了,希望能给大家一个参考,也希望大家多多支持自学编程网。

- 本文固定链接: https://www.zxbcw.cn/post/199898/
- 转载请注明:必须在正文中标注并保留原文链接
- QQ群: PHP高手阵营官方总群(344148542)
- QQ群: Yii2.0开发(304864863)
