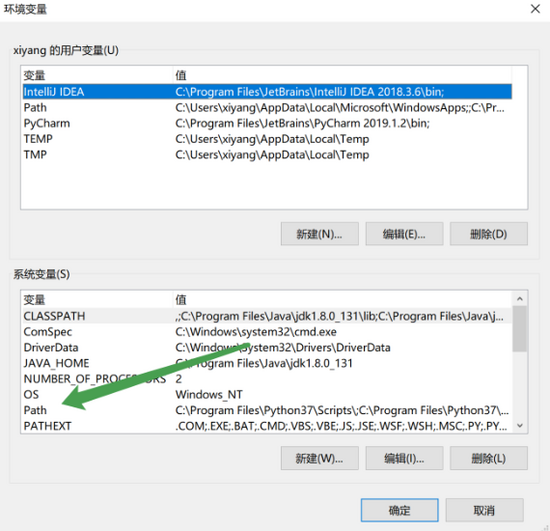
1、配置maven环境变量,将maven安装的bin⽬录添加到path路径中(此电脑->属性->高级系统设置->环境变量->)

路径为maven安装目录

2、找到ValidateCode.jar包的本地路径

3、制作Jar包
原jar包地址:链接: https://pan.baidu.com/s/1QpqiZaF_ZYhW1Qn3ifn2eg 提取码: uc47
无法直接使用,需要命令行制作,命令如下:
mvn install:install-file -DgroupId=it.source
-DartifactId=ValidateCode -Dversion=1.0
-Dpackaging=jar -Dfile=C:\Users\xiyang\Desktop\ValidateCode-1.0.jar
‘C:\Users\xiyang\Desktop\ValidateCode-1.0.jar'为jar包路径
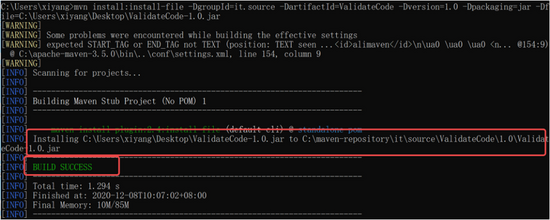
4、成功效果

5、在maven项目的pom.xml文件中添加依赖
<dependency>
<groupId>cn.dsna.util.images</groupId>
<artifactId>ValidateCode</artifactId>
<version>1.0</version>
</dependency>
注意:‘cn.dsna.util.images'为依赖的路径,笔者是将jar包放在本地maven仓库的cn/dsna/util/images路径下
6、前端html实现
<!DOCTYPE html>
<html class="loginHtml" lang="cn" xmlns:th="http://www.thymeleaf.org">
<head>
 <meta charset="utf-8">
 <title>后台登录</title>
 <meta name="renderer" content="webkit">
 <meta http-equiv="X-UA-Compatible" content="IE=edge,chrome=1">
 <meta name="viewport" content="width=device-width, initial-scale=1, maximum-scale=1">
 <meta name="apple-mobile-web-app-status-bar-style" content="black">
 <meta name="apple-mobile-web-app-capable" content="yes">
 <meta name="format-detection" content="telephone=no">

 <link rel="icon" href="img/ico.ico" rel="external nofollow" >
 <link rel="stylesheet" href="layui/css/layui.css" rel="external nofollow" media="all" />
 <link rel="stylesheet" href="css/public.css" rel="external nofollow" media="all" />
</head>
<body class="loginBody">
 <form class="layui-form" >
 <div class="login_face"><img src="" class="userAvatar" style="width: 100%;height: 100%"></div>
 <div class="layui-form-item input-item">
  <label for="userName">用户名</label>
  <input type="text" placeholder="请输入用户名" autocomplete="off" id="username" name="username" class="layui-input" lay-verify="required">
 </div>
 <div class="layui-form-item input-item">
  <label for="password">密码</label>
  <input type="password" placeholder="请输入密码" autocomplete="off" id="password" name="password" class="layui-input" lay-verify="required">
 </div>
 <div class="layui-form-item input-item" id="imgCode">
  <label for="code">验证码</label>
  <input type="text" placeholder="请输⼊验证码" autocomplete="off" id="code" name="code" class="layui-input">
  <img src="http://localhost:8080/home/code" onclick="changeCode()" id="codeImg">
 </div>
 <div class="layui-form-item">
  <button class="layui-btn layui-block" lay-filter="login" lay-submit>登录</button>
 </div>
 </form>

</body>

<script type="text/javascript" src="layui/layui.js"></script>
<script type="text/javascript" src="js/login.js"></script>
</html>
注意:页面是layui框架渲染的,layui官网: https://www.layui.com/
也可以在网盘中下载:链接: https://pan.baidu.com/s/1QpqiZaF_ZYhW1Qn3ifn2eg 提取码: uc47
7、前端js代码(login.js)
//点击验证码进⾏刷新验证码,(登陆失败以后,重新调⽤该⽅法去刷新验证码)
function changeCode(){
 var img = document.getElementById("codeImg");
 //注意:如果请求⽹址完全相同 则浏览器不会帮你刷新
 //可以拼接当前时间 让每次请求的⽹址都不⼀样
 img.src ="http://localhost:8080/home/code?time="+new Date().getTime();
 }
8、后端java代码(控制层)
//获取验证码
 @GetMapping("code")
 public void getCode(HttpServletRequest request, HttpServletResponse response){
//参数列表:宽度,⾼度,字符数,⼲扰线数量
 ValidateCode vs = new ValidateCode(120,40,5,100);
 //获取文本
 //String code = vs.getCode();
 //将文本放入session中,一个公共的存储空间,存值的方式是key-value
 try {
 request.getSession().setAttribute("code",vs.getCode());
 request.getSession().setMaxInactiveInterval(300);//永不过期为-1
 vs.write(response.getOutputStream());
 } catch (IOException e) {//有io流就可能有io流异常,就要加try catch语句
 e.printStackTrace();
 }
 }
9、最终效果

点击验证码自动刷新
到此这篇关于Idea中maven项目实现登录验证码功能的文章就介绍到这了,更多相关Idea maven登录验证码内容请搜索自学编程网以前的文章或继续浏览下面的相关文章希望大家以后多多支持自学编程网!

- 本文固定链接: https://zxbcw.cn/post/203091/
- 转载请注明:必须在正文中标注并保留原文链接
- QQ群: PHP高手阵营官方总群(344148542)
- QQ群: Yii2.0开发(304864863)
