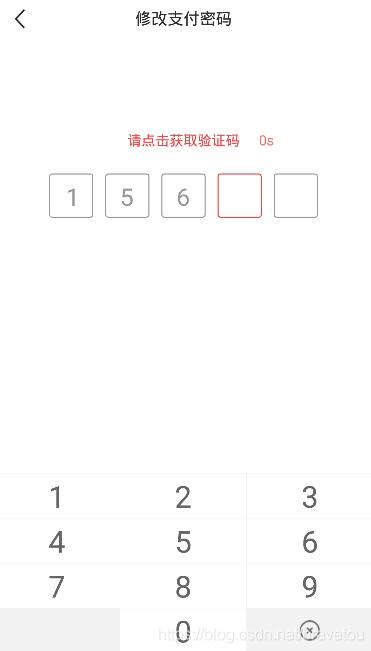
本文实例为大家分享了Android实现通用验证码输入框第2篇具体实现代码,供大家参考,具体内容如下
效果图
话不多说,我们还是先上效果图,可以先先看看是不是自己想要的

闲聊
这种验证码输入框使用组合控件就比较烦人了,所以这边直接使用自定View步奏实现
源码
自定义输入框属性(attrs.xml)
<?xml version="1.0" encoding="utf-8"?>
<resources>

  <declare-styleable name="CodeInputView">
    <!-- 边框宽度 -->
    <attr name="borderWidth"
      format="dimension" />
    <!-- 边框高度 -->
    <attr name="borderHeight"
      format="dimension" />
    <!-- 边框间距 -->
    <attr name="borderSpacing"
      format="dimension" />
    <!-- 边框背景图 -->
    <attr name="borderImage"
      format="reference" />
    <!-- 最大输入长度 -->
    <attr name="android:maxLength" />
  </declare-styleable>

</resources>
资源文件(code_input_view_border_bg.xml)
<?xml version="1.0" encoding="utf-8"?>
<selector xmlns:android="http://schemas.android.com/apk/res/android">

  <item android:state_focused="true">
    <shape android:shape="rectangle">
      <corners android:radius="5mm" />
      <stroke android:width="2mm"
        android:color="@color/colorMain" />
    </shape>
  </item>

  <item android:state_enabled="true">
    <shape android:shape="rectangle">
      <corners android:radius="5mm" />
      <stroke android:width="2mm"
        android:color="@color/colorTextLight" />
    </shape>
  </item>

</selector>
自定义控件(CodeInputView.java)
import android.annotation.SuppressLint;
import android.content.Context;
import android.content.res.TypedArray;
import android.graphics.Canvas;
import android.graphics.Color;
import android.graphics.Rect;
import android.graphics.drawable.Drawable;
import android.os.Build;
import android.text.InputFilter;
import android.text.TextPaint;
import android.util.AttributeSet;
import android.widget.EditText;

import androidx.annotation.RequiresApi;
import androidx.core.content.ContextCompat;

/**
 * <pre>
 *   <b>author</b>  :BraveTou
 *   <b>blog</b>   :https://blog.csdn.net/bravetou
 *   <b>time</b>   :2020/9/8 11:49
 *   <b>desc</b>   :<pre>
 *     自定义验证码输入框
 *   </pre>
 * </pre>
 */
@SuppressLint("AppCompatCustomView")
public class CodeInputView extends EditText {
  // <!-- 最大输入长度 -->
  private int mMaxLength = 4;
  // <!-- 边框宽度 -->
  private int mBorderWidth = 100;
  // <!-- 边框高度 -->
  private int mBorderHeight = 100;
  // <!-- 边框间距 -->
  private int mBorderSpacing = 24;
  // <!-- 边框背景图 -->
  private Drawable mBorderImage;

  // 用矩形来保存方框的位置、大小信息
  private final Rect mRect = new Rect();

  // 文本颜色
  private int mTextColor;

  public CodeInputView(Context context) {
    super(context);
    init(context, null);
  }

  public CodeInputView(Context context, AttributeSet attrs) {
    super(context, attrs);
    init(context, attrs);
  }

  public CodeInputView(Context context, AttributeSet attrs, int defStyleAttr) {
    super(context, attrs, defStyleAttr);
    init(context, attrs);
  }

  @RequiresApi(api = Build.VERSION_CODES.LOLLIPOP)
  public CodeInputView(Context context, AttributeSet attrs, int defStyleAttr, int defStyleRes) {
    super(context, attrs, defStyleAttr, defStyleRes);
    init(context, attrs);
  }

  // 初始化
  private void init(Context context, AttributeSet attrs) {
    if (null == mBorderImage) {
      mBorderImage = ContextCompat.getDrawable(context,
          R.drawable.code_input_view_border_bg);
    }
    initAttrs(context, attrs);
    // 设置最大输入长度
    setMaxLength(mMaxLength);
    // 禁止长按
    setLongClickable(false);
    // 去掉背景颜色
    setBackgroundColor(Color.TRANSPARENT);
    // 不显示光标
    setCursorVisible(false);
  }

  // 设置最大长度
  private void setMaxLength(int maxLength) {
    if (maxLength >= 0) {
      setFilters(new InputFilter[]{new InputFilter.LengthFilter(maxLength)});
    } else {
      setFilters(new InputFilter[0]);
    }
  }

  // 初始化属性
  private void initAttrs(Context context, AttributeSet attrs) {
    if (null != attrs) {
      // AttributeSet 属性值的索引
      TypedArray o = context.obtainStyledAttributes(attrs, R.styleable.CodeInputView);
      // <!-- 最大输入长度 -->
      mMaxLength = o.getInteger(R.styleable.CodeInputView_android_maxLength, 4);
      // <!-- 边框宽度 -->
      mBorderWidth = (int) o.getDimension(R.styleable.CodeInputView_borderWidth, 100f);
      // <!-- 边框高度 -->
      mBorderHeight = (int) o.getDimension(R.styleable.CodeInputView_borderHeight, 100f);
      // <!-- 边框间距 -->
      mBorderSpacing = (int) o.getDimension(R.styleable.CodeInputView_borderSpacing, 24);
      // <!-- 边框背景图 -->
      Drawable drawable = o.getDrawable(R.styleable.CodeInputView_borderImage);
      if (null != drawable) {
        mBorderImage = drawable;
      }
      // 回收资源
      o.recycle();
    }
  }

  @Override
  protected void onMeasure(int widthMeasureSpec, int heightMeasureSpec) {
    super.onMeasure(widthMeasureSpec, heightMeasureSpec);
    // 当前输入框的宽高信息
    int width = getMeasuredWidth();
    int height = getMeasuredHeight();
    int widthMode = MeasureSpec.getMode(widthMeasureSpec);
    int heightMode = MeasureSpec.getMode(heightMeasureSpec);

    // 判断高度是否小于自定义边框高度
    height = height < mBorderHeight ? mBorderHeight : height;

    // 自定义输入框宽度 = 边框宽度 * 数量 + 边框间距 * (数量 - 1)
    int customWidth = mBorderWidth * mMaxLength
        + mBorderSpacing * ((mMaxLength - 1) > 0 ? (mMaxLength - 1) : 0);

    // 判断宽度是否小于自定义宽度
    width = width < customWidth ? customWidth : width;

    widthMeasureSpec = MeasureSpec.makeMeasureSpec(width, widthMode);
    heightMeasureSpec = MeasureSpec.makeMeasureSpec(height, heightMode);

    // 重新设置测量布局
    setMeasuredDimension(widthMeasureSpec, heightMeasureSpec);
  }

  @Override
  protected void onDraw(Canvas canvas) {
    // 获取当前输入文本颜色
    mTextColor = getCurrentTextColor();
    // 屏蔽系统文本颜色,直接透明
    setTextColor(Color.TRANSPARENT);
    // 父类绘制
    super.onDraw(canvas);
    // 重新设置文本颜色
    setTextColor(mTextColor);
    // 重绘背景
    drawBorderBackground(canvas);
    // 重绘文本
    drawText(canvas);
  }

  // 绘制背景
  private void drawBorderBackground(Canvas canvas) {
    // 下面绘制方框背景颜色
    // 确定反馈位置
    mRect.left = 0;
    mRect.top = 0;
    mRect.right = mBorderWidth;
    mRect.bottom = mBorderHeight;
    // 当前画布保存的状态
    int count = canvas.getSaveCount();
    // 保存画布
    canvas.save();
    // 获取当前输入字符串长度
    int length = getEditableText().length();
    for (int i = 0; i < mMaxLength; i++) {
      // 设置位置
      mBorderImage.setBounds(mRect);
      // 设置图像状态
      if (i == length) {
        // 当前输入位高亮的索引
        mBorderImage.setState(new int[]{android.R.attr.state_focused});
      } else {
        // 其他输入位置默认
        mBorderImage.setState(new int[]{android.R.attr.state_enabled});
      }
      // 画到画布上
      mBorderImage.draw(canvas);
      // 确定下一个方框的位置
      // X坐标位置
      float dx = mRect.right + mBorderSpacing;
      // 保存画布
      canvas.save();
      // [注意细节] 移动画布到下一个位置
      canvas.translate(dx, 0);
    }
    // [注意细节] 把画布还原到画反馈之前的状态,这样就还原到最初位置了
    canvas.restoreToCount(count);
    // 画布归位
    canvas.translate(0, 0);
  }

  // 绘制文本
  private void drawText(Canvas canvas) {
    int count = canvas.getSaveCount();
    canvas.translate(0, 0);
    int length = getEditableText().length();
    for (int i = 0; i < length; i++) {
      String text = String.valueOf(getEditableText().charAt(i));
      TextPaint textPaint = getPaint();
      textPaint.setColor(mTextColor);
      // 获取文本大小
      textPaint.getTextBounds(text, 0, 1, mRect);
      // 计算(x,y) 坐标
      int x = mBorderWidth / 2 + (mBorderWidth + mBorderSpacing) * i - (mRect.centerX());
      int y = canvas.getHeight() / 2 + mRect.height() / 2;
      canvas.drawText(text, x, y, textPaint);
    }
    canvas.restoreToCount(count);
  }
}
使用
<RelativeLayout
    android:layout_width="match_parent"
    android:layout_height="wrap_content">

    <*.*.*.widget.CodeInputView
      android:id="@+id/mCodeInputView"
      android:layout_width="wrap_content"
      android:layout_height="wrap_content"
      android:layout_centerInParent="true"
      android:layout_marginTop="56mm"
      android:maxLength="5"
      android:text="156"
      android:textSize="48mm"
      app:borderHeight="88mm"
      app:borderSpacing="24mm"
      app:borderWidth="88mm" />

</RelativeLayout>
以上就是本文的全部内容,希望对大家的学习有所帮助,也希望大家多多支持自学编程网。

- 本文固定链接: https://zxbcw.cn/post/204962/
- 转载请注明:必须在正文中标注并保留原文链接
- QQ群: PHP高手阵营官方总群(344148542)
- QQ群: Yii2.0开发(304864863)
