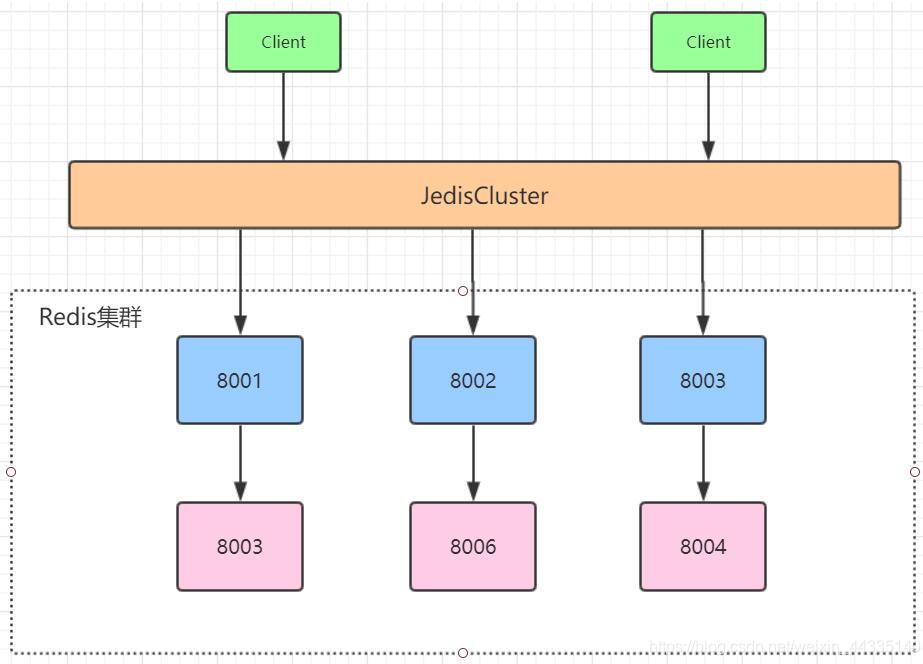
在Redis集群搭建中,我们搭建了下图所示的Redis集群,接下来我们就来看看如何为我们的Redis集群进行水平扩容。

[root@localhost redis-5.0.3]# src/redis-server redis-cluster/8001/redis.conf
[root@localhost redis-5.0.3]# src/redis-server redis-cluster/8004/redis.conf
[root@localhost redis-5.0.3]# src/redis-server redis-cluster/8002/redis.conf
[root@localhost redis-5.0.3]# src/redis-server redis-cluster/8005/redis.conf
[root@localhost redis-5.0.3]# src/redis-server redis-cluster/8003/redis.conf
[root@localhost redis-5.0.3]# src/redis-server redis-cluster/8006/redis.conf
首先,先启动我们的集群(在上一篇博客中,我们已经将集群环境搭好了,只需要重启启动redis服务即可)
查看集群中的信息:

为集群水平扩容
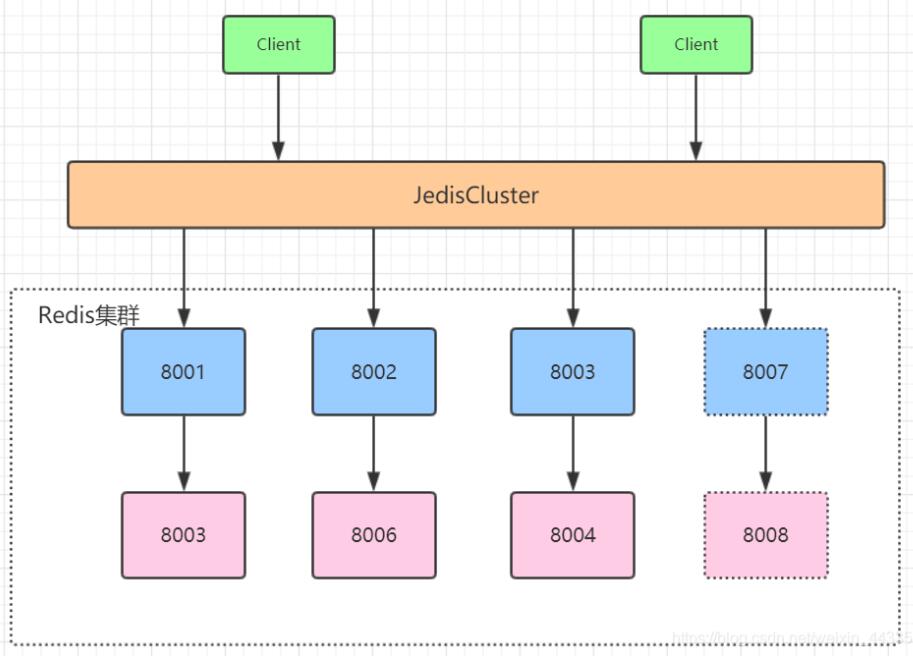
接下来,我们将在集群得基础上再添加一主一从,增加后集群如下图所示:

1. 增加8007和8008俩个redis实例
在/usr/local/software/redis-5.0.3/redis-cluster下创建8007和8008文件夹,并拷贝8001文件夹下的redis.conf文件到8007和8008这两个文件夹下,进行修改
mkdir 8007 8008
cd 8001
cp redis.conf /usr/local/software/redis-5.0.3/redis-cluster/8007/
cp redis.conf /usr/local/software/redis-5.0.3/redis-cluster/8008/

# 修改8007文件夹下的redis.conf配置文件
vim /usr/local/software/redis-5.0.3/redis-cluster/8007/redis.conf
# 修改如下内容:
port 8007
dir /usr/local/software/redis-5.0.3/redis-cluster/8007
cluster-config-file nodes-8007.conf

# 修改8008文件夹下的redis.conf配置文件
vim /usr/local/software/redis-5.0.3/redis-cluster/8008/redis.conf
修改内容如下:
port 8008
dir /usr/local/software/redis-5.0.3/redis-cluster/8008
cluster-config-file nodes-8008.conf

# 启动8007和8008俩个服务并查看服务状态
src/redis-server /usr/local/software/redis-5.0.3/redis-cluster/8007/redis.conf
src/redis-server /usr/local/software/redis-5.0.3/redis-cluster/8008/redis.conf
ps -el | grep redis
2. 将8007和8008加入集群中
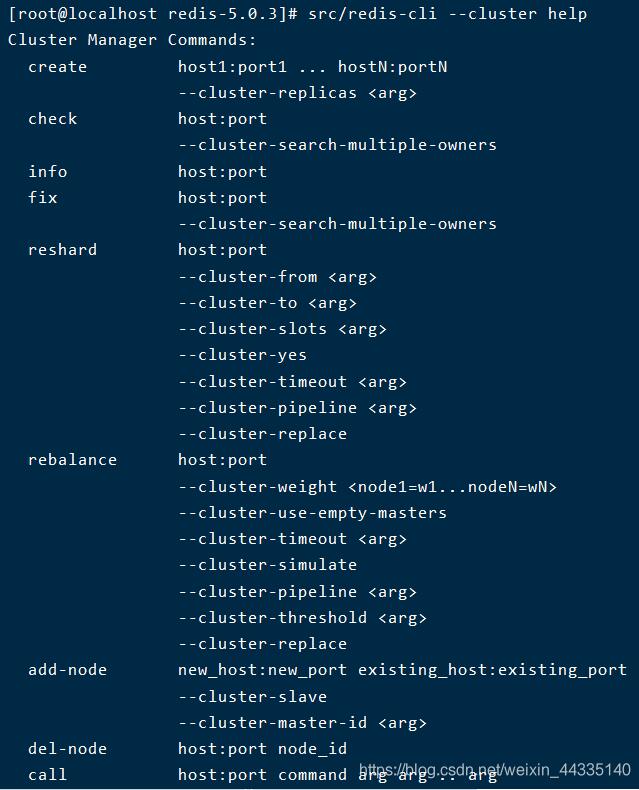
查看redis集群得帮助命令:

1.create:创建一个集群环境host1:port1 … hostN:portN
2.call:可以执行redis命令
3.add-node:将一个节点添加到集群里,第一个参数为新节点的ip:port,第二个参数为集群中任意一个已经存在的节点的ip:port
4.del-node:移除一个节点
5.reshard:重新分片
6.check:检查集群状态
添加8007和8008节点到集群中
[root@localhost redis-5.0.3]# src/redis-cli --cluster add-node 192.168.243.133:8007 192.168.243.133:8001
[root@localhost redis-5.0.3]# src/redis-cli --cluster add-node 192.168.243.133:8008 192.168.243.133:8001
3. 查看集群状态

我们发现对于新加入的节点默认都是master节点,最重要的是,他们都没有分配slots槽位,所以根据Redis集群分片的原理,这些刚加入集群的节点实际上是不能读写数据的。
4. 为新加入的节点分配槽位
使用集群中的任意一个主节点,对其进行重新分片工作
[root@localhost redis-5.0.3]# src/redis-cli --cluster reshard 192.168.243.133:8001
输入命令后,会进入一个交互式的操作:
1. How many slots do you want to move (from 1 to 16384)? 600
你想移动多少个槽位? 这里移动600个
2. What is the receiving node ID? 7cbcddaea49560b2847327b1465e8db7082655d2
要将槽位分配给拿给节点? 指定节点的ID
3. Please enter all the source node IDs.
 Type 'all' to use all the nodes as source nodes for the hash slots.
 Type 'done' once you entered all the source nodes IDs.
Source node #1: all
要从哪几个节点抽取槽位,all:从所有的节点中,各自抽取一部分槽位给8007。输入all后会有一个抽取槽位的计划
4.Do you want to proceed with the proposed reshard plan (yes/no)? yes开始执行
是否执行该reshard计划。
查看集群的最新状态:

我们可以看到8007已经有hash槽位了,此时我们就能往8007进行读写操作了
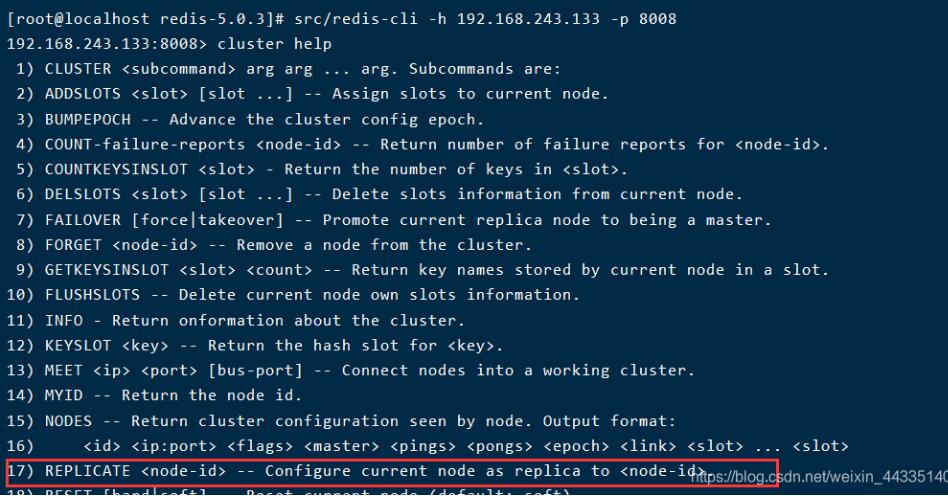
5. 将8008配置为8007的从节点
我们可以通过replicate命令指定当前节点成为哪一个节点的从节点。

192.168.243.133:8008> cluster replicate 7cbcddaea49560b2847327b1465e8db7082655d2
OK
查看集群的状态:

发现8008已经成为8007的从节点了,至此,Redis水平扩容成功。
删除集群中的节点
删除8008从节点
用del-node删除从节点8008,指定删除节点ip和端口,以及节点id
[root@localhost redis-5.0.3]# src/redis-cli --cluster del-node 192.168.243.133:8008 840340ce7a2dabdfc6ad40fde17e9e0c803b386c

发现8008已经被移除了。
删除8007主节点
删除8007节点比删除8008节点麻烦一点,因为8007节点管理一部分slots,在删除它之前,需要将slots分配给其他可用的master节点上,否则就会出现数据丢失问题。
1、重新分配8007上的slots
[root@localhost redis-5.0.3]# src/redis-cli --cluster reshard 192.168.243.133:8007
交互流程:
1. How many slots do you want to move (from 1 to 16384)? 600
2. What is the receiving node ID? ec0001bd4282f790017d1e68259c67f2d7037a3c
接收slots的节点ID(这里是8001的主节点ID)
3. Please enter all the source node IDs.
 Type 'all' to use all the nodes as source nodes for the hash slots.
 Type 'done' once you entered all the source nodes IDs.
Source node #1: 7cbcddaea49560b2847327b1465e8db7082655d2
Source node #2: done
数据源ID,这里输入8007节点的ID,表示600个slots都由8007提供(8007总共就600个slots)
4. Do you want to proceed with the proposed reshard plan (yes/no)? yes
查看集群节点状态:

2、使用del-node命令删除8007节点
[root@localhost redis-5.0.3]# src/redis-cli --cluster del-node 192.168.243.133:8007 7cbcddaea49560b2847327b1465e8db7082655d2
再次查看集群状态:

8007已经被移除
以上为个人经验,希望能给大家一个参考,也希望大家多多支持自学编程网。如有错误或未考虑完全的地方,望不吝赐教。

- 本文固定链接: https://zxbcw.cn/post/208347/
- 转载请注明:必须在正文中标注并保留原文链接
- QQ群: PHP高手阵营官方总群(344148542)
- QQ群: Yii2.0开发(304864863)
