
本文实例为大家分享了python tkinter实现定时关机的具体代码,供大家参考,具体内容如下
很早以前写的,懒得修改,代码很简单,适合初学者
运行效果图如下:
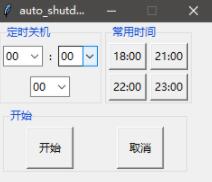
使用注意
- 设定时间后点击开始即可实现定时关机,同时窗口也会关闭
- 想要取消关机的话,再次打开,点取消即可
代码如下
import os,time
# import multiprocessing
import threading
from tkinter import *
from tkinter import ttk
import tkinter.messagebox as message_box
window =Tk()
window.title('auto_shutdown')
window.geometry('240x180')
window.resizable(False, False)
window.update()
var = StringVar()
var1 = StringVar()
var2 = StringVar()
# 设置func为守护线程
def funcs():
 t = threading.Thread(target=func)
 t.setDaemon(True)
 t.start()
# 执行自动关机指令
def func():
 #弹出messagebox警告提示
 message_box.showwarning("Warning", "Your pc will shutdown at %s : %s" % (var.get(),var1.get()))
 print('wohaizai')
 mytime = time.strftime('%H:%M:%S')
 h2 = mytime[0:2]
 m2 = mytime[3:5]
 s2 = mytime[6:]
 print(h2)
 print(m2)
 print(s2)
 print(var.get())
 print(var1.get())
 # 算出距离关机时间的秒数
 count_down_second=-int(h2)*3600-int(m2)*60-int(s2)+int(var.get())*3600+int(var1.get())*60+int(var2.get())
 # 如果关机设置在第二天,结果加86400(一天的总秒数)
 if count_down_second<0:
  count_down_second=count_down_second+86400
 os.system("shutdown -s -t %s" % count_down_second)
 print(count_down_second)
 window.quit()


# 快捷关机选项入口
def fun_set1():
 cb_h.current(18)
def fun_set2():
 cb_h.current(21)
def fun_set3():
 cb_h.current(22)
def fun_set4():
 cb_h.current(23)
def funcq():
 os.system('shutdown -a')

# 定义三个容器,方便布局
root = ttk.LabelFrame(window, text="定时关机")
root.grid(column=0, row=0,padx=2, pady=2)
root1 = ttk.LabelFrame(window, text="常用时间")
root1.grid(column=1, row=0,padx=2, pady=2)
root2 = ttk.LabelFrame(window, text="开始")
root2.grid(column=0, row=1,columnspan=2,padx=2, pady=2)


Label(root,text=':').grid(column=1, row=0,padx=2, pady=5)

cb_h = ttk.Combobox(root,width=3,textvariable =var)
a = []
for i in range(10):
 a.append(('0'+str(i)))
for i in range(10,24):
 a.append(i)
 cb_h['values'] =tuple(a)
cb_h.current(0)
cb_h.grid(column=0, row=0,padx=2, pady=5)


cb_m = ttk.Combobox(root,width=3,textvariable =var1)

b = []
for i in range(10):
 b.append('0'+str(i))

for i in range(10,60):
 b.append(str(i))
 cb_m['values'] =tuple(b)
cb_m.current(0)
cb_m.grid(column=2, row=0,padx=2, pady=5)

cb_s = ttk.Combobox(root,width=3,textvariable =var2)

c = []
for i in range(10):
 c.append('0'+str(i))

for i in range(10,60):
 c.append(str(i))
 cb_s['values'] =tuple(c)
cb_s.current(0)
cb_s.grid(columnspan=3, row=1,padx=2, pady=6)


Button(root1,text = '18:00',command = fun_set1).grid(column=0, row=0,padx=2, pady=2)
Button(root1,text = '21:00',command = fun_set2).grid(column=1, row=0,padx=2, pady=2)
Button(root1,text = '22:00',command = fun_set3).grid(column=0, row=1,padx=2, pady=2)
Button(root1,text = '23:00',command = fun_set4).grid(column=1, row=1,padx=2, pady=2)


b1=Button(root2,text = '开始',command = funcs,height =2,width =6)
b1.grid(column=0, row=0,padx=24, pady=2)
b1=Button(root2,text = '取消',command = funcq,height =2,width =6)
b1.grid(column=1, row=0,padx=24, pady=2)

root.mainloop()
项目的github地址
ps:已打包为exe格式,可在dist目录下找到
以上就是本文的全部内容,希望对大家的学习有所帮助,也希望大家多多支持自学编程网。

- 本文固定链接: https://zxbcw.cn/post/210178/
- 转载请注明:必须在正文中标注并保留原文链接
- QQ群: PHP高手阵营官方总群(344148542)
- QQ群: Yii2.0开发(304864863)