1. 父子间通信
最常见的就是父子之间的通信,通信是双向的数据传递。
1.1 父组件 --> 儿子组件
父组件向儿子组件传递数据的方式就是 通过 Prop 向子组件传递数据。
//child.vue
<template>
    <div>
        我是儿子,我收到来自父亲的数据为 {{value}}
    </div>
</template>

<script>
export default {
    props:{
        value: String
    }
}
//App.vue
<template>
  <div id="app">
    <Child :value="x" />
  </div>
</template>

<script>
import Child from './components/Child'
export default {
  data(){
    return {
      x: 'hi,child'
    }
  },
  components:{
    Child
  }
}
</script>
1.2 儿子组件 --> 父组件
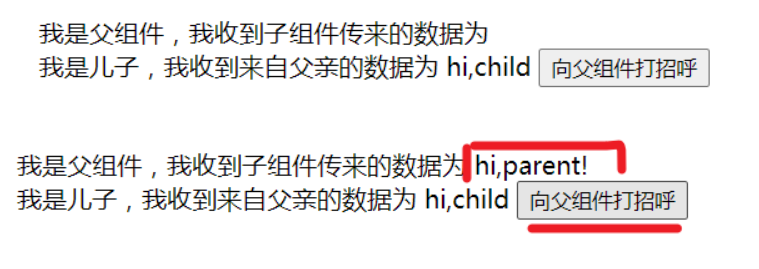
儿子组件向父组件传递数据的方式就是通过子组件内 $emit 触发自定义事件,子组件使用时 v-on 绑定监听自定义事件。
这里的 v-on 事件通信是在子组件使用时作为子组件的事件属性自动进行监听的。
因此儿子组件向父组件传递数据,依赖于子组件使用时的自定义事件属性。
//child.vue
<template>
    <div>
        我是儿子,我收到来自父亲的数据为 {{value}}
        <button @click="sayHi">
            向父组件打招呼
        </button>
    </div>
</template>

<script>
export default {
    props:{
        value: String
    },
    methods:{
        sayHi(){
            this.$emit('sayHi','hi,parent!');
        }
    }
}
</script>
//App.vue
<template>
  <div id="app">
    我是父组件,我收到子组件传来的数据为 {{y}}
    <Child :value="x" @sayHi="y = $event"/>
  </div>
</template>

<script>
import Child from './components/Child'
export default {
  data(){
    return {
      x: 'hi,child',
      y: ''
    }
  },
  components:{
    Child
  }
}
</script>

2. 爷孙间通信
爷孙间通信,可以使用两次 v-on 通信,爷爷爸爸通信,然后爸爸儿子通信。
也可使用下方的任意组件间通信的方式。
3. 任意组件间通信
任意组件间通信就不再区分是 A 向 B 通信,还是 B 向 A 通信,而是通用的方式,谁想发送数据就使用对应的 API 发送数据,谁想要接收什么数据,就使用对应的 API 接收。
任意组件间通信有两种方式,一种是使用 EventBus 发布订阅模式通信,一种是使用 Vuex 通信。
3.1 EventBus
EventBus ,从字面意思理解就是事件公交车,所有触发的事件传递的数据都从前门上车保存到公交车上,然后通过监听对应事件提供的出口让对应的事件数据下车。
EventBus,实际意思是发布和订阅模式,就是谁想把数据传递出去,就要通过触发自定义事件的 API 进行数据的发布;谁需要接收该数据信息的,就通过事件监听的 API 进行数据的监听,一旦检测到监听的数据发布出来,就会接收,这就是数据的订阅。
EventBus 通信方式最重要是搞明白发布和订阅的接口 API,在 Vue 中,Vue 实例有提供两个接口,即 $emit 和 $on ,因此可以新创建一个空的 Vue 实例,来获得这两个接口。
const eventBus = new Vue();
eventBus.$emit(eventName, […args]) //发布事件
eventBus.$on(event, callback)      //订阅事件
实例如下:
// eventBus.js
import Vue from 'vue'
export const eventBus = new Vue();
//child
<template>
    <div>
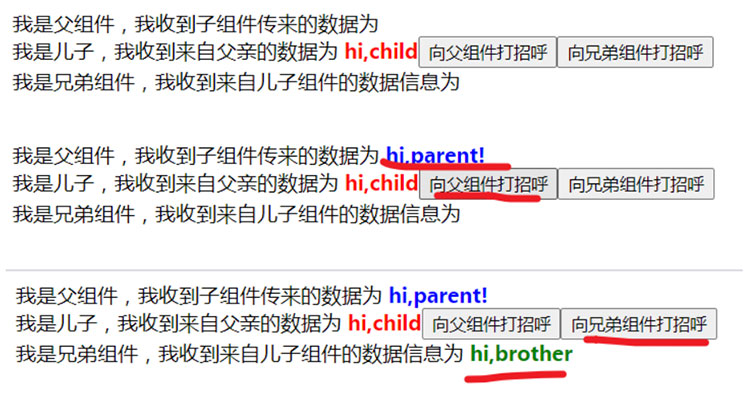
        我是儿子,我收到来自父亲的数据为 <strong>{{value}}</strong>
        <button @click="sayHi">
            向父组件打招呼
        </button>
        <button @click="sibling">
            向兄弟组件打招呼
        </button>
    </div>
</template>

<script>
import {eventBus} from '../eventBus.js'
export default {
    props:{
        value: String
    },
    methods:{
        sayHi(){
            this.$emit('sayHi','hi,parent!');
        },
        sibling(){
            eventBus.$emit('sibling','hi,brother');
        }
    }
}
</script>

<style scoped>
    strong{
        color: red;
    }
</style>
//sibling
<template>
    <div>
        我是兄弟组件,我收到来自儿子组件的数据信息为 <strong>{{x}}</strong>
    </div>
</template>

<script>
import {eventBus} from '../eventBus.js'
export default {
    data(){
        return {
            x: ''
        }
    },
    mounted(){
        eventBus.$on('sibling', (msg)=>{
            this.x = msg;
        })
    }
}
</script>

<style scoped>
    strong{
            color: green;
    }
</style>
//parent
<template>
  <div id="app">
    我是父组件,我收到子组件传来的数据为 <strong>{{y}}</strong>
    <Child :value="x" @sayHi="y = $event"/>
    <Sibling></Sibling>
  </div>
</template>

<script>
import Child from './components/Child'
import Sibling from './components/Sibling'
export default {
  data(){
    return {
      x: 'hi,child',
      y: ''
    }
  },
  components:{
    Child,
    Sibling
  }
}
</script>

<style scoped>
    strong{
            color: blue;
    }
</style>

关于 EventBus 这部分,可能存在这样一个疑问,既然 Vue 实例中都有 $emit 和 $on,为什么不直接用 this.$emit 触发事件, this.$on 接收事件呢?还非得要额外一个空实例 eventBus = new Vue() 。那是因为,Vue 中每个组件都是一个单独的 Vue 实例,你在这个 Vue 实例中触发该实例的 emit 事件,另外一个实例的 on 事件是接收不到的,不在一辆公交车上,怎么能进行事件通信呢?因此就必须要一个公共的公交车,也就是事件总线。
上述实例中的 eventBus 的使用方法是局部的 eventBus,谁要用到 eventBus 要自己手动引入。也可以将 eventBus 做成全局的,比如挂在 vue 的原型上。
//main.js
import Vue from 'vue'
import App from './App.vue'

Vue.config.productionTip = false

Vue.prototype.$eventBus = new Vue();//添加这句,一定要在下方的 new Vue 前。

new Vue({
  render: h => h(App),
}).$mount('#app')
//child
sibling(){
    this.$eventBus.$emit('sibling','hi,brother');
}
//sibling
mounted(){
    this.$eventBus.$on('sibling', (msg)=>{
        this.x = msg;
    })
}
除了上述的添加属性到 Vue 原型的方式外,还可以使用 Object.defineProperty() 为 Vue 原型添加属性。
import Vue from 'vue'
import App from './App.vue'

Vue.config.productionTip = false

let eventBus = new Vue()
Object.defineProperty(Vue.prototype,'$eventBus',{
  get(){
    return eventBus
  }
})

new Vue({
  render: h => h(App),
}).$mount('#app')
3.2 Vuex
Vue 组件间的通信也可使用专门为 vue.js 应用程序开发的状态管理模式:Vuex。Vuex 的使用比较复杂,详细可见 Vuex 博客。Vuex 适用于大型的复杂的 Vue 项目的状态管理。对于一些中小型的应用程序,可以根据 Vuex 的原理自定义 store 模式进行状态管理,vue 自定义状态管理,可详见 Vue 简单状态管理—store模式 博客。
无论是 Vuex 还是 自定义 store模式 ,其实现组件间通信的原理都是通过共享数据的方式实现的。组件间使用相同的数据源,当一个组件改变数据时,另一个组件依赖的数据源也就改变了。
以上就是Vue如何实现组件间通信的详细内容,更多关于Vue组件间通信的资料请关注自学编程网其它相关文章!

- 本文固定链接: https://zxbcw.cn/post/212343/
- 转载请注明:必须在正文中标注并保留原文链接
- QQ群: PHP高手阵营官方总群(344148542)
- QQ群: Yii2.0开发(304864863)
