多线程解决for循环效率问题
在for里面,如果执行一次for里面的内容所需时间比较长,可以使用线程池来提高for循环的效率
public class TreadFor {
private static final int loopNum = 1*10;
    public static void main(String args[]) throws InterruptedException {
    	TreadFor TestThreadPool = new TreadFor();
        long bt = System.currentTimeMillis();
        List<String> list = new ArrayList<>();
        list.add("0");
        list.add("1");
        list.add("2");
        list.add("3");
        list.add("4");
        list.add("5");
        list.add("6");
        list.add("7");
        list.add("8");
        list.add("9");
        TestThreadPool.m1(list);
        long et2 = System.currentTimeMillis();
        System.out.println("[1]耗时:"+(et2 - bt)+ "ms");
        Thread thread = new Thread();
        long at = System.currentTimeMillis();
        TestThreadPool.m2();
        long et3 = System.currentTimeMillis();
        System.out.println("[2]耗时:"+(et3 - at)+ "ms");
    }

    public void m1( List<String> list) {
        ExecutorService pool = Executors.newCachedThreadPool();
        for (int i = 0; i < list.size(); i++) {
        	String str = list.get(i);
        	System.out.println(list.get(i));
            Runnable run = new Runnable() {
                public void run() {
                    try {
                        new Thread().sleep(1000);
                        //模拟耗时操作
                    	System.out.println("[1]" + Thread.currentThread().getName()+"----"+str);
                    } catch (Exception e) {
                    }
                }
            };
            pool.execute(run);

		}
        System.out.println("[1] done!");
        pool.shutdown();
    }

    public void m2() {
    	AtomicInteger connectionIds = new AtomicInteger(0);
        for (int index = 0; index < loopNum; index++) {
            try {
                new Thread().sleep(1000);  //模拟耗时操作
                System.out.println("[2]" + Thread.currentThread().getName());

            } catch (Exception e) {
                e.printStackTrace();
            }
        }
        System.out.println("[2] done!");
    }
}
其中遍历list,给方法传参,参数最终也可以进入的线程里;
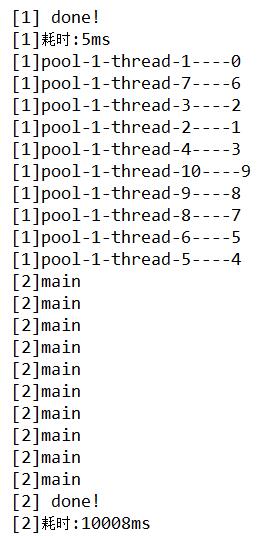
运行结果:

由打印结果可知:m1方法是用到了多线程的,多线程此时被线程池管理;而m2方法始终是main主线程执行的。
采用先把要执行的“耗时”内容放到一个线程的执行主体(run方法)里面,再用线程池执行该线程,可大大减少for循环的耗时。
但这种情况不适合for次数较大的情形,因为每循环一次,就开辟一个线程,开销较大。
注意这种不叫高并发,只是相当于原来由一个工人干的活现在由多个工人协作完成一样。
Java 多个线程交替循环执行
有些时候面试官经常会问,两个线程怎么交替执行呀,如果是三个线程,又怎么交替执行呀,这种问题一般人还真不一定能回答上来。多线程这块如果理解的不好,学起来是很吃力的,更别说面试了。
下面我们就来剖析一下怎么实现多个线程顺序输出。
两个线程循环交替打印
//首先我们来看一种比较简单的方式
public class ThreadCq {
 public static void main(String[] args) {
   Stack<Integer> stack = new Stack<>();
   for(int i=1;i<100;i++) {
    stack.add(i);
   }
   Draw draw = new Draw(stack);
   new Thread(draw).start();
   new Thread(draw).start();
 }
}

class Draw implements Runnable{
 private Stack<Integer> stack;
 public Draw(Stack<Integer> stack) {
  this.stack = stack;
 }

 @Override
 public void run() {
  while(!stack.isEmpty()) {
   synchronized (this) {
    notify();
    System.out.println(Thread.currentThread().getName()+"---"+stack.pop());
    try {
     wait();
    } catch (InterruptedException e) {
     e.printStackTrace();
    }
   }
  }
 }
}
这种方式是用Condition对象来完成的:
public class ThreadCq3 {
 //声明一个锁
 static ReentrantLock lock = new ReentrantLock();
 public static void main(String[] args) {
  //创建两个Condition对象
  Condition c1 = lock.newCondition();
  Condition c2 = lock.newCondition();
  Stack<Integer> stack = new Stack<>();
  for (int i = 0; i <= 100; i++) {
   stack.add(i);
  }

  new Thread(() -> {
   try {
    Thread.sleep(500);
   } catch (InterruptedException e1) {
    e1.printStackTrace();
   }
   while (true) {
    lock.lock();
    // 打印偶数
    try {
     if (stack.peek() % 2 != 0) {
      c1.await();
     }
     System.out.println(Thread.currentThread().getName() + "-----" + stack.pop());
     c2.signal();
    } catch (InterruptedException e) {
     e.printStackTrace();
    } finally {
     lock.unlock();
    }
   }
  }).start();

  new Thread(() -> {
   while (true) {
    try {
     Thread.sleep(500);
    } catch (InterruptedException e1) {
     e1.printStackTrace();
    }
    lock.lock();
    try {
     // 打印奇数
     if (stack.peek() % 2 != 1) {
      c2.await();
     }
     System.out.println(Thread.currentThread().getName() + "-----" + stack.pop());
     c1.signal();
    } catch (InterruptedException e) {
     e.printStackTrace();
    } finally {
     lock.unlock();
    }
   }
  }).start();
 }
}
这种方式是通过Semaphore来实现的:
public class ThreadCq4 {
 //利用信号量来限制
 private static Semaphore s1 = new Semaphore(1);
 private static Semaphore s2 = new Semaphore(1);
 public static void main(String[] args) {

  try {
   //首先调用s2为 acquire状态
   s1.acquire();
//   s2.acquire();  调用s1或者s2先占有一个
  } catch (InterruptedException e1) {
   e1.printStackTrace();
  }

  new Thread(()->{
   while(true) {
    try {
     s1.acquire();
    } catch (InterruptedException e) {
     e.printStackTrace();
    }
    try {
     Thread.sleep(500);
    } catch (InterruptedException e) {
     e.printStackTrace();
    }
    System.out.println("A");
    s2.release();
   }
  }).start();

  new Thread(()->{
   while(true) {
    try {
     s2.acquire();
    } catch (InterruptedException e) {
     e.printStackTrace();
    }
    try {
     Thread.sleep(500);
    } catch (InterruptedException e) {
     e.printStackTrace();
    }
    System.out.println("B");
    s1.release();
   }
  }).start();
 }
}
上面就是三种比较常用的,最常用的要属第一种和第二种。
三个线程交替打印输出
上面我们看了两个线程依次输出的实例,这里我们来看看三个线程如何做呢。
public class LockCond {
 private static int count = 0;
 private static Lock lock = new ReentrantLock();
 public static void main(String[] args) {
  Condition c1 = lock.newCondition();
  Condition c2 = lock.newCondition();
  Condition c3 = lock.newCondition();
  new Thread(()->{
   while(true) {
    lock.lock();
    try {
     while(count %3 != 0) {
      //刚开始count为0  0%3=0 所以此线程执行  执行完之后 唤醒现成2,由于此时count已经进行了++,所有while成立,c1进入等待状态,其他两个也一样
      c1.await();
     }
     System.out.println(Thread.currentThread().getName()+"========:A");
     count++;
     //唤醒线程2
     c2.signal();
    } catch (InterruptedException e) {
     e.printStackTrace();
    } finally {
     lock.unlock();
    }
   }
  }) .start();

  new Thread(()->{
   while(true) {
    lock.lock();
    try {
     while(count %3 != 1) {
      c2.await();
     }
     System.out.println(Thread.currentThread().getName()+"========:B");
     count++;
     //唤醒线程3
     c3.signal();
    } catch (InterruptedException e) {
     e.printStackTrace();
    } finally {
     lock.unlock();
    }
   }
  }) .start();

  new Thread(()->{
   while(true) {
    lock.lock();
    try {
     while(count %3 != 2) {
      c3.await();
     }
     System.out.println(Thread.currentThread().getName()+"========:C");
     count++;
     //唤醒线程1
     c1.signal();
    } catch (InterruptedException e) {
     e.printStackTrace();
    } finally {
     lock.unlock();
    }
   }
  }) .start();
 }
}
三个线程的也可以写三种,这里写一种就行了,写法和上面两个线程的都一样。大家可以自己试一下。
Condition介绍
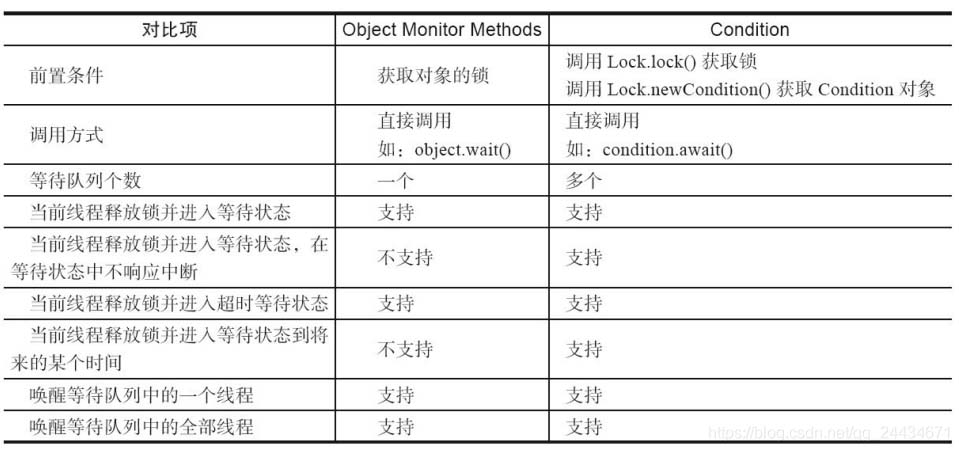
我们在没有学习Lock之前,使用的最多的同步方式应该是synchronized关键字来实现同步方式了。配合Object的wait()、notify()系列方法可以实现等待/通知模式。Condition接口也提供了类似Object的监视器方法,与Lock配合可以实现等待/通知模式,但是这两者在使用方式以及功能特性上还是有差别的。Object和Condition接口的一些对比。摘自《Java并发编程的艺术》

Condition接口常用方法
condition可以通俗的理解为条件队列。当一个线程在调用了await方法以后,直到线程等待的某个条件为真的时候才会被唤醒。这种方式为线程提供了更加简单的等待/通知模式。Condition必须要配合锁一起使用,因为对共享状态变量的访问发生在多线程环境下。一个Condition的实例必须与一个Lock绑定,因此Condition一般都是作为Lock的内部实现。
await() :造成当前线程在接到信号或被中断之前一直处于等待状态。
await(long time, TimeUnit unit) :造成当前线程在接到信号、被中断或到达指定等待时间之前一直处于等待状态。
awaitNanos(long nanosTimeout) :造成当前线程在接到信号、被中断或到达指定等待时间之前一直处于等待状态。返回值表示剩余时间,如果在nanosTimesout之前唤醒,那么返回值 = nanosTimeout - 消耗时间,如果返回值 <= 0 ,则可以认定它已经超时了。
awaitUninterruptibly() :造成当前线程在接到信号之前一直处于等待状态。【注意:该方法对中断不敏感】。
awaitUntil(Date deadline) :造成当前线程在接到信号、被中断或到达指定最后期限之前一直处于等待状态。如果没有到指定时间就被通知,则返回true,否则表示到了指定时间,返回返回false。
signal() :唤醒一个等待线程。该线程从等待方法返回前必须获得与Condition相关的锁。
signal()All :唤醒所有等待线程。能够从等待方法返回的线程必须获得与Condition相关的锁。
Semaphore介绍
Semaphore 是 synchronized 的加强版,作用是控制线程的并发数量。就这一点而言,单纯的synchronized 关键字是实现不了的。他可以保证某一个资源在一段区间内有多少给线程可以去访问。


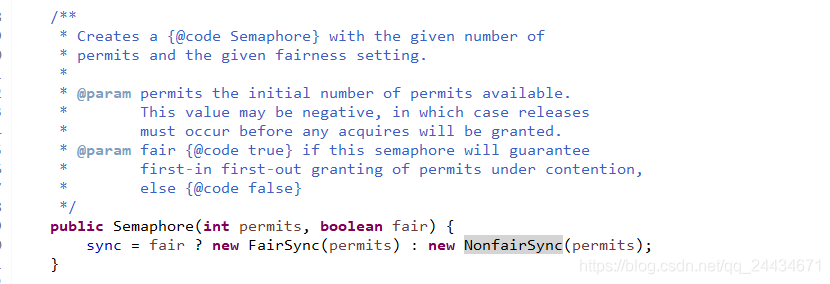
从源码我们可以看出来,它new了一个静态内部类,继承Sync接口。他同时也提供了一些构造方法

比如说通过这个构造方法可以创建一个是否公平的Semaphore类。
以上为个人经验,希望能给大家一个参考,也希望大家多多支持自学编程网。

- 本文固定链接: https://zxbcw.cn/post/215131/
- 转载请注明:必须在正文中标注并保留原文链接
- QQ群: PHP高手阵营官方总群(344148542)
- QQ群: Yii2.0开发(304864863)
