
首先大家可以先了解一下SFTP和FTP协议的区别,这里我就不赘述了。
Sftp 默认监听端口22 Ftp协议默认监听端口21 本质没什么区别都是基于文件传输协议。前者安全性能高,后者效率高。
下面进入正题:
一,确保你的Linux 账号能连接,sftp默认就是Linux root账号密码
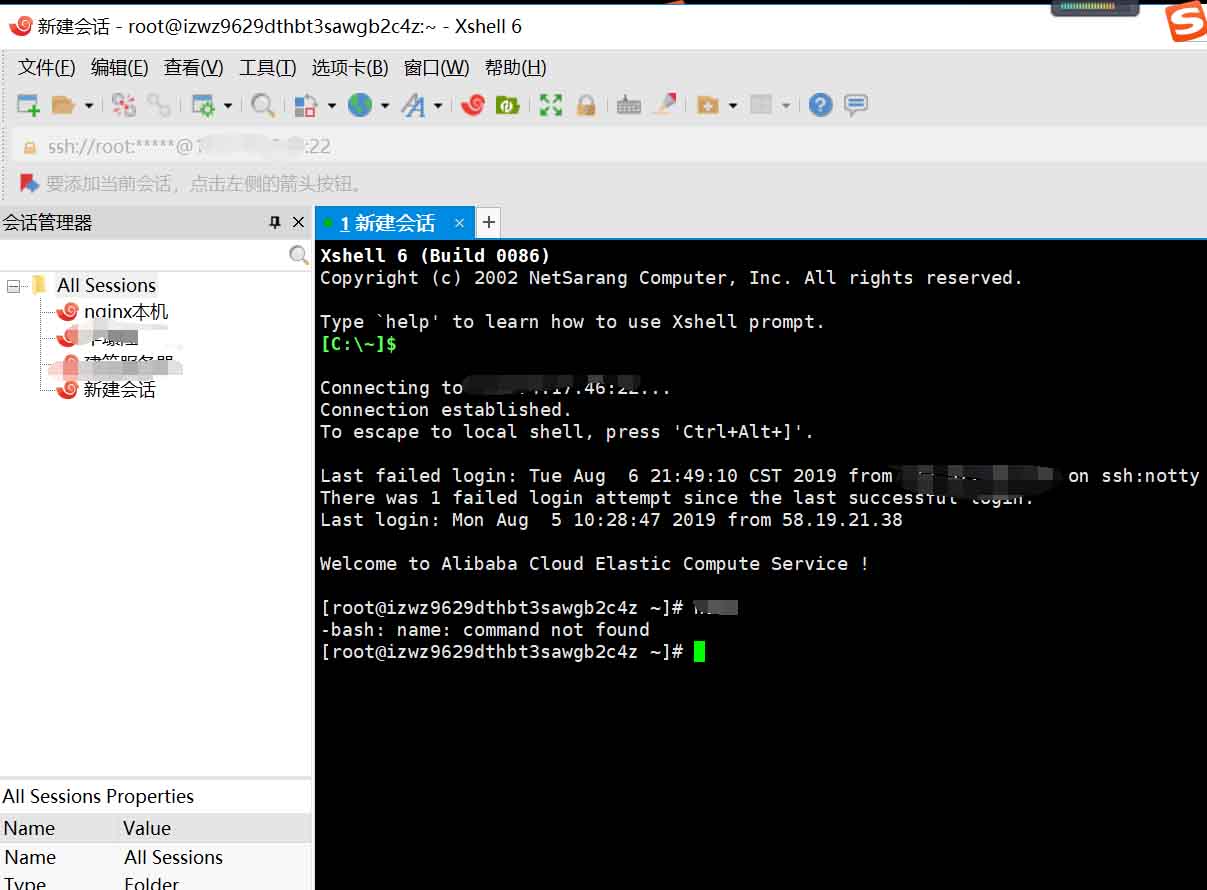
这里就是你的管理员账号用户名和密码。一般这个密码Sftp就直接连就行了不用改的都。下面看看Xftp

连接成功了说明没有问题。
二,通过如果是阿里云服务器一定把防火墙和安全组都打开,以免出现其他问题
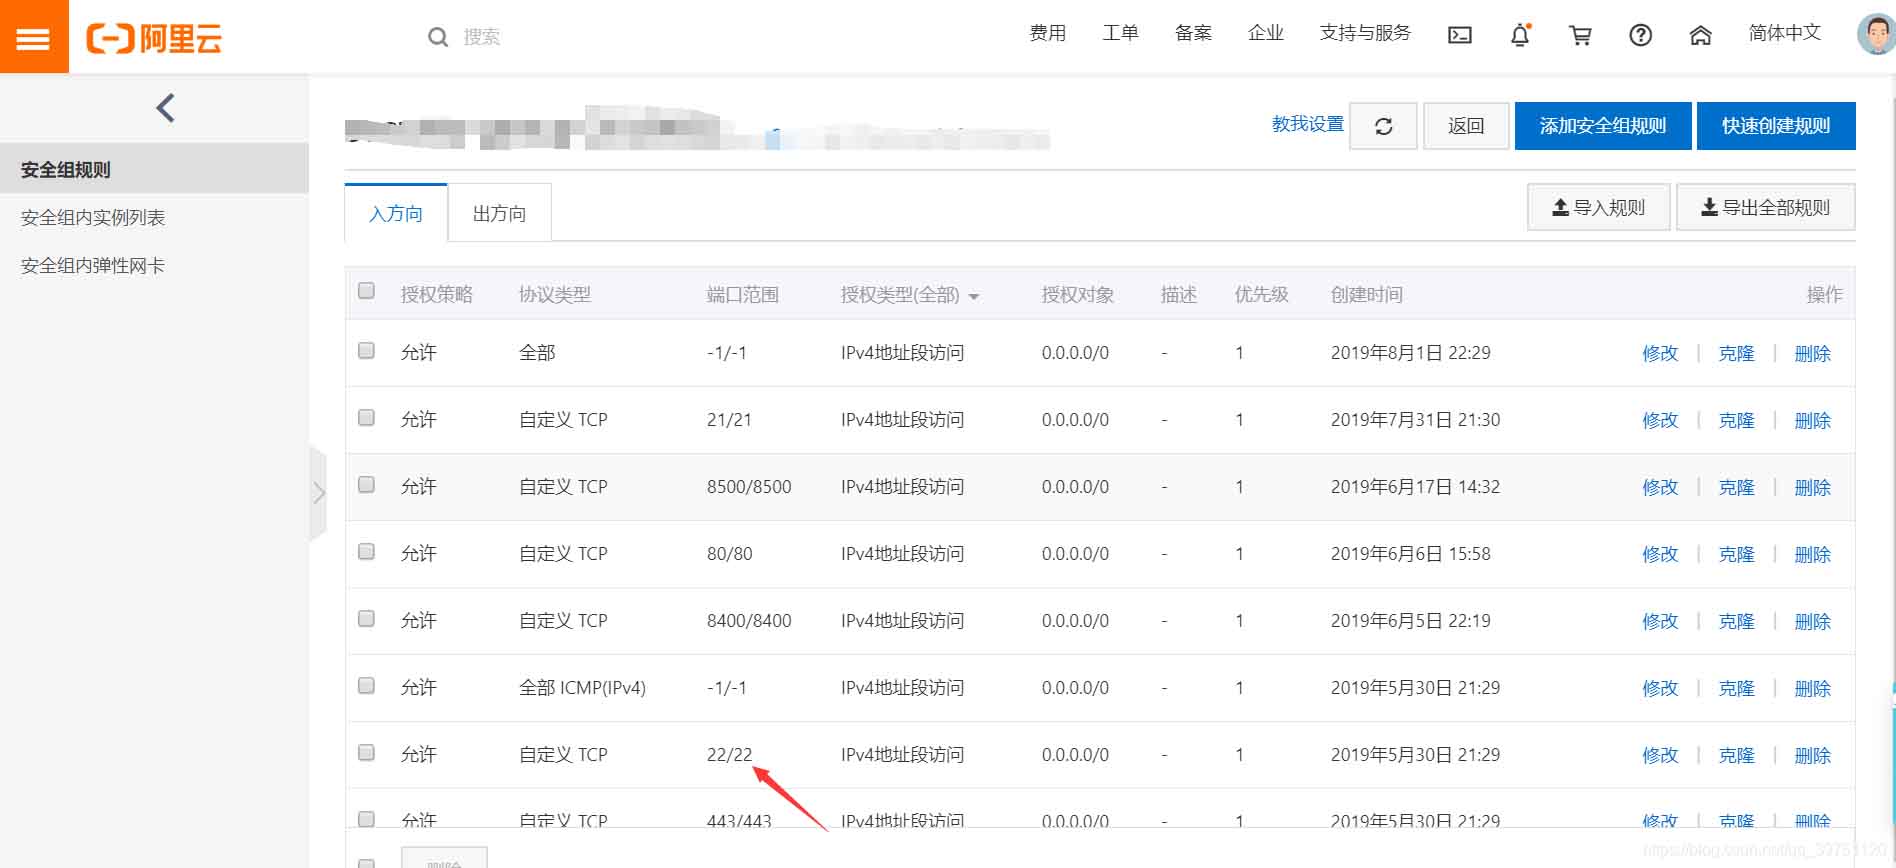
还有一个防火墙

三,很重要的一步,通过java JSCH上传
博主这里是maven项目直接把包发给你们(如果是web项目去官网下载jar包)
<dependency>
    <groupId>com.jcraft</groupId>
    <artifactId>jsch</artifactId>
    <version>0.1.49</version>
</dependency>
四,配置包下好过后现在使用工具类上传连接啦。(这里可以注解配置文件自行配置)
public class SFTPInfo {
    public static final String SFTP_REQ_HOST = "000.00.00.00";        //云服务器ip
    public static final String SFTP_REQ_USERNAME = "00t";           // 用户名
    public static final String SFTP_REQ_PASSWORD = "00";      //密码
    public static final int SFTP_DEFAULT_PORT = 22;                  //端口
   public static String basePath="/usr/games/images";               // 文件在服务器端保存的主目录 (文件上传路径这是)
    public  static String baseUrl="https://##.##.com/images";   //线上域名访问指定nginx访问路径 (这里路径很关键)
}
这里的用户和密码都是你自己的服务器用户名和密码。
五,SFTP上传工具类:
import java.io.InputStream;
import java.util.Properties;
import org.slf4j.Logger;
import org.slf4j.LoggerFactory;
import com.jcraft.jsch.Channel;
import com.jcraft.jsch.ChannelSftp;
import com.jcraft.jsch.JSch;
import com.jcraft.jsch.JSchException;
import com.jcraft.jsch.Session;
import com.jcraft.jsch.SftpException;
public class SftpUtils {
    private static final Logger LOG = LoggerFactory.getLogger(SftpUtils.class);

    /**
     * 参考实例
     *
     * @param args
     */
    public Channel getChannel(Session session) {
        Channel channel = null;
        try {
            channel = session.openChannel("sftp");
            channel.connect();
            LOG.info("get Channel success!");
        } catch (JSchException e) {
            LOG.info("get Channel fail!", e);
        }
        return channel;
    }

    public Session getSession(String host, int port, String username,
                              final String password) {
        Session session = null;
        try {
            JSch jsch = new JSch();
            jsch.getSession(username, host, port);
            session = jsch.getSession(username, host, port);
            session.setPassword(password);
            Properties sshConfig = new Properties();
            sshConfig.put("StrictHostKeyChecking", "no");
            session.setConfig(sshConfig);
            session.connect();
            LOG.info("Session connected!");
        } catch (JSchException e) {
            LOG.info("get Channel failed!", e);
        }
        return session;
    }

    /**
     * 创建文件夹
     *
     * @param sftp
     * @param dir
     *            文件夹名称
     */
    public void mkdir(ChannelSftp sftp, String dir) {
        try {
            sftp.mkdir(dir);
            System.out.println("创建文件夹成功!");
        } catch (SftpException e) {
            System.out.println("创建文件夹失败!");
            e.printStackTrace();
        }
    }

    /**
     * @param sftp
     * @param dir
     *            上传目录
     * @param file
     *            上传文件
     * @return
     */
    public Boolean uploadFile(ChannelSftp sftp, String dir, InputStream  file,String fileName) {
        Boolean flag = false;
        try {
            sftp.cd(dir);
            if (file != null) {
                sftp.put(file, fileName);
                flag=true;
                return flag;
            } else {
                flag=false;
                return flag;
            }
        } catch (Exception e) {

            flag=false;
            return flag;
        }
    }

    /**
     * 下载文件
     *
     * @param directory
     *            下载目录
     * @param downloadFile
     *            下载的文件
     * @param saveFile
     *            存在本地的路径
     * @param sftp
     */
    public String download(String directory, String downloadFile,
                           String saveFile, ChannelSftp sftp) {
        String result = "";
        try {
            sftp.cd(directory);
            sftp.get(downloadFile, saveFile);
            result = "下载成功!";
        } catch (Exception e) {
            result = "下载失败!";
            LOG.info("下载失败!", e);
            ;
        }
        return result;
    }

    /**
     * 删除文件
     *
     * @param directory
     *            要删除文件所在目录
     * @param deleteFile
     *            要删除的文件
     * @param sftp
     */
    public String delete(String directory, String deleteFile, ChannelSftp sftp) {
        String result = "";
        try {
            sftp.cd(directory);
            sftp.rm(deleteFile);
            result = "删除成功!";
        } catch (Exception e) {
            result = "删除失败!";
            LOG.info("删除失败!", e);
        }
        return result;
    }

    private void closeChannel(Channel channel) {
        if (channel != null) {
            if (channel.isConnected()) {
                channel.disconnect();
            }
        }
    }

    private void closeSession(Session session) {
        if (session != null) {
            if (session.isConnected()) {
                session.disconnect();
            }
        }
    }

    public void closeAll(ChannelSftp sftp, Channel channel, Session session) {
        try {
            closeChannel(sftp);
            closeChannel(channel);
            closeSession(session);
        } catch (Exception e) {
            LOG.info("closeAll", e);
        }
    }
}
工具类不需要修改直接使用即可。
还有一个随机生成文件名称的工具类也发给大家
import java.util.Random;
public class IDUtils {

    /**
     * 生成随机图片名
     */
    public static String genImageName() {
        //取当前时间的长整形值包含毫秒
        long millis = System.currentTimeMillis();
        //加上三位随机数
        Random random = new Random();
        int end3 = random.nextInt(999);
        //如果不足三位前面补0
        String str = millis + String.format("%03d", end3);
        return str;
    }
}
六,后台请求方法看看
博主这里用了 Clipboard 上传,参数不支持序列化所以就一个个接受了,很多@RequestParam("file") MultipartFile file,加其他参数加上是post请求方式有的会报错把post请求方法找不到,这个问题不影响。
@Log("网站案例上传信息")
@ResponseBody
@PostMapping("/upload")
@RequiresPermissions("common:cases:upload")
R upload(@RequestParam("file") MultipartFile file,@RequestParam("ctitle") String ctitle, @RequestParam("cmessage") String  cmessage,
       @RequestParam("casetroduction") String  casetroduction,@RequestParam("strdate") Date  strdate,@RequestParam("stpdate") Date  stpdate,
       @RequestParam("credate") Date  credate,HttpServletRequest request) throws ParseException, IOException {
   String oldName = file.getOriginalFilename();
   //使用IDUtils工具类生成新的文件名,新文件名 = newName + 文件后缀
   String newName = IDUtils.genImageName();
   newName = newName + oldName.substring(oldName.lastIndexOf("."));
   SftpUtils ft = new SftpUtils();
   //通过SFtoInfo  参数连接传入参数即可
   Session s = ft.getSession(SFTPInfo.SFTP_REQ_HOST,SFTPInfo.SFTP_DEFAULT_PORT,      SFTPInfo.SFTP_REQ_USERNAME,SFTPInfo.SFTP_REQ_PASSWORD);
   Channel channel = ft.getChannel(s);
   ChannelSftp sftp = (ChannelSftp)channel;
   Boolean upload = ft.uploadFile(sftp,SFTPInfo.basePath, file.getInputStream(),newName);
   if(upload){
      //上传成功关闭信息
      ft.closeAll(sftp, channel, s); //关闭连接
      CasesDO cases=new CasesDO();
      cases.setCtitle(ctitle);
        // 这里很重要 这是访问路径写入到数据库的路径加线上域名访问图片的路径,博主这里加了ssl证书
      //     https://**.**.com/images   newName=文件名图片
      cases.setCaseimg(SFTPInfo.baseUrl + "/" + newName);
      cases.setCasetroduction(casetroduction);
      cases.setStpdate(stpdate);
      cases.setCredate(credate);
      cases.setStrdate(strdate);
      cases.setCmessage(cmessage);
      if (casesService.save(cases) > 0) {
         return R.ok("上传成功");
      }
               }else {
      return R.error("上传error");
   }
   return R.error();
}
看看前台js------请求参数大家可以换成HashMap但是后台会用Object转其他类型转俩次
var clipboard = new Clipboard('button.copy', {
    text: function (trigger) {
        layer.msg('文件路径已复制到粘贴板');
        return $(trigger).attr('url');
    }
});
layui.use('upload', function () {
    var upload = layui.upload;
    //执行实例
    upload.render({
        elem: '#test1', //绑定元素
        url: '/common/cases/upload', //上传接口
        size: 100000,
        // auto: false,
        accept: 'file',
        //bindAction: '#submits',
        before: function (obj) {
            //obj参数包含的信息,跟 choose回调完全一致。其中输入向后台传输的参数
            layer.load();
            this.data = {
                ctitle: $('#ctitle').val(),
                cmessage: $('#cmessage').val()                    ,
                casetroduction: $('#casetroduction').val()
                ,strdate: $('#strdate').val()
                ,stpdate: $('#stpdate').val()
                ,credate: $('#credate').val(),
            };
        },
        done: function (r) {
            parent.layer.msg(r.msg);
            parent.reLoad();
            var index = parent.layer.getFrameIndex(window.name); // 获取窗口索引
            parent.layer.close(index);
        },
        error: function (r) {
            layer.msg(r.msg);
        }
    });
});
成功后报存到数据库-------
七,页面我就不展示了
这里上传成功过后图片在SftpInfo类的 /usr/games/images路径也就是服务器路径地址

上传成功后就在这个路径了。如果不是root用户一定要给权限 chmod 777 /usr/gemes/
八,下面就是nginx配置 (这里nginx我就不说安装方法自行百度)
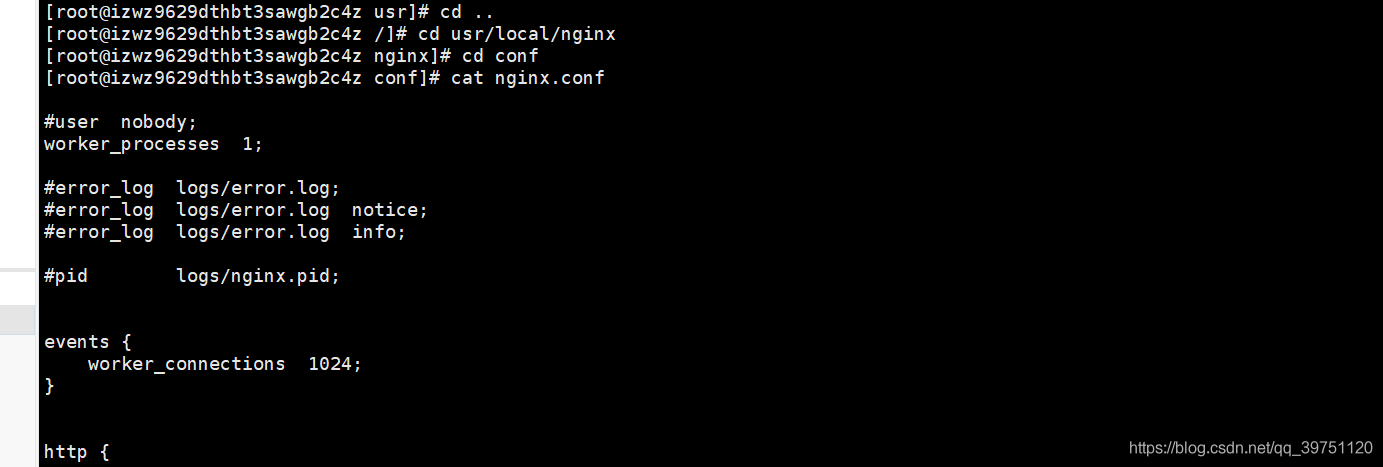
最关键一步这里就是通过这个nginx路径指向到上传图片路径,autoIndex on;是开启浏览, alias 是直接指向
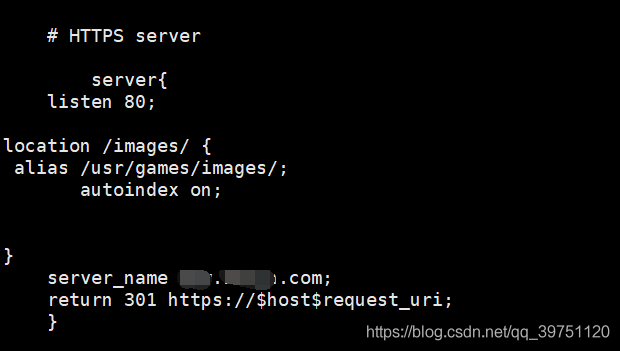
启动nginx 刷新一下配置
/usr/local/nginx/sbin/nginx -s reload
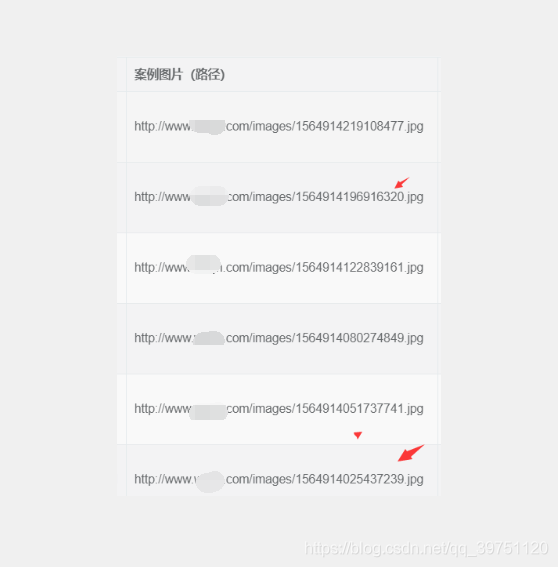
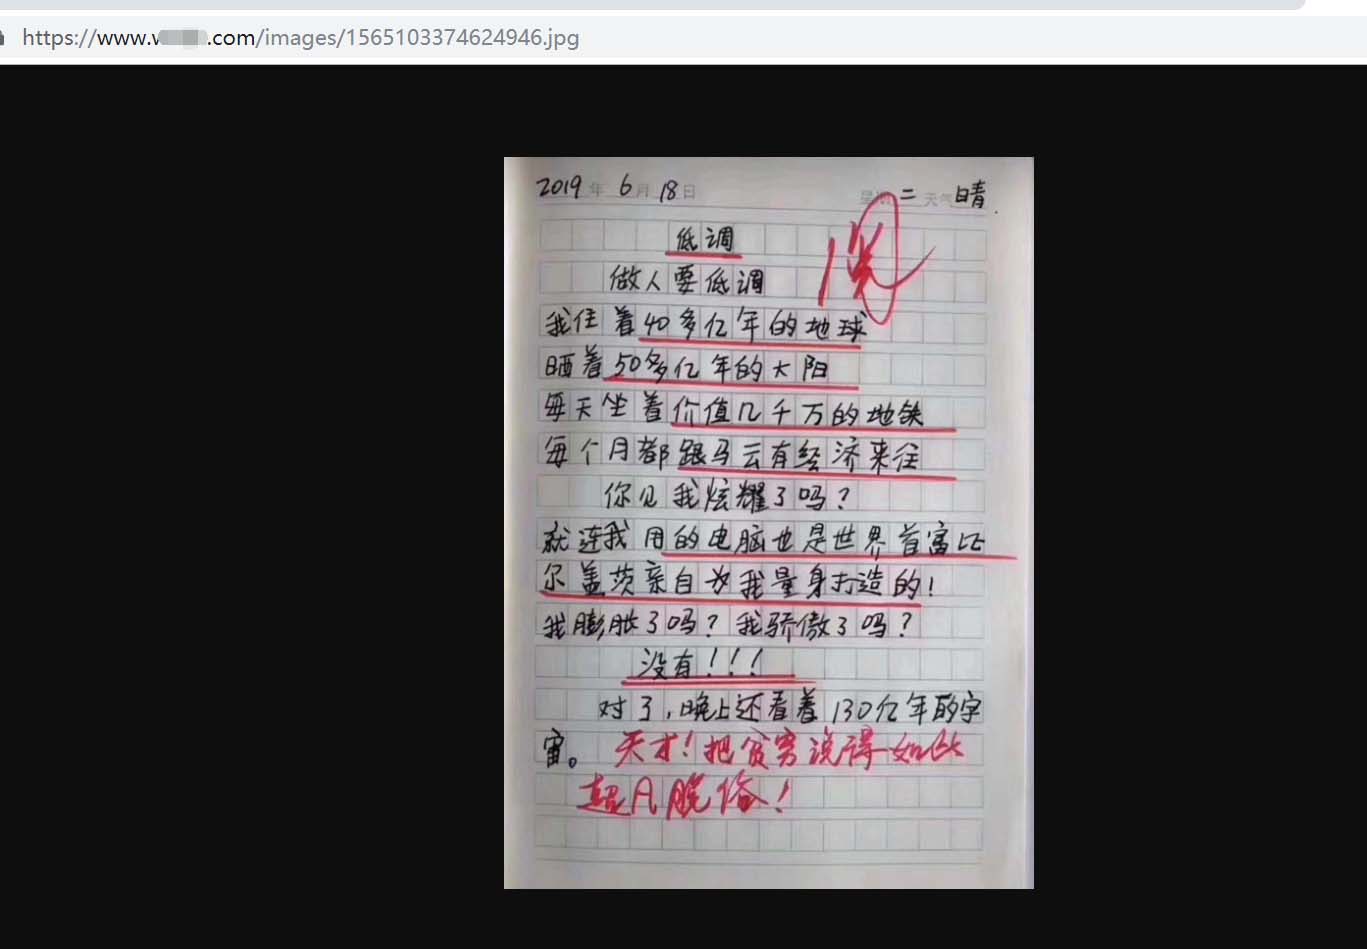
九,访问一下图片大工告成。
博主重新上传了一张图片

以上为个人经验,希望能给大家一个参考,也希望大家多多支持自学编程网。

- 本文固定链接: https://zxbcw.cn/post/216456/
- 转载请注明:必须在正文中标注并保留原文链接
- QQ群: PHP高手阵营官方总群(344148542)
- QQ群: Yii2.0开发(304864863)