
一、IOC如何获取对象
1.1 Spring是如何获取对象的?
①新建一个maven项目后导入webmvc的依赖:因为webmvc包含了很多其他依赖,为了省事,干脆导入一个总的,方便省事!版本嘛!个人比较喜欢用最新版。
    <dependency>
            <groupId>org.springframework</groupId>
            <artifactId>spring-webmvc</artifactId>
            <version>5.3.5</version>
    </dependency>
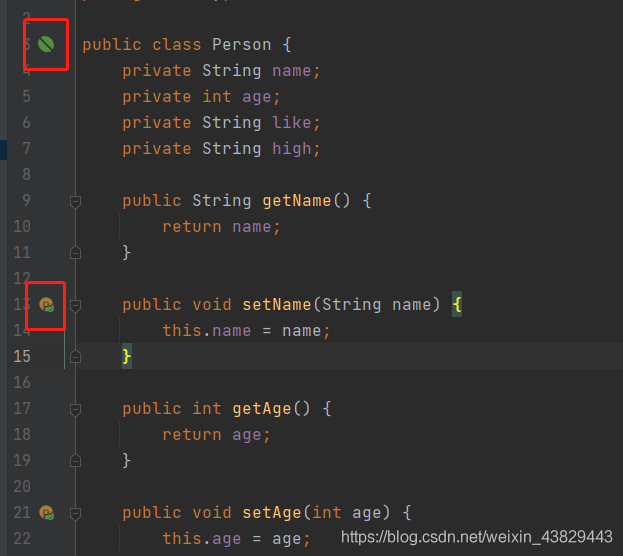
②新建实体测试类:
public class Person {
    private String name;
    private int age;
    private String like;
    private String high;
    //get、set、tostring方法为了篇幅省略,可以自己加或者使用lombok
}
③在resources目录下新建ContextAplication.xml文件
<?xml version="1.0" encoding="UTF-8"?>
<beans xmlns="http://www.springframework.org/schema/beans"
       xmlns:xsi="http://www.w3.org/2001/XMLSchema-instance"
       xsi:schemaLocation="http://www.springframework.org/schema/beans http://www.springframework.org/schema/beans/spring-beans.xsd">
    <bean id="Person" class="entity.Person">
        <property name="age" value="23"></property>
        <property name="name" value="丁大大"></property>
        <property name="like" value="钓鱼"></property>
        <property name="high" value="173"></property>
    </bean>
</beans>
④以上前提之后,你会发现你的测试Person类种发生了变化:点击可以跳转到指定的xml位置哦~
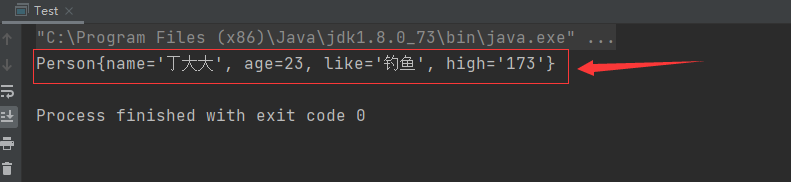
⑤测试:
Context.getBean() 不指定类时,需要强制转换,所以建议使用第二种方式来获取对象
public class Test {
    public static void main(String[] args) {
        ApplicationContext Context = new ClassPathXmlApplicationContext("ContextAplication.xml");
//        Person person = (Person) Context.getBean("Person");//这里不指定的话需要强转,建议用下面的方式来拿对象
        Person person = Context.getBean("Person",Person.class);
        System.out.println(person);
    }
}
⑥执行结果如下:成功拿到值!
⑦总结:
- 控制: 传统的程序对象的创建是由程序来控制创建的。
- 反转: 交给Spring容器来创建对象,而程序只负责被动的接收对象。这就是反转。
- 依赖注入: 就是通过set方法来注入的。
1.2 改造案例由xml选择创建对象
①xml:
 <bean id="StudentMapperImpl" class="mapper.impl.StudentMapperImpl"/>
    <bean id="TeacherMapperImpl" class="mapper.impl.TeacherMapperImpl"/>
    <bean id="PersonServiceImpl" class="service.impl.PersonServiceImpl">
        <property name="studentMapper" ref="StudentMapperImpl"/>
    </bean>
②测试:
        ApplicationContext Context1 = new ClassPathXmlApplicationContext("ContextAplication.xml");
        PersonServiceImpl personServiceImpl = Context1.getBean("PersonServiceImpl", PersonServiceImpl.class);
        personServiceImpl.getPersonInfo();
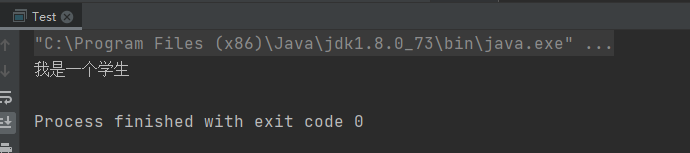
③执行结果:
⑤总结:
对象由Spring 来创建 , 管理 , 装配 !这就是 IOC!
二、IOC是通过什么方式来创建对象的?
2.1 通过无参构造函数来创建对象
①以Person类为例子,但是加上一个无参构造函数!
public class Person {
private String name;
private int age;
private String like;
private String high;
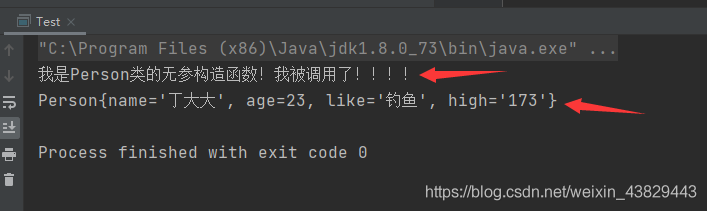
public Person() {
//输出一句话证明自己被调用了!
System.out.println("我是Person类的无参构造函数!我被调用了!!!!");
}
//set、get、tostring方法因为篇幅原因省略,请手动加上!
}
②xml中配置:
<?xml version="1.0" encoding="UTF-8"?>
<beans xmlns="http://www.springframework.org/schema/beans"
       xmlns:xsi="http://www.w3.org/2001/XMLSchema-instance"
       xsi:schemaLocation="http://www.springframework.org/schema/beans http://www.springframework.org/schema/beans/spring-beans.xsd">
    <bean id="Person" class="entity.Person">
        <property name="age" value="23"></property>
        <property name="name" value="丁大大"></property>
        <property name="like" value="钓鱼"></property>
        <property name="high" value="173"></property>
    </bean>
</beans>
③测试类:
public class Test {
    public static void main(String[] args) {
        ApplicationContext Context = new ClassPathXmlApplicationContext("ContextAplication.xml");
        Person person = Context.getBean("Person", Person.class);
        System.out.println(person);
    }
}
④执行结果:
⑤去除无参构造,增加有参构造:
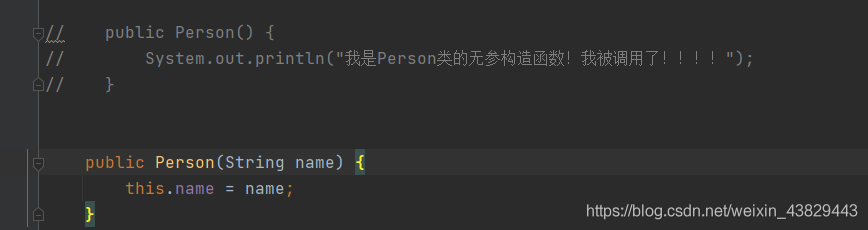
xml配置程序直接报错:
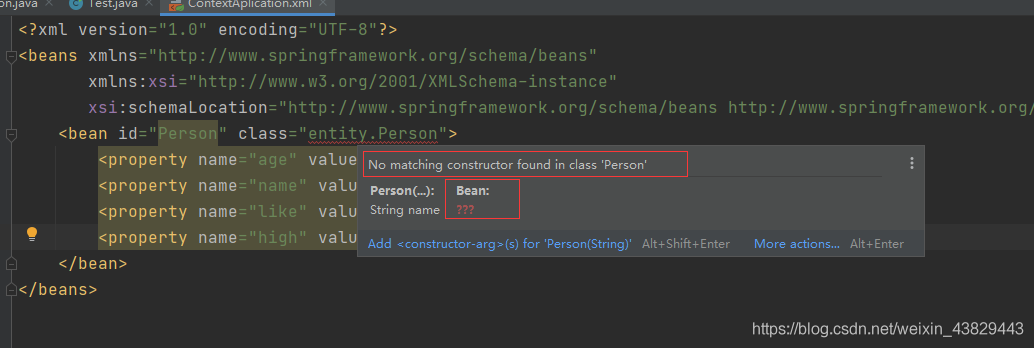
⑥总结:
Spring创建对象默认是通过无参构造函数创建的!能通过有参构造函数来创建对象嘛?能!看下面!
2.2 通过有参构造方法来创建对象
①前提于 2.1 一致,新增有参构造函数:(因为类中,默认的也就是不写构造参数就是无参构造,写了有参构造才能真正意义上去除无参构造,这个不用解释太多吧,java基础的内容了~!)
    public Person(String name, int age, String like, String high) {
        this.name = name;
        this.age = age;
        this.like = like;
        this.high = high;
    }
②xml配置文件中要发生一定的改变:
<?xml version="1.0" encoding="UTF-8"?>
<beans xmlns="http://www.springframework.org/schema/beans"
       xmlns:xsi="http://www.w3.org/2001/XMLSchema-instance"
       xsi:schemaLocation="http://www.springframework.org/schema/beans http://www.springframework.org/schema/beans/spring-beans.xsd">
    <bean id="Person" class="entity.Person">
<!--        <property name="name" value="丁大大"></property>-->
<!--        <property name="age" value="23"></property>-->
<!--        <property name="like" value="钓鱼"></property>-->
<!--        <property name="high" value="173"></property>-->
        <constructor-arg index="0" value="丁大大"/>
        <constructor-arg name="age" value="23"/>
        <constructor-arg type="java.lang.String" value="钓鱼"/>
        <constructor-arg type="java.lang.String" value="173"/>
    </bean>
</beans>
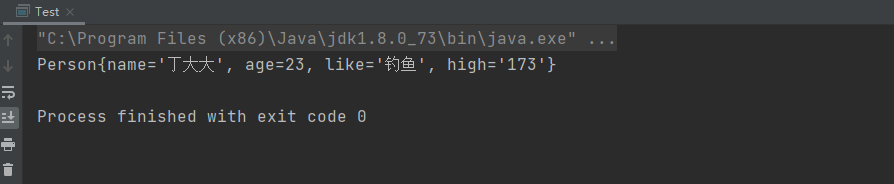
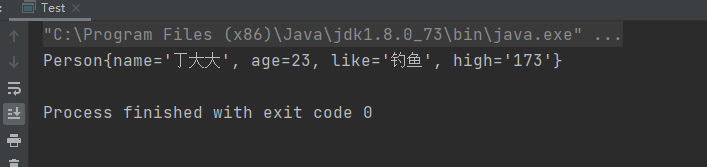
③执行结果:
⑤总结:
- 无参构造函数指定值时使用 propert 标签
- 有参构造函数指定值时使用 constructor-arg 标签,三种写法
- index --通过下标来给属性赋值
- name --通过属性名称来给属性赋值
- type -- 指定属性的类型来给属性赋值
- 基本类型可以直接写
- 引用类型得加上全称,如:java.lang.String
- 位置跟index差不多,依次从上到下对应属性的从上到下。
- 在配置文件加载的时候。其中管理的对象都已经初始化了!
三、Spring的配置
3.1 alias(别名):
- 为bean设置别名,可设置多个!
①xml:
<?xml version="1.0" encoding="UTF-8"?>
<beans xmlns="http://www.springframework.org/schema/beans"
       xmlns:xsi="http://www.w3.org/2001/XMLSchema-instance"
       xsi:schemaLocation="http://www.springframework.org/schema/beans http://www.springframework.org/schema/beans/spring-beans.xsd">
    <alias name="Person" alias="personAlias1"/>
    <alias name="Person" alias="personAlias2"/>
    <alias name="Person" alias="personAlias3"/>
    <bean id="Person" class="entity.Person">
        <constructor-arg index="0" value="丁大大"/>
        <constructor-arg name="age" value="23"/>
        <constructor-arg type="java.lang.String" value="钓鱼"/>
        <constructor-arg type="java.lang.String" value="173"/>
    </bean>
</beans>
②测试类:
public class Test {
    public static void main(String[] args) {
        ApplicationContext Context = new ClassPathXmlApplicationContext("ContextAplication.xml");
        Person person = Context.getBean("personAlias1", Person.class);
        System.out.println(person);
    }
}
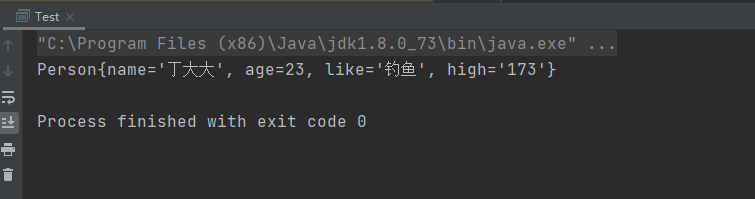
③执行结果:
④总结:讲实话,这玩意用处不大,因为还有更好的方式来设置别名!
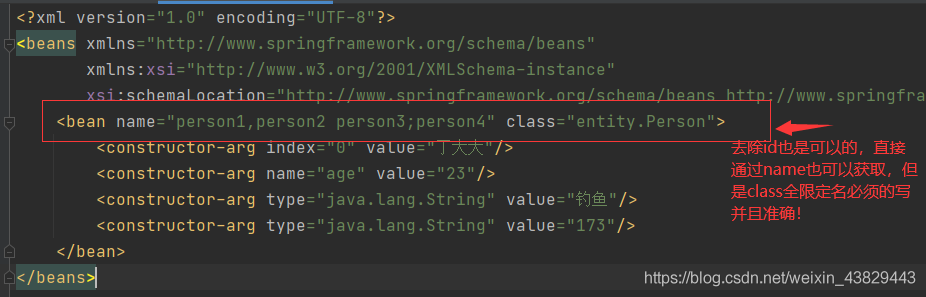
3.2 Bean的配置:
- bean就相当于java对象,由Spring创建和管理
①xml:
<?xml version="1.0" encoding="UTF-8"?>
<beans xmlns="http://www.springframework.org/schema/beans"
       xmlns:xsi="http://www.w3.org/2001/XMLSchema-instance"
       xsi:schemaLocation="http://www.springframework.org/schema/beans http://www.springframework.org/schema/beans/spring-beans.xsd">
    <alias name="Person" alias="personAlias1"/>
    <alias name="Person" alias="personAlias2"/>
    <alias name="Person" alias="personAlias3"/>
    <bean id="Person" name="person1,person2 person3;person4" class="entity.Person">
        <constructor-arg index="0" value="丁大大"/>
        <constructor-arg name="age" value="23"/>
        <constructor-arg type="java.lang.String" value="钓鱼"/>
        <constructor-arg type="java.lang.String" value="173"/>
    </bean>
</beans>
②测试类:
public class Test {
    public static void main(String[] args) {
        ApplicationContext Context = new ClassPathXmlApplicationContext("ContextAplication.xml");
        Person person = Context.getBean("person4", Person.class);
        System.out.println(person);
    }
}
③执行结果:
④总结:
- id是bean的唯一标识符
- 如果没有配置id,那么name相当于标识符,并且可以设置多个
- name也是别名,可多个,并且可以通过 逗号 空格 分号 来分隔,是不是比alias别名方便?所以设置别名我们一般使用name
- id和name同时存在,name只是别名,不是标识符
- class是类的全限定名 包名+类名
3.3 import(团队合作之导入)
①在实际工作的开发过程中,一个项目可能由多个程序员来进行开发,所以为了解决共性问题,比如:同一文件提交时都进行了修改可能引起冲突,所以我们使用import来解耦!
②新建多个xml配置文件:
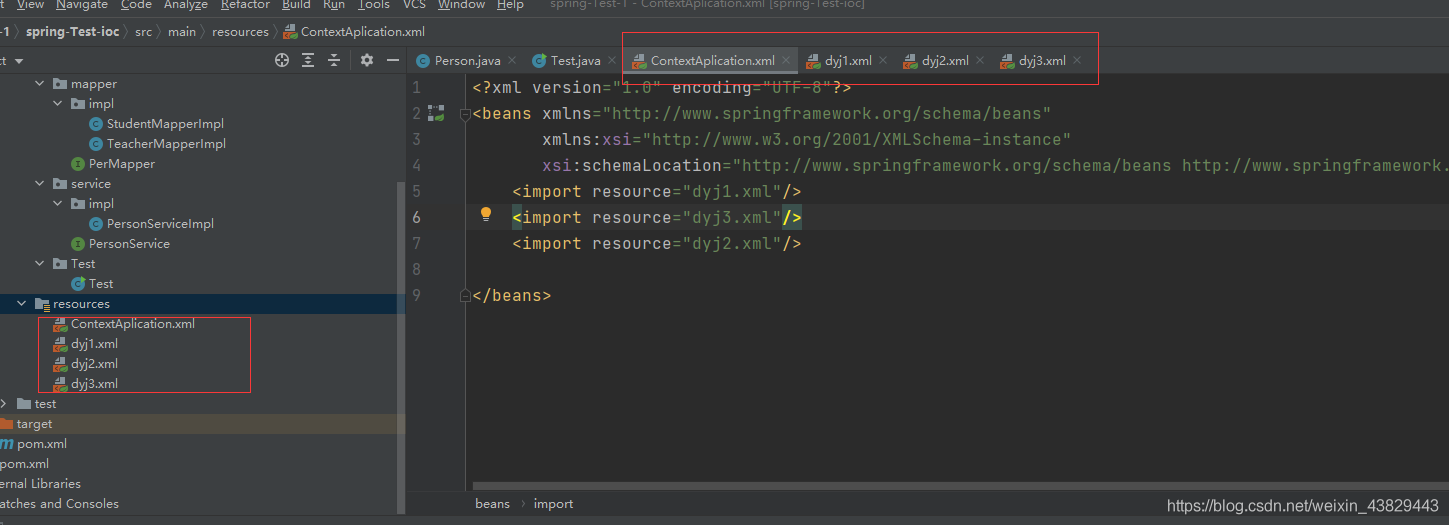
ContextAplication.xml:
<?xml version="1.0" encoding="UTF-8"?>
<beans xmlns="http://www.springframework.org/schema/beans"
       xmlns:xsi="http://www.w3.org/2001/XMLSchema-instance"
       xsi:schemaLocation="http://www.springframework.org/schema/beans http://www.springframework.org/schema/beans/spring-beans.xsd">
    <import resource="dyj1.xml"/>
    <import resource="dyj3.xml"/>
    <import resource="dyj2.xml"/>
</beans>
dyj1.xml:
<?xml version="1.0" encoding="UTF-8"?>
<beans xmlns="http://www.springframework.org/schema/beans"
       xmlns:xsi="http://www.w3.org/2001/XMLSchema-instance"
       xsi:schemaLocation="http://www.springframework.org/schema/beans http://www.springframework.org/schema/beans/spring-beans.xsd">
    <bean name="person1,person2 person3;person4" class="entity.Person">
        <constructor-arg index="0" value="丁大大1"/>
        <constructor-arg name="age" value="23"/>
        <constructor-arg type="java.lang.String" value="钓鱼1"/>
        <constructor-arg type="java.lang.String" value="173"/>
    </bean>
</beans>
dyj2.xml:
<?xml version="1.0" encoding="UTF-8"?>
<beans xmlns="http://www.springframework.org/schema/beans"
       xmlns:xsi="http://www.w3.org/2001/XMLSchema-instance"
       xsi:schemaLocation="http://www.springframework.org/schema/beans http://www.springframework.org/schema/beans/spring-beans.xsd">
    <bean name="person1,person2 person3;person4" class="entity.Person">
        <constructor-arg index="0" value="丁大大2"/>
        <constructor-arg name="age" value="23"/>
        <constructor-arg type="java.lang.String" value="钓鱼2"/>
        <constructor-arg type="java.lang.String" value="173"/>
    </bean>
</beans>
dyj3.xml:
<?xml version="1.0" encoding="UTF-8"?>
<beans xmlns="http://www.springframework.org/schema/beans"
       xmlns:xsi="http://www.w3.org/2001/XMLSchema-instance"
       xsi:schemaLocation="http://www.springframework.org/schema/beans http://www.springframework.org/schema/beans/spring-beans.xsd">
    <bean name="person1,person2 person3;person4" class="entity.Person">
        <constructor-arg index="0" value="丁大大3"/>
        <constructor-arg name="age" value="23"/>
        <constructor-arg type="java.lang.String" value="钓鱼3"/>
        <constructor-arg type="java.lang.String" value="173"/>
    </bean>
</beans>
③执行:
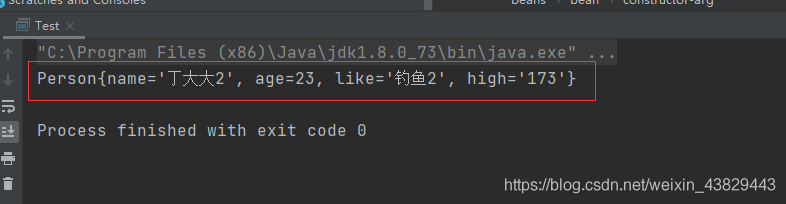
④总结:
- 如果三个文件都是对同一个操作同一个类,或者说内容一致,那么就以主xml中从上到下最后一个impot为准。
- 语法格式:
- 优点:
- 每个人开发的都是独立的,如果重复的内容,Spring会帮我们自动合并!
- 降低了程序的冲突性!
- 大大提高了后期代码的可维护性!
总结
本篇文章就到这里了,希望能帮助到你,也希望您能够多多关注自学编程网的更多内容!

- 本文固定链接: https://zxbcw.cn/post/216772/
- 转载请注明:必须在正文中标注并保留原文链接
- QQ群: PHP高手阵营官方总群(344148542)
- QQ群: Yii2.0开发(304864863)