
Spring Cloud Stream对Spring Cloud体系中的Mq进⾏了很好的上层抽象,可以让我们与具体消息中间件解耦合,屏蔽掉了底层具体MQ消息中间件的细节差异,就像Hibernate屏蔽掉了具体数据库(Mysql/Oracle⼀样)。如此⼀来,我们学习、开发、维护MQ都会变得轻松。⽬前Spring Cloud Stream原生⽀持RabbitMQ和Kafka,阿里在这个基础上提供了RocketMQ的支持
简单使用Spring Cloud Stream 构建基于RocketMQ的生产者和消费者
生产者
pom文件中加入依赖
<dependencies>
        <dependency>
            <groupId>org.springframework.cloud</groupId>
            <artifactId>spring-cloud-starter-netflix-eureka-client</artifactId>
        </dependency>
        <dependency>
            <groupId>com.alibaba.cloud</groupId>
            <artifactId>spring-cloud-starter-stream-rocketmq</artifactId>
            <version>2.1.0.RELEASE</version>
        </dependency>

    </dependencies>
配置文件中增加关于Spring Cloud Stream binder和bindings的配置
spring:
  application:
    name: zhao-cloud-stream-producer
  cloud:
    stream:
      rocketmq:
        binder:
          name-server: 127.0.0.1:9876
        bindings:
          output:
            producer:
              group: test
              sync: true
      bindings:
        output:
          destination: stream-test-topic
          content-type: text/plain # 内容格式。这里使用 JSON
其中destination代表生产的数据发送到的topic 然后定义一个channel用于数据发送
import org.springframework.cloud.stream.annotation.Output;
import org.springframework.messaging.MessageChannel;

public interface TestChannel {
    @Output("output")
    MessageChannel output();
}
最后构造数据发送的接口
@Controller
public class SendMessageController {
    @Resource
    private TestChannel testChannel;

    @ResponseBody
    @RequestMapping(value = "send", method = RequestMethod.GET)
    public String sendMessage() {
        String messageId = UUID.randomUUID().toString();
        Message<String> message = MessageBuilder
                .withPayload("this is a test:" + messageId)
                .setHeader(MessageConst.PROPERTY_TAGS, "test")
                .build();
        try {
            testChannel.output().send(message);
            return messageId + "发送成功";
        } catch (Exception e) {
            return messageId + "发送失败,原因:" + e.getMessage();
        }
    }
}
消费者
消费者的pom引入与生产者相同,在此不再赘述,配置时需要将stream的output修改为input并修改对应属性
spring:
  application:
    name: zhao-cloud-stream-consumer
  cloud:
    stream:
      rocketmq:
        binder:
          name-server: 127.0.0.1:9876
        bindings:
          input:
            consumer:
              tags: test
      bindings:
        input:
          destination: stream-test-topic
          content-type: text/plain # 内容格式。这里使用 JSON
          group: test
另外关于channel的构造也要做同样的修改
import org.springframework.cloud.stream.annotation.Input;
import org.springframework.messaging.SubscribableChannel;

public interface TestChannel {
    @Input("input")
    SubscribableChannel input();
}
最后我在启动类中对收到的消息进行了监听
   @StreamListener("input")
    public void receiveInput(@Payload Message message) throws ValidationException {
        System.out.println("input1 receive: " + message.getPayload() + ", foo header: " + message.getHeaders().get("foo"));
    }
测试结果


Stream其他特性
消息发送失败的处理
消息发送失败后悔发送到默认的一个“topic.errors"的channel中(topic是配置的destination)。要配置消息发送失败的处理,需要将错误消息的channel打开 消费者配置如下
spring:
  application:
    name: zhao-cloud-stream-producer
  cloud:
    stream:
      rocketmq:
        binder:
          name-server: 127.0.0.1:9876
        bindings:
          output:
            producer:
              group: test
              sync: true
      bindings:
        output:
          destination: stream-test-topic
          content-type: text/plain # 内容格式。这里使用 JSON
          producer:
            errorChannelEnabled: true
在启动类中配置错误消息的Channel信息
 @Bean("stream-test-topic.errors")
    MessageChannel testoutPutErrorChannel(){
        return new PublishSubscribeChannel();
    }
新建异常处理service
import org.springframework.integration.annotation.ServiceActivator;
import org.springframework.messaging.Message;
import org.springframework.stereotype.Service;

@Service
public class ErrorProducerService {

    @ServiceActivator(inputChannel = "stream-test-topic.errors")
    public void receiveProducerError(Message message){
        System.out.println("receive error msg :"+message);
    }
}
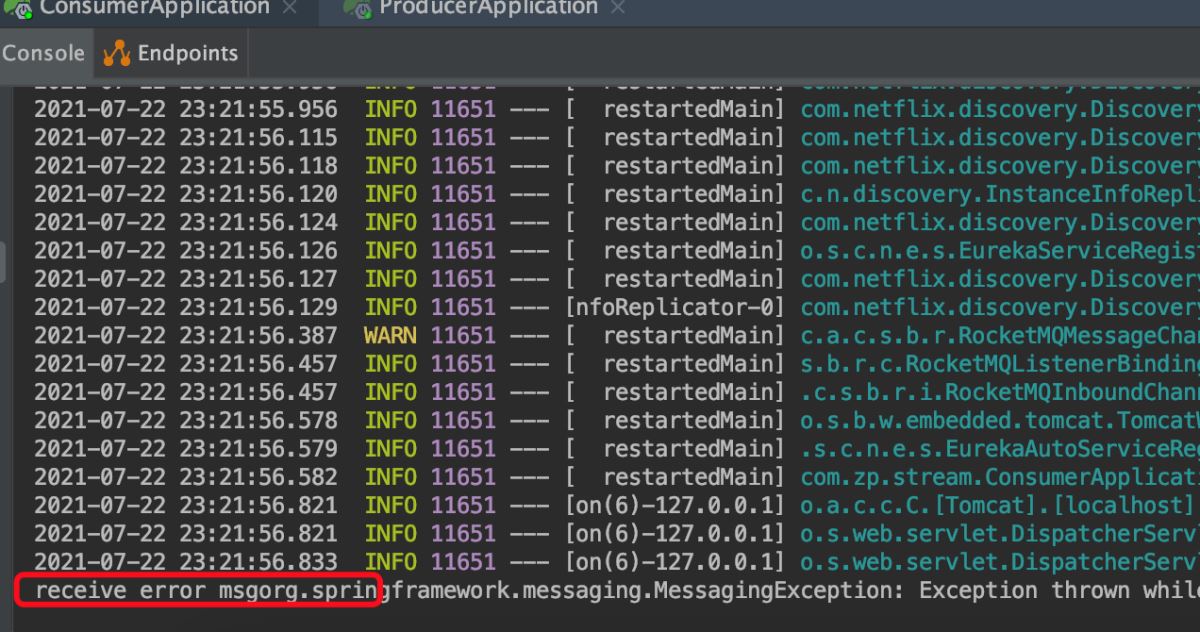
当发生异常时,由于测试类中已经将异常捕获,处理发送异常主要是在这里进行。模拟,应用与rocketMq断开的场景。可见


消费者错误处理
首先增加配置为
spring:
  application:
    name: zhao-cloud-stream-producer
  cloud:
    stream:
      rocketmq:
        binder:
          name-server: 127.0.0.1:9876
        bindings:
          output:
            producer:
              group: test
              sync: true
      bindings:
        output:
          destination: stream-test-topic
          content-type: text/plain # 内容格式。这里使用 JSON
          producer:
            errorChannelEnabled: true
增加相应的模拟异常的操作
 @StreamListener("input")
    public void receiveInput(@Payload Message message) throws ValidationException {
        //System.out.println("input1 receive: " + message.getPayload() + ", foo header: " + message.getHeaders().get("foo"));
        throw new RuntimeException("oops");
    }
    @ServiceActivator(inputChannel = "stream-test-topic.test.errors")
    public void receiveConsumeError(Message message){
        System.out.println("receive error msg"+message.getPayload());
    }
代码地址https://github.com/zhendiao/deme-code/tree/main/zp
到此这篇关于Spring Cloud Stream简单用法的文章就介绍到这了,更多相关Spring Cloud Stream使用内容请搜索自学编程网以前的文章或继续浏览下面的相关文章希望大家以后多多支持自学编程网!

- 本文固定链接: https://zxbcw.cn/post/218002/
- 转载请注明:必须在正文中标注并保留原文链接
- QQ群: PHP高手阵营官方总群(344148542)
- QQ群: Yii2.0开发(304864863)