
SpringMVC
一,概述
作用是接受服务器请求并做出响应,是spring的后续产品,使用注解@RestController和@RequestMapping
MVC设计模式:
M是model模型,用来封装数据
V是view视图,用来展示数据
C是control控制器,用来控制浏览器如何请求,做出数据响应
好处:提高代码的复用性,松耦合
二、原理:
1.前端控制器DispatcherServlet:当浏览器发送请求成功后,充当调度者的角色,负责调度每个组件
2.处理器映射器HandlerMapping:根据请求的url路径,找到能处理请求的类名和方法名
Url:http://localhost:8080/abc 在HelloControl类中找到abc()
3.处理器适配器HandlerAdaptor:正式处理业务,并返回结果交给DispatcherServlet
4.视图解析器ViewResolver:找到正确的能展示数据的视图,准备展示数据
5.视图渲染view:展示数据
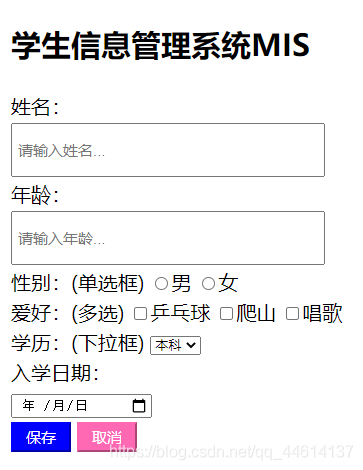
1.创建form表单
表单form默认提交方式是get,将提交的数据展示在网址上,而post提交方式隐藏了数据在网址上,因此更加的安全,这里使用springMVC来处理post的请求参数
<!DOCTYPE html>
<html>
	<head>
		<meta charset="utf-8">
		<title>学生管理系统</title>
		<link rel="stylesheet" href="../css/form.css"/>
	</head>
	<body>
		<!-- 利用表单,向服务器发送数据,
		默认是get提交,通过method属性修改提交方式
		 action属性,指定提交的位置-->
		<form method="post" action="http://localhost:8080/stu/add">
			<table width="500px" height="300px">
				<tr><td><h2>学生信息管理系统MIS</h2></td></tr>
				<tr><td>姓名:</td></tr>
				<tr><td><input class="a" type="text" placeholder="请输入姓名..." name="name" /></td></tr>
				<tr><td>年龄:</td></tr>
				<tr><td><input class="a" type="number" placeholder="请输入年龄..." name="age"/></td></tr>
				<tr><td>性别:(单选框)
					<input type="radio" name="sex" value="1" />男
					<input type="radio" name="sex" value="0" />女
				</td></tr>
				<tr><td>爱好:(多选)
					<input type="checkbox" name="hobby" value="ppq" />乒乓球
					<input type="checkbox" name="hobby" value="ps" />爬山
					<input type="checkbox" name="hobby" value="cg" />唱歌
				</td></tr>
				<tr><td>学历:(下拉框)
				<select name="edu">
					<option value="1">本科</option>
					<option value="2">硕士</option>
					<option value="3">博士</option>
					<option value="4">专科</option>
				</select>
				</td></tr>
					<tr><td>入学日期:</td></tr>
					<tr><td><input type="date" name="intime" /></td></tr>
					<tr><td>
						<input type="submit" value="保存"/ >
						<input type="reset" value="取消" />
					</td></tr>
			</table>
		</form>
	</body>
</html>
css代码
css的三种引入方式
1.行内样式:通过style属性引入css样式
例如:<h1 style="width: 20px; height: 10px; color: #FF0000;">行内样式</h1>
一般实际写页面时不提倡,测试的时候可以使用
2,内部样式表
通过<style></style>标签,写在head标签中
例如:<style> .b{ width: 200px; height: 100px; background-color: #FF69B4; } </style>
3,外部样式表
创建.css文件,将css样式写入其中,然后在html文件中引入,使用link标签
例如:href是css文件路径
<link rel="stylesheet" href="../css/form.css"/>`
我这里使用了外部样式表的方式,使css代码和html代码分离,使结构更加清晰
/* 输入框 */
/* 类选择器 */
.a{
		width: 300px;/*宽度*/
	    height: 40px;/*高度*/
		padding: 5px;/*内边距*/
		font-size: 15px;/*字号*/
}
/* 属性选择器 */
/*修饰提交按钮*/
input[type="submit"]{
	    width: 60px;
	    height: 30px;
	    background-color: blue;
		color: #fff;
		font-size: 15px;
		border-color: blue;
}
input[type="reset"]{
		width: 60px;
		height: 30px;
		background-color:hotpink;
		color: #fff;
		font-size: 15px;
		border-color: hotpink;
}
body{
	font-size: 20px;
}
页面还可以用css做得更加美观哦,这里只是为了测试,如果有兴趣还可以自己做得更加好看哦~
2.准备Student类
package cn.tedu.pojo;
import org.springframework.format.annotation.DateTimeFormat;
import java.util.Arrays;
import java.util.Date;
//@RequestMapping("find")
//是Model层,用来封装数据,就是一个pojo(封装的属性+get/set)
public class Student {
    //属性(成员变量):变量类型 变量名
    //提交数据的类型  页面上name属性的值
//    public Student find(){
        private String name;
        private Integer age;//避免一些异常,能用引用类型最好使用引用类型
        private Integer sex;
        private String[] hobby;
        private Integer edu;
        //浏览器上提交的日期默认是2021/8/12默认是String类型
        //报错400,需要把String的日期转成Date日期,使用注解 @DateTimeFormat
        @DateTimeFormat(pattern = "yyyy-MM-dd")
        private Date intime;
//    }
// 获取get   set   toString
    public String getName() {
        return name;
    }
    public void setName(String name) {
        this.name = name;
    }
   public Integer getAge() {
        return age;
    }
    public void setAge(Integer age) {
        this.age = age;
    }
    public Integer getSex() {
        return sex;
    }
    public void setSex(Integer sex) {
        this.sex = sex;
    }
    public String[] getHobby() {
        return hobby;
    }
    public void setHobby(String[] hobby) {
        this.hobby = hobby;
    }
    public Integer getEdu() {
        return edu;
    }
    public void setEdu(Integer edu) {
        this.edu = edu;
    }
    public Date getIntime() {
        return intime;
    }
    public void setIntime(Date intime) {
        this.intime = intime;
    }
    @Override
    public String toString() {
        return "Student{" +
                "name='" + name + '\'' +
                ", age=" + age +
                ", sex=" + sex +
                ", hobby=" + Arrays.toString(hobby) +
                ", edu=" + edu +
                ", intime=" + intime +
                '}';
    }
}
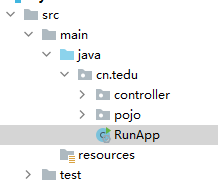
3.创建启动类
一般命名为RunApp,位置必须放在所有资源之上的包里
package cn.tedu;
import org.springframework.boot.SpringApplication;
import org.springframework.boot.autoconfigure.SpringBootApplication;
/**这是一个启动类
 * 位置:必须在所有资源之上的包里*/
@SpringBootApplication
public class RunApp {
    public static void main(String[] args) {
        SpringApplication.run(RunApp.class);
    }
}
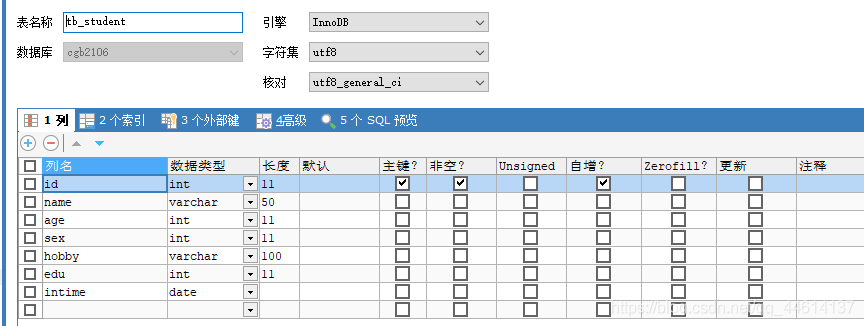
4,创建数据库,表
要与Student类相对应,爱好这一字段是数组类型,而MySQL中没有数组类型,因此使用varchar
注意字符集使用utf-8
使用JDBC把得到的数据入库
5.创建StudentController类
首先要在pom.xml中导入jar包(工具包)
<!--    添加jdbc的jar包依赖-->
    <dependencies>
        <dependency>
            <groupId>mysql</groupId>
            <artifactId>mysql-connector-java</artifactId>
            <version>5.1.48</version>
        </dependency>
    </dependencies>
下面是将数据入库的代码
package cn.tedu.controller;
//是controller层,控制层,用来接受请求和给出响应
import cn.tedu.pojo.Student;
import org.springframework.web.bind.annotation.RequestMapping;
import org.springframework.web.bind.annotation.RestController;
import java.sql.Connection;
import java.sql.DriverManager;
import java.sql.PreparedStatement;
import java.util.Arrays;
@RestController
@RequestMapping("stu")
public class StudentController {
    @RequestMapping("add")
    public Object add(Student s) throws Exception {
        //实现入库insert--jdbc
        //注册驱动
        Class.forName("com.mysql.jdbc.Driver");
        //获取连接
        String url = "jdbc:mysql://localhost:3306/cgb2106";
        Connection conn = DriverManager.getConnection(url, "root", "123456");
        //SQL骨架
            String sql = "insert into tb_student values(null,?,?,?,?,?,?)";
            //获取传输器
            PreparedStatement ps = conn.prepareStatement(sql);
            //给SQL设置值
            ps.setObject(1, s.getName());
            ps.setObject(2, s.getAge());
            ps.setObject(3, s.getSex());
            //s.getHobby())得到一个数组,不能直接入数据库,需要变成串
            ps.setObject(4, Arrays.toString(s.getHobby()));
            ps.setObject(5, s.getEdu());
            ps.setObject(6, s.getIntime());
            //执行SQL
            ps.executeUpdate();//执行增删改的SQL
            System.out.println("数据插入成功");
            return s;
        }
    }
6.测试
运行启动类,执行前端页面,提交表单数据,并在数据库中查看数据入库情况


总结
本篇文章就到这里了,希望能给你带来帮助,也希望您能够多多关注自学编程网的更多内容!

- 本文固定链接: https://zxbcw.cn/post/220176/
- 转载请注明:必须在正文中标注并保留原文链接
- QQ群: PHP高手阵营官方总群(344148542)
- QQ群: Yii2.0开发(304864863)