
本文主要介绍了OpenCV绘制圆端矩形的示例代码,分享给大家,具体如下:
功能函数
// 绘制圆端矩形(药丸状,pill)
void DrawPill(cv::Mat mask, const cv::RotatedRect &rotatedrect, const cv::Scalar &color, int thickness, int lineType)
{
	cv::Mat canvas = cv::Mat::zeros(mask.size(), CV_8UC1);
	// 确定短边,短边绘制圆形
	cv::RotatedRect rect = rotatedrect;
	float r = rect.size.height / 2.0f;
	if (rect.size.width > rect.size.height) {
		rect.size.width -= rect.size.height;
	}
	else {
		rect.size.height -= rect.size.width;
		r = rect.size.width / 2.0f;
	}
	cv::Point2f ps[4];
	rect.points(ps);

	// 绘制边缘
	std::vector<std::vector<cv::Point>> tmpContours;
	std::vector<cv::Point> contours;
	for (int i = 0; i != 4; ++i) {
		contours.emplace_back(cv::Point2i(ps[i]));
	}
	tmpContours.insert(tmpContours.end(), contours);
	drawContours(canvas, tmpContours, 0, cv::Scalar(255),5, lineType);  // 填充mask

	// 计算常长短轴
	float a = rotatedrect.size.width;
	float b = rotatedrect.size.height;

	int point01_x = (int)((ps[0].x + ps[1].x) / 2.0f);
	int point01_y = (int)((ps[0].y + ps[1].y) / 2.0f);
	int point03_x = (int)((ps[0].x + ps[3].x) / 2.0f);
	int point03_y = (int)((ps[0].y + ps[3].y) / 2.0f);
	int point12_x = (int)((ps[1].x + ps[2].x) / 2.0f);
	int point12_y = (int)((ps[1].y + ps[2].y) / 2.0f);
	int point23_x = (int)((ps[2].x + ps[3].x) / 2.0f);
	int point23_y = (int)((ps[2].y + ps[3].y) / 2.0f);

	cv::Point c0 = a < b ? cv::Point(point12_x, point12_y) : cv::Point(point23_x, point23_y);
	cv::Point c1 = a < b ? cv::Point(point03_x, point03_y) : cv::Point(point01_x, point01_y);

	// 长轴两端以填充的方式画圆,直径等于短轴
	cv::circle(canvas, c0, (int)r, cv::Scalar(255), 5, lineType);
	cv::circle(canvas, c1, (int)r, cv::Scalar(255), 5, lineType);

	// 绘制外围轮廓,如果不这样操作,会得到一个矩形加两个圆形,丑。。。
	std::vector<std::vector<cv::Point>> EXcontours;
	cv::findContours(canvas,EXcontours,cv::RETR_EXTERNAL, CHAIN_APPROX_SIMPLE);
	drawContours(mask, EXcontours, 0, color, thickness,lineType);  // 填充mask
}
测试代码
#include <iostream>
#include <opencv2/opencv.hpp>

using namespace std;
using namespace cv;

void DrawPill(cv::Mat mask, const cv::RotatedRect &rotatedrect, const cv::Scalar &color, int thickness, int lineType);

int main()
{
	cv::Mat src = imread("test.jpg");
	cv::Mat result = src.clone();
	cv::RotatedRect rorect(cv::Point(src.cols / 2, src.rows / 2), cv::Size(1000, 800), 50);
	DrawPill(result, rorect, cv::Scalar(0, 255, 255),8,16);
	imshow("original", src);
	imshow("result", result);
	waitKey(0);
	return 0;
}

// 绘制圆端矩形(药丸状,pill)
void DrawPill(cv::Mat mask, const cv::RotatedRect &rotatedrect, const cv::Scalar &color, int thickness, int lineType)
{
	cv::Mat canvas = cv::Mat::zeros(mask.size(), CV_8UC1);
	// 确定短边,短边绘制圆形
	cv::RotatedRect rect = rotatedrect;
	float r = rect.size.height / 2.0f;
	if (rect.size.width > rect.size.height) {
		rect.size.width -= rect.size.height;
	}
	else {
		rect.size.height -= rect.size.width;
		r = rect.size.width / 2.0f;
	}
	cv::Point2f ps[4];
	rect.points(ps);

	// 绘制边缘
	std::vector<std::vector<cv::Point>> tmpContours;
	std::vector<cv::Point> contours;
	for (int i = 0; i != 4; ++i) {
		contours.emplace_back(cv::Point2i(ps[i]));
	}
	tmpContours.insert(tmpContours.end(), contours);
	drawContours(canvas, tmpContours, 0, cv::Scalar(255),5, lineType);  // 填充mask

	// 计算常长短轴
	float a = rotatedrect.size.width;
	float b = rotatedrect.size.height;

	int point01_x = (int)((ps[0].x + ps[1].x) / 2.0f);
	int point01_y = (int)((ps[0].y + ps[1].y) / 2.0f);
	int point03_x = (int)((ps[0].x + ps[3].x) / 2.0f);
	int point03_y = (int)((ps[0].y + ps[3].y) / 2.0f);
	int point12_x = (int)((ps[1].x + ps[2].x) / 2.0f);
	int point12_y = (int)((ps[1].y + ps[2].y) / 2.0f);
	int point23_x = (int)((ps[2].x + ps[3].x) / 2.0f);
	int point23_y = (int)((ps[2].y + ps[3].y) / 2.0f);

	cv::Point c0 = a < b ? cv::Point(point12_x, point12_y) : cv::Point(point23_x, point23_y);
	cv::Point c1 = a < b ? cv::Point(point03_x, point03_y) : cv::Point(point01_x, point01_y);

	// 长轴两端以填充的方式画圆,直径等于短轴
	cv::circle(canvas, c0, (int)r, cv::Scalar(255), 5, lineType);
	cv::circle(canvas, c1, (int)r, cv::Scalar(255), 5, lineType);

	// 绘制外围轮廓,如果不这样操作,会得到一个矩形加两个圆形,丑。。。
	std::vector<std::vector<cv::Point>> EXcontours;
	cv::findContours(canvas,EXcontours,cv::RETR_EXTERNAL, CHAIN_APPROX_SIMPLE);
	drawContours(mask, EXcontours, 0, color, thickness,lineType);  // 填充mask
}
测试效果

图1 原图

图2 绘制圆端矩形
绘制圆端矩形其实就是绘制了一个旋转矩形,然后分析哪个轴更长,就在哪个轴上的两端画圆,再取外围轮廓,大功告成,通俗来讲就画了一个矩形两个圆,如图3所示。
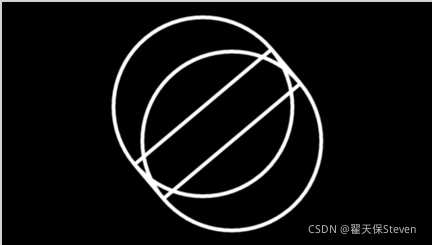
图3 绘制逻辑
不过注意,这个图形最好不要超过图像边界,因为超过后再分析外围轮廓,它认为的外围就到了内部,如图4所示。
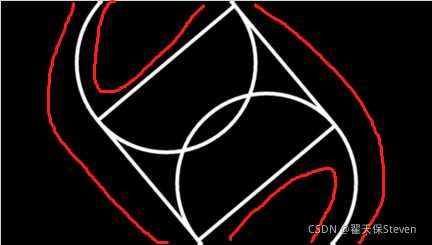
图4 外围线
然后,你就会得到一个奇葩图形,如图5所示。

图5 示意图
到此这篇关于OpenCV绘制圆端矩形的示例代码的文章就介绍到这了,更多相关OpenCV 圆端矩形内容请搜索自学编程网以前的文章或继续浏览下面的相关文章希望大家以后多多支持自学编程网!

- 本文固定链接: https://zxbcw.cn/post/221130/
- 转载请注明:必须在正文中标注并保留原文链接
- QQ群: PHP高手阵营官方总群(344148542)
- QQ群: Yii2.0开发(304864863)