在整理手上几台SQL SERVER 2000的数据库备份时,一方面为了方便快速还原数据库,另外一方面为了备份冗余、备份方式统一(先备份到本地,然后收上磁带),将以前通过Symantec Backup Exec直接备份上带的作业改成了如下方式:
Step 1: 通过数据库维护计划将备份生成在本地磁盘M,完整备份保留2天,事务日志备份保留3天
M:\DB_BACKUP\FULL_BACKUP
M:\DB_BACKUP\LOG_BACKUP
Step 2: 备份完成后通过Symantec Backup Exec将备份文件收上磁带。
但是发现即使SQL SERVER 2000的数据库维护计划设置了删除几天前的备份文件,但是发现根本没有删除过期备份。于是只好使用dos命令来处理。刚开始想用forfiles命令,结果我搜索的时候,发现Windows 2000下没有forfiles命令,后来通过从第三方复制过来,发现Windows 2000下也可以使用forfiles(如果不借助于forfiles命令,直接用批处理命令完成这个,那简直痛苦死了)
关于forfiles命令的语法如下所示
C:\>forfiles /?
FORFILES [/P pathname] [/M searchmask] [/S]
[/C command] [/D [+ | -] {yyyy-MM-dd | dd}]
Description:
Selects a file (or set of files) and executes a
command on that file. This is helpful for batch jobs.
Parameter List:
/P pathname Indicates the path to start searching.
The default folder is the current working
directory (.).
/M searchmask Searches files according to a searchmask.
The default searchmask is '*' .
/S Instructs forfiles to recurse into
subdirectories. Like "DIR /S".
/C command Indicates the command to execute for each file.
Command strings should be wrapped in double
quotes.
The default command is "cmd /c echo @file".
The following variables can be used in the
command string:
@file - returns the name of the file.
@fname - returns the file name without
extension.
@ext - returns only the extension of the
file.
@path - returns the full path of the file.
@relpath - returns the relative path of the
file.
@isdir - returns "TRUE" if a file type is
a directory, and "FALSE" for files.
@fsize - returns the size of the file in
bytes.
@fdate - returns the last modified date of the
file.
@ftime - returns the last modified time of the
file.
To include special characters in the command
line, use the hexadecimal code for the character
in 0xHH format (ex. 0x09 for tab). Internal
CMD.exe commands should be preceded with
"cmd /c".
/D date Selects files with a last modified date greater
than or equal to (+), or less than or equal to
(-), the specified date using the
"yyyy-MM-dd" format; or selects files with a
last modified date greater than or equal to (+)
the current date plus "dd" days, or less than or
equal to (-) the current date minus "dd" days. A
valid "dd" number of days can be any number in
the range of 0 - 32768.
"+" is taken as default sign if not specified.
/? Displays this help message.
Examples:
FORFILES /?
FORFILES
FORFILES /P C:\WINDOWS /S /M DNS*.*
FORFILES /S /M *.txt /C "cmd /c type @file | more"
FORFILES /P C:\ /S /M *.bat
FORFILES /D -30 /M *.exe
/C "cmd /c echo @path 0x09 was changed 30 days ago"
FORFILES /D 2001-01-01
/C "cmd /c echo @fname is new since Jan 1st 2001"
FORFILES /D +2014-12-15 /C "cmd /c echo @fname is new today"
FORFILES /M *.exe /D +1
FORFILES /S /M *.doc /C "cmd /c echo @fsize"
FORFILES /M *.txt /C "cmd /c if @isdir==FALSE notepad.exe @file"
对应的中文提示信息如下所示:
语法
forfiles [/p Path ] [/m SearchMask ] [/s ] [/c Command ] [/d [{+ | - }] [{MM / DD / YYYY | DD }]]
参数
/p Path
指定Path ,表明要从哪里开始搜索。默认的文件夹是当前工作目录,该目录通过键入句号(.) 指定。
/m SearchMask
按照SearchMask 搜索文件。默认的SearchMask 是*.* 。
/s
指示forfiles 在子目录中搜索。
/c Command
在每个文件上运行指定的Command 。带有空格的命令字符串必须用引号括起来。默认的Command 是"cmd /c echo @file" 。
/d [{+ | - }] [{MM / DD / YYYY | DD }]
选择日期大于或等于(+ )(或者小于或等于(- ))指定日期的文件,其中MM / DD / YYYY 是指定的日期,DD 是当前日期减去DD 天。如果未指定+ 或- ,则使用+ 。DD 的有效范围是0 - 32768。
/?
在命令提示符下显示帮助。
如下所示,由于Windows Server 2000下拷贝过来的forfiles命令的版本是V 1.1,使用参数必须为-p、-c、-m 而且参数后面不能有空格。
如下所示,delete_old_backup.bat 删除2天前的完整备份、事务日志备份、以及维护计划生成的日志文件。
echo --------------------------------------------- >>delete_old_backup.log
echo Delete the backup log start at %Date% - %time% >>delete_old_backup.log
rem Delete days.
set DaysAgo=2
rem delete old backup log files.
set LogPath=M:\DB_BACKUP\
forfiles -p%LogPath% -m*.txt -d-%DaysAgo% -c"cmd /c del /q @FILE" >> delete_old_backup.log
echo Delete the backup log Stop at %Date% - %time% >>delete_old_backup.log
echo Delete the full backup start at %Date% - %time% >>delete_old_backup.log
set FullBackupPath=M:\DB_BACKUP\FULL_BACKUP
forfiles -p%FullBackupPath% -m*.bak -d-%DaysAgo% -c"cmd /c del /q @FILE" >> delete_old_backup.log
echo Delete the full backup Stop at %Date% - %time% >>delete_old_backup.log
echo Delete the log backup start at %Date% - %time% >>delete_old_backup.log
set LogBackupPath=M:\DB_BACKUP\LOG_BACKUP
forfiles -p%LogBackupPath% -m*.TRN -d-%DaysAgo% -c"cmd /c del /q @FILE" >> delete_old_backup.log
echo Delete the log backup Stop at %Date% - %time% >>delete_old_backup.log
echo --------------------------------------------- >>delete_old_backup.log
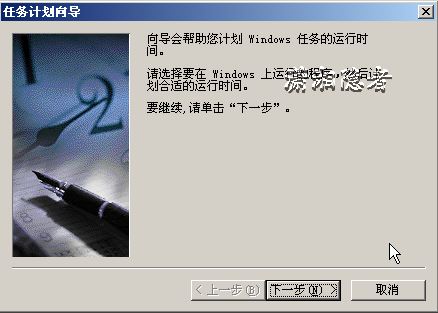
脚本编写、测试成功后,然后设置Task Schedule,大体步骤如下步骤所示:
Step 1:在控制面板找到任务计划,执行任务计划向导:
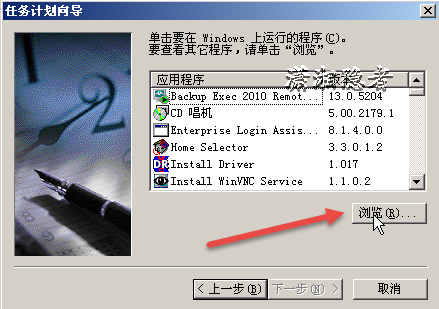
Step 2: 点击“浏览”按钮,选择M:\DB_BACKUP\delete_old_backup.bat文件
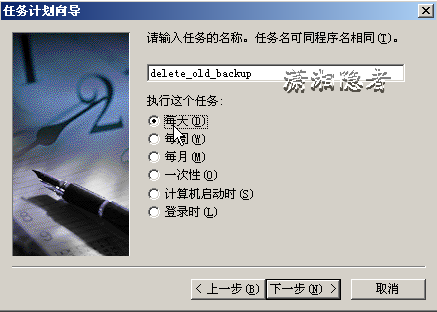
Step 3:输入任务的名称,以及执行任务的Schedule
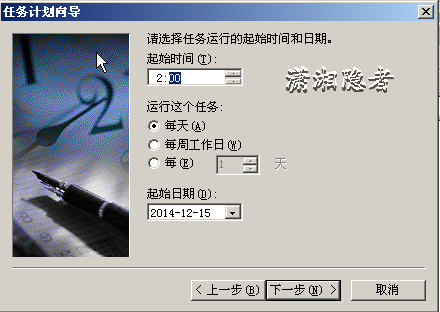
Step 4:设置任务执行的时间以及频率
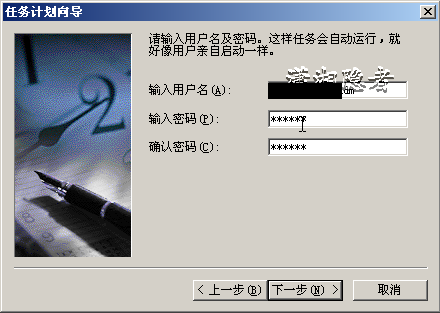
Step 5:输入知晓计划任务的账号以及密码
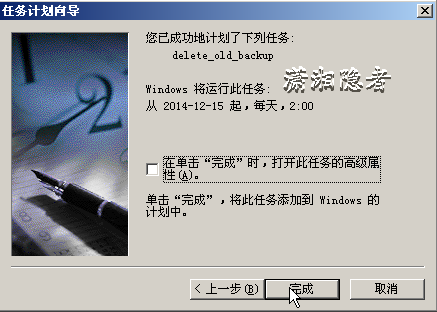
Step 6:完成任务计划设置。

- 本文固定链接: https://zxbcw.cn/post/2434/
- 转载请注明:必须在正文中标注并保留原文链接
- QQ群: PHP高手阵营官方总群(344148542)
- QQ群: Yii2.0开发(304864863)


