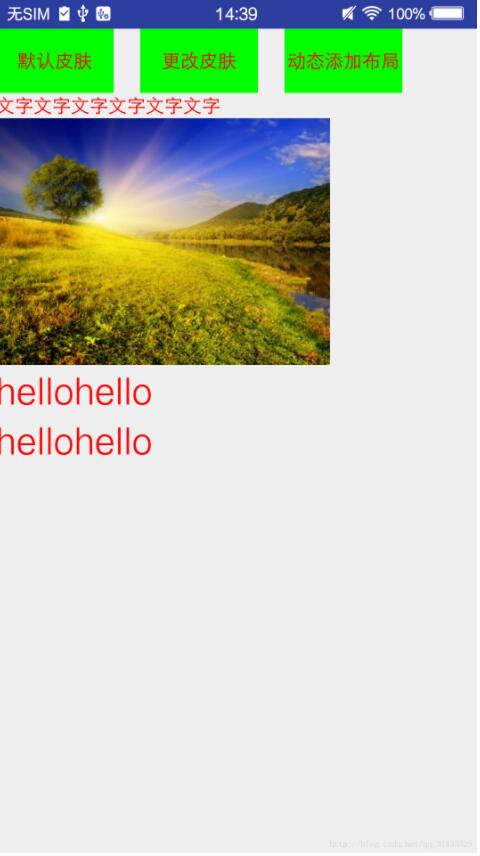
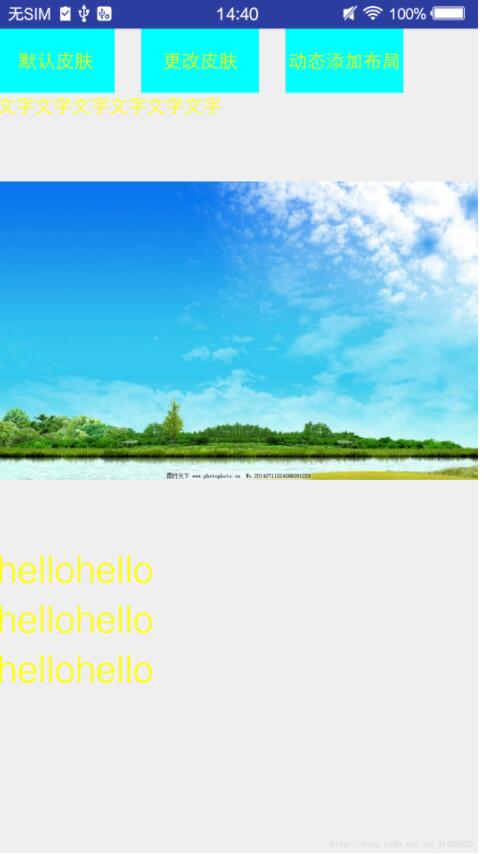
skin-loader框架的换肤是通过插件化的形式替换资源文件,实现换肤效果。好处是可以在线更新皮肤换肤
Demo样例


流程
整个框架大概的流程是加载皮肤包,找到被标记的控件,通过自定义的Factory工程过滤掉其他控件,使用皮肤包中的资源文件更新被标记的ui。
使用操作
1、导入android-skin-loader框架包
androidStudio File->new->import Module选择android-skin-loader
项目右键->open Module Setting->app中加载依赖android-skin-loader库
2、在MyApplication 初始化框架
SkinManager.getInstance().init(this);
SkinManager.getInstance().load();
3、需要换肤的activity需要继承skin-loader中的BaseActivity
需要换肤的控件添加skin:enable=”true”,控件xml添加命名空间xmlns:skin=”http://schemas.android.com/android/skin”
4、准备需要替换的color或drawable同名的资源文件包将其打包,重命名以.skin结尾
本地测试可以使用adb命令将.skin包放在sdcard
adb push 文件目录/test.skin /sdcard
样例代码
xml文件,使用databinding,不知道的自行百度
<?xml version="1.0" encoding="utf-8"?>
<layout xmlns:android="http://schemas.android.com/apk/res/android"
 xmlns:skin="http://schemas.android.com/android/skin">
 <LinearLayout
  android:layout_width="match_parent"
  android:layout_height="match_parent"
  android:orientation="vertical">
  <LinearLayout
   android:layout_width="match_parent"
   android:layout_height="wrap_content"
   android:orientation="horizontal">
   <Button
    android:id="@+id/btn_default"
    android:layout_width="wrap_content"
    android:layout_height="wrap_content"
    android:textColor="@color/text_color"
    android:background="@color/button_background"
    skin:enable="true"
    android:text="默认皮肤"/>
   <Button
    android:id="@+id/btn_change_skin"
    android:layout_width="wrap_content"
    android:layout_height="wrap_content"
    android:layout_marginLeft="20dp"
    android:textColor="@color/text_color"
    android:background="@color/button_background"
    skin:enable="true"
    android:text="更改皮肤"/>
   <Button
    android:id="@+id/btn_add"
    android:layout_width="wrap_content"
    android:layout_height="wrap_content"
    android:layout_marginLeft="20dp"
    android:textColor="@color/text_color"
    android:background="@color/button_background"
    skin:enable="true"
    android:text="动态添加布局"/>
  </LinearLayout>
  <TextView
   android:layout_width="match_parent"
   android:layout_height="wrap_content"
   android:textColor="@color/text_color"
   android:text="文字文字文字文字文字文字"
   skin:enable="true" />
  <ImageView
   android:layout_width="wrap_content"
   android:layout_height="wrap_content"
   android:src="@drawable/skin"
   skin:enable="true"/>
  <LinearLayout
   android:id="@+id/add_layout"
   android:layout_width="match_parent"
   android:layout_height="wrap_content"
   skin:enable="true"
   android:orientation="vertical">
  </LinearLayout>

 </LinearLayout>
</layout>
public class SkinChangeAct extends BaseActivity{
 private ActivitySkinchangeBinding binding;
 //skin包名
 private String SKIN_NAME = "test.skin";
 //skin皮肤包的路径
 private String SKIN_DIR = Environment.getExternalStorageDirectory()+ File.separator+SKIN_NAME;
 @Override
 public void onCreate(@Nullable Bundle savedInstanceState) {
  super.onCreate(savedInstanceState);
  binding = DataBindingUtil.setContentView(this, R.layout.activity_skinchange);
  //更换皮肤
  binding.btnChangeSkin.setOnClickListener(new View.OnClickListener() {
   @Override
   public void onClick(View view) {
    File skin = new File(SKIN_DIR);
    if(skin == null || !skin.exists()){
     Toast.makeText(getApplicationContext(), "请检查" + SKIN_DIR + "是否存在", Toast.LENGTH_SHORT).show();
     return;
    }

    SkinManager.getInstance().load(skin.getAbsolutePath(), new ILoaderListener() {
     @Override
     public void onStart() {
      System.out.println("start");
     }

     @Override
     public void onSuccess() {
      System.out.println("onSuccess");
     }

     @Override
     public void onFailed() {
      System.out.println("onFailed");
     }
    });
   }
  });
  //恢复默认皮肤
  binding.btnDefault.setOnClickListener(new View.OnClickListener() {
   @Override
   public void onClick(View view) {
    SkinManager.getInstance().restoreDefaultTheme();
   }
  });
  //动态加载控件
  binding.btnAdd.setOnClickListener(new View.OnClickListener() {
   @Override
   public void onClick(View view) {
    dynamicAddTextView();
   }
  });
 }
 /**动态添加textview*/
 private void dynamicAddTextView() {
  TextView     textView = new TextView(this);
  RelativeLayout.LayoutParams params = new RelativeLayout.LayoutParams(ViewGroup.LayoutParams.WRAP_CONTENT, ViewGroup.LayoutParams.WRAP_CONTENT);
  params.addRule(RelativeLayout.CENTER_IN_PARENT);
  textView.setLayoutParams(params);
  textView.setTextColor(SkinManager.getInstance().getColor(R.color.text_color));
  textView.setText("hellohello");
  textView.setTextSize(28);
  //将动态添加的布局也更换皮肤,否则之前添加的不能更改
  List<DynamicAttr> mDanamicAttr = new ArrayList<DynamicAttr>();
  mDanamicAttr.add(new DynamicAttr(AttrFactory.TEXT_COLOR,R.color.text_color));
  dynamicAddView(textView,mDanamicAttr);
  binding.addLayout.addView(textView);
 }
}
资源文件color.xml
<?xml version="1.0" encoding="utf-8"?>
<resources>
 <color name="colorPrimary">#3F51B5</color>
 <color name="colorPrimaryDark">#303F9F</color>
 <color name="colorAccent">#FF4081</color>
 <color name="text_color">#ff0000</color>
 <color name="button_background">#00ff00</color>
</resources>
skin皮肤包中的资源文件color.xml
<?xml version="1.0" encoding="utf-8"?>
<resources>
 <color name="colorPrimary">#3F51B5</color>
 <color name="colorPrimaryDark">#303F9F</color>
 <color name="colorAccent">#FF4081</color>
 <color name="text_color">#ffff00</color>
 <color name="button_background">#00ffff</color>
</resources>
对比一下,只是更改了数值,名字相同。
框架迭代,增加功能
android-skin-loader框架是没有对于src属性的修改,案例中使用imageView模拟了src的更改。
在AttrFactory中增加对于src的支持
public class AttrFactory {

 public static final String BACKGROUND = "background";
 public static final String TEXT_COLOR = "textColor";
 public static final String LIST_SELECTOR = "listSelector";
 public static final String DIVIDER = "divider";
 //增加src属性
 public static final String SRC="src";

 public static SkinAttr get(String attrName, int attrValueRefId, String attrValueRefName, String typeName){

  SkinAttr mSkinAttr = null;
  System.out.println("attrName="+attrName);
  if(BACKGROUND.equals(attrName)){
   mSkinAttr = new BackgroundAttr();
  }else if(TEXT_COLOR.equals(attrName)){
   mSkinAttr = new TextColorAttr();
  }else if(LIST_SELECTOR.equals(attrName)){
   mSkinAttr = new ListSelectorAttr();
  }else if(DIVIDER.equals(attrName)){
   mSkinAttr = new DividerAttr();
  }else if(SRC.equals(attrName)){
   //自定义加载src
   mSkinAttr =new SrcAttr();
  }else{
   return null;
  }

  mSkinAttr.attrName = attrName;
  mSkinAttr.attrValueRefId = attrValueRefId;
  mSkinAttr.attrValueRefName = attrValueRefName;
  mSkinAttr.attrValueTypeName = typeName;
  return mSkinAttr;
 }

 /**
  * Check whether the attribute is supported
  * @param attrName
  * @return true : supported <br>
  *   false: not supported
  */
 public static boolean isSupportedAttr(String attrName){
  if(BACKGROUND.equals(attrName)){
   return true;
  }
  if(TEXT_COLOR.equals(attrName)){
   return true;
  }
  if(LIST_SELECTOR.equals(attrName)){
   return true;
  }
  if(DIVIDER.equals(attrName)){
   return true;
  }
  //支持src
  if(SRC.equals(attrName)){
   return true;
  }
  return false;
 }
}
srcAttr继承SkinAttr定义加载src
public class SrcAttr extends SkinAttr{
 @Override
 public void apply(View view) {
  if(view instanceof ImageView){
   ImageView imageView = (ImageView) view;
   if(RES_TYPE_NAME_COLOR.equals(attrValueTypeName)){
    imageView.setImageResource(SkinManager.getInstance().getColor(attrValueRefId));
   }else if(RES_TYPE_NAME_DRAWABLE.equals(attrValueTypeName)){
    Drawable bg = SkinManager.getInstance().getDrawable(attrValueRefId);
    imageView.setImageDrawable(bg);
   }
  }
 }
}
各种控件的支持都可以自己添加。
以上就是本文的全部内容,希望对大家的学习有所帮助,也希望大家多多支持自学编程网。

- 本文固定链接: https://zxbcw.cn/post/183034/
- 转载请注明:必须在正文中标注并保留原文链接
- QQ群: PHP高手阵营官方总群(344148542)
- QQ群: Yii2.0开发(304864863)
