1. 新建项目
引入web和security包
完整的pom.xml文件如下
<?xml version="1.0" encoding="UTF-8"?>
<project xmlns="http://maven.apache.org/POM/4.0.0" xmlns:xsi="http://www.w3.org/2001/XMLSchema-instance"
     xsi:schemaLocation="http://maven.apache.org/POM/4.0.0 https://maven.apache.org/xsd/maven-4.0.0.xsd">
  <modelVersion>4.0.0</modelVersion>
  <parent>
    <groupId>org.springframework.boot</groupId>
    <artifactId>spring-boot-starter-parent</artifactId>
    <version>2.2.6.RELEASE</version>
    <relativePath/> <!-- lookup parent from repository -->
  </parent>
  <groupId>com.example</groupId>
  <artifactId>spring-demo</artifactId>
  <version>0.0.1-SNAPSHOT</version>
  <name>spring-demo</name>
  <description>Demo project for Spring Boot</description>

  <properties>
    <java.version>1.8</java.version>
  </properties>

  <dependencies>
    <dependency>
      <groupId>org.springframework.boot</groupId>
      <artifactId>spring-boot-starter-security</artifactId>
    </dependency>
    <dependency>
      <groupId>org.springframework.boot</groupId>
      <artifactId>spring-boot-starter-web</artifactId>
    </dependency>

    <dependency>
      <groupId>org.springframework.boot</groupId>
      <artifactId>spring-boot-starter-test</artifactId>
      <scope>test</scope>
      <exclusions>
        <exclusion>
          <groupId>org.junit.vintage</groupId>
          <artifactId>junit-vintage-engine</artifactId>
        </exclusion>
      </exclusions>
    </dependency>
    <dependency>
      <groupId>org.springframework.security</groupId>
      <artifactId>spring-security-test</artifactId>
      <scope>test</scope>
    </dependency>
  </dependencies>

  <build>
    <plugins>
      <plugin>
        <groupId>org.springframework.boot</groupId>
        <artifactId>spring-boot-maven-plugin</artifactId>
      </plugin>
    </plugins>
  </build>
</project>
2. 编写启动类和控制器方法和自定义登录页面
package com.example.springdemo;

import org.springframework.boot.SpringApplication;
import org.springframework.boot.autoconfigure.SpringBootApplication;
import org.springframework.web.bind.annotation.GetMapping;
import org.springframework.web.bind.annotation.RestController;

@RestController
@SpringBootApplication
public class SpringDemoApplication {

  public static void main(String[] args) {
    SpringApplication.run(SpringDemoApplication.class, args);
  }

  @GetMapping("/")
  public String hello() {
    return "hello spring security";
  }
}
<!DOCTYPE html>
<html lang="en">
<head>
  <meta charset="UTF-8">
  <title>Title</title>
</head>
<body>
<form action="myLogin.html" method="post">
  <input type="text" name="username">
  <input type="password" name="password">
  <input type="submit" value="登录">
</form>
</body>
</html>
3. 编写配置类
package com.example.springdemo.conf;

import org.springframework.security.config.annotation.web.builders.HttpSecurity;
import org.springframework.security.config.annotation.web.configuration.EnableWebSecurity;
import org.springframework.security.config.annotation.web.configuration.WebSecurityConfigurerAdapter;
import org.springframework.security.core.Authentication;
import org.springframework.security.core.AuthenticationException;
import org.springframework.security.web.authentication.AuthenticationFailureHandler;
import org.springframework.security.web.authentication.AuthenticationSuccessHandler;

import javax.servlet.ServletException;
import javax.servlet.http.HttpServletRequest;
import javax.servlet.http.HttpServletResponse;
import java.io.IOException;
import java.io.PrintWriter;

@EnableWebSecurity
public class WebSecurityConfig extends WebSecurityConfigurerAdapter {
  @Override
  protected void configure(HttpSecurity http) throws Exception {
    http.authorizeRequests()
        .anyRequest().authenticated()
        .and()
        .formLogin()
        //指定处理登录页面
        .loginPage("/myLogin.html")
        //指定登录成功的处理逻辑
        .successHandler(new AuthenticationSuccessHandler() {
          @Override
          public void onAuthenticationSuccess(HttpServletRequest request,
                            HttpServletResponse response,
                            Authentication authentication)
              throws IOException, ServletException {
            response.setContentType("application/json;charset=UTF-8");
            PrintWriter writer = response.getWriter();
            writer.write("{\"error_code\":\"0\",\"message\":\"欢迎登录\"}");
          }
        })
        //指定登录失败时的处理逻辑
        .failureHandler(new AuthenticationFailureHandler() {
          @Override
          public void onAuthenticationFailure(HttpServletRequest request,
                            HttpServletResponse response,
                            AuthenticationException e)
              throws IOException, ServletException {
            response.setStatus(401);
            PrintWriter writer = response.getWriter();
            writer.write("{\"error_code\":\"401\",\"name\":\"" + e.getClass() + "\",\"message\":\"" + e.getMessage() + "\"}");

          }
        })
        .permitAll()
        .and()
        .csrf().disable();
  }
}
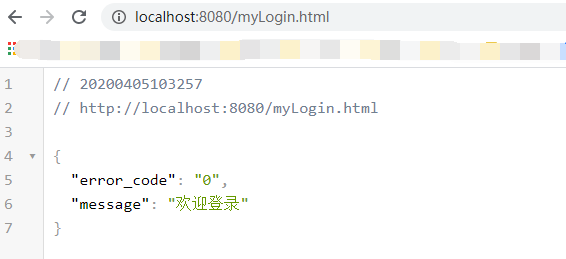
4. 运行结果
当输入密码错误时

当输入密码正确时

以上就是本文的全部内容,希望对大家的学习有所帮助,也希望大家多多支持自学编程网。

- 本文固定链接: https://www.zxbcw.cn/post/184248/
- 转载请注明:必须在正文中标注并保留原文链接
- QQ群: PHP高手阵营官方总群(344148542)
- QQ群: Yii2.0开发(304864863)
