
C++/CLI 下创建WPF项目的方法
由于WPF不仅仅支持C#/VB开发,还支持其他语言,比如: C++、F#等开发,于是大白我最近花了点时间摸索了一下,本文主要介绍 C++/CLI 下创建WPF项目的方法。
我使用的开发环境是: Win10 x64 + Visual Studio 2019 (16.6.1版本)。
今天我们需要使用 C++/CLI ,算是C++的一个子集吧。
要能正常使用 C++/CLI ,首先需要确保你安装了 C++/CLI build套件(见下图),同时还需要确保你安装好了Visual C++相应版本的运行库。
进入 控制面板 ,找到 Visual Studio 2019,右击"修改",然后切换到"独立组件"(Individual components)这个选项卡。
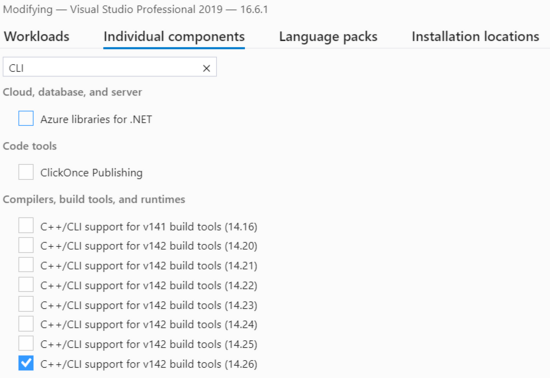
如果没安装,勾选后安装一下即可。
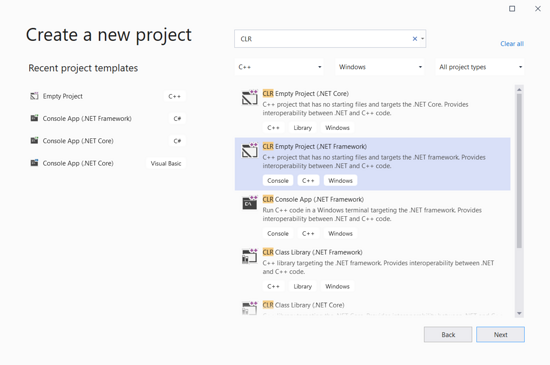
接下来我们可以创建项目了,建议选用模板 CLR Empty Project (.NET Framework) ,解决方案和项目名可以都用 CppWpfDemo 。
这时一个空项目就创建完成了。
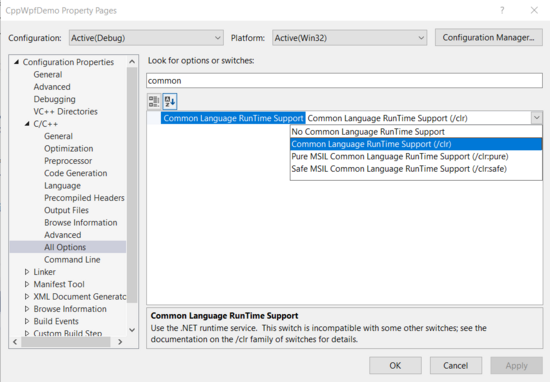
此时查看 Project的属性, Configration Properties -> "C/C++" -> "All Options",输入 "common"进行搜索,确保选中的是 Common Language Runtime Suppor(/clr) .
接下来我们鼠标右击项目下的文件夹"Resource Files",点"Add" -> "new item",类型选"Component Class",可使用默认的名字 MyComponent 。

此时, MyComponent.cpp 中的代码如下:
#include "MyComponent.h"
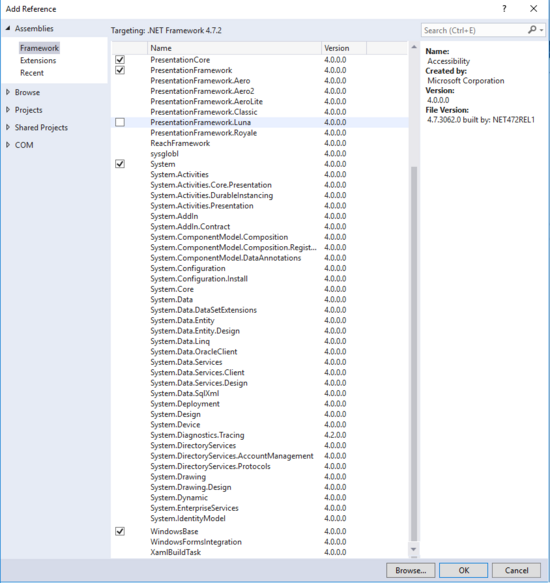
为了正确引用到 WPF 中的各种库,我们还需要加入 WPF中 3 个核心的 dll,操作方法是:
右键点击项目中的 References ,然后点 Add Reference ,勾选上:
- PresentationCore
- PresentationFramework
- WindowsBase
接下来,进行了一番倒腾,我改成了这个,做成了一个简单的界面:
此时 MyComponent.cpp 的内容如下:
#include "MyComponent.h"

using namespace CppWpfDemo;
using namespace System::Windows;
using namespace System::Windows::Controls;
using namespace System::Windows::Media;

[System::STAThreadAttribute]
int main(array<System::String^>^ args)
{
  Application^ app = gcnew Application();
  Window^ window = gcnew Window();
  window->Title = "C++/CLI WPF demo";

  TextBlock^ tb = gcnew TextBlock();
  tb->Text = "Hello WPF";

  // Add root Grid
  Grid^ rootGrid = gcnew Grid();
  rootGrid->Width = 120;
  rootGrid->Height = 120;
  RowDefinition^ myRowDef1 = gcnew RowDefinition();
  rootGrid->RowDefinitions->Add(myRowDef1);

  DataGrid^ grid = gcnew DataGrid();
  grid->Background = Brushes::LightBlue;
  grid->Width = 80;
  grid->Height = 100;

  // Define the Canvas
  Canvas^ mainCanvas = gcnew Canvas();
  mainCanvas->Children->Add(tb);
  mainCanvas->Children->Add(grid);

  Canvas::SetTop(tb, 20);
  Canvas::SetLeft(tb, 20);

  Canvas::SetTop(grid, 50);
  Canvas::SetLeft(grid, 20);

  rootGrid->Children->Add(mainCanvas);
  Grid::SetRow(mainCanvas, 0);

  window->Content = rootGrid;
  app->Run(window);

  return 0;
}
代码中的 [STAThread] 是需要的,等价于 [System::STAThread] 或 [System::STAThreadAttribute] .
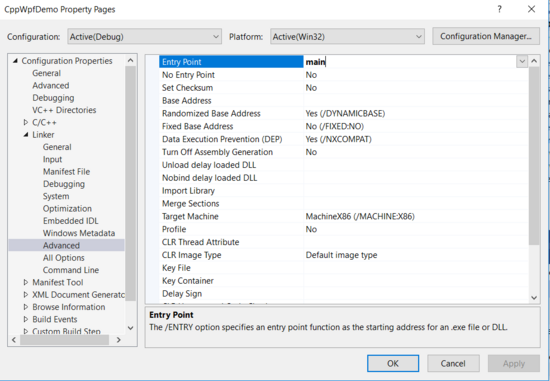
还有个朋友说需要在项目属性中设置"Entry Point"的值为"main",测试过了填与不填没影响,建议别填。
接下来,可以build了。
如果出现 VCRUNTIME140.dll missing 的问题,安装一下Visual C++ Redistributable for Visual Studio 2015 和 Microsoft Visual C++ 2015 Redistributable Update 3 RC 可以解决,x64和x86的运行库都需要安装。
如果还不行,
- 下载VCRUNTIME140.DLL
- 以管理员权限复制这个 dll 到
C:\Windows\System32 - 检查该 dll 的文件读写权限是否为
只读,如果是只读,去掉前面的勾勾.
此时按F5(或 Ctrl + F5),运行结果如下:
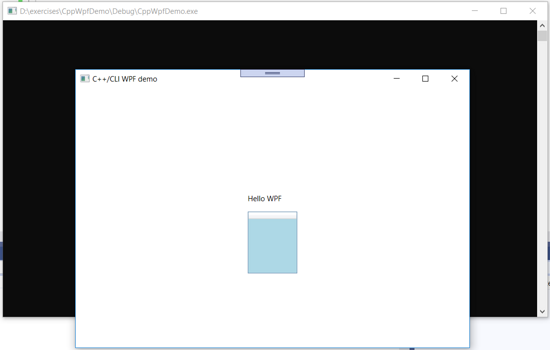
美中不足的是后面一直有个命令行窗口。
网上找了下解决方案,发现将目前用的 int main() 改为 int WINAPI WinMain() 可以解决,要能使用 WinMain() 则需要引入 windows.h 头文件。
当把 #include windows.h 加到 #include "MyComponent.h" 下一行时,发现如下错误:

原因在于命令空间冲突,使得 Window 的引用出现起义。
解决方法是: 将 #include windows.h 放在代码的第一行。
此时,此时 MyComponent.cpp 的内容如下:
#include "windows.h"
#include "MyComponent.h"

using namespace System::Windows;
using namespace System::Windows::Controls;
using namespace System::Windows::Media;

[STAThread]
int WINAPI WinMain(HINSTANCE hInstance, HINSTANCE hPrevInstance,
  LPSTR lpCmd, int nCmd)
{
  Application^ app = gcnew Application();
  Window^ window = gcnew Window();
  window->Title = "C++/CLI WPF demo";

  TextBlock^ tb = gcnew TextBlock();
  tb->Text = "Hello WPF";

  // Add root Grid
  Grid^ rootGrid = gcnew Grid();
  rootGrid->Width = 120;
  rootGrid->Height = 120;
  RowDefinition^ myRowDef1 = gcnew RowDefinition();
  rootGrid->RowDefinitions->Add(myRowDef1);

  DataGrid^ grid = gcnew DataGrid();
  grid->Background = Brushes::LightBlue;
  grid->Width = 80;
  grid->Height = 100;

  // Define the Canvas
  Canvas^ mainCanvas = gcnew Canvas();
  mainCanvas->Children->Add(tb);
  mainCanvas->Children->Add(grid);

  Canvas::SetTop(tb, 20);
  Canvas::SetLeft(tb, 20);

  Canvas::SetTop(grid, 50);
  Canvas::SetLeft(grid, 20);

  rootGrid->Children->Add(mainCanvas);
  Grid::SetRow(mainCanvas, 0);

  window->Content = rootGrid;
  app->Run(window);

  return 0;
}
而运行结果为:

大白今天躺坑完毕,总算解决了问题,先酱~
第一个版本代码已上传到 github : https://github.com/yanglr/CppWpfDemo/tree/master/CppWpfDemo/CppWpfDemo .
到此这篇关于Visual C++下创建WPF项目的方法探索的文章就介绍到这了,更多相关Visual C++下创建WPF项目的方法探索内容请搜索自学编程网以前的文章或继续浏览下面的相关文章希望大家以后多多支持自学编程网!

- 本文固定链接: https://zxbcw.cn/post/189915/
- 转载请注明:必须在正文中标注并保留原文链接
- QQ群: PHP高手阵营官方总群(344148542)
- QQ群: Yii2.0开发(304864863)