
1、添加依赖
这个应该是web项目相关的jar
 <dependency>
  <groupId>org.springframework.boot</groupId>
  <artifactId>spring-boot-starter-web</artifactId>
 </dependency>
 <!-- jstl JSP标准标签库 -->
 <dependency>
   <groupId>javax.servlet</groupId>
   <artifactId>jstl</artifactId>
   <version>1.2</version>
 </dependency>
 <!-- 返回jsp页面还需要这个依赖 -->
 <dependency>
   <groupId>org.apache.tomcat.embed</groupId>
   <artifactId>tomcat-embed-jasper</artifactId>
   <scope>provided</scope>
 </dependency>
2、application.properties
 <parent>
 <groupId>org.springframework.boot</groupId>
 <artifactId>spring-boot-starter-parent</artifactId>
 <version>1.5.10.RELEASE</version>
 <relativePath/> <!-- lookup parent from repository -->
 </parent>
我这里是parent是1.5.10,所以jsp的配置应该如下
#jsp path
spring.mvc.view.prefix=/WEB-INF/jsp/
spring.mvc.view.suffix=.jsp
老版本的应该是这个
spring.view.prefix=/WEB-INF/jsp/
spring.view.suffix=.jsp
3、控制器
因为是返回页面,所以不能用@RestController返回json格式
package com.example.demo.controller;
import javax.servlet.http.HttpServletRequest;
import javax.servlet.http.HttpServletResponse;

import org.slf4j.Logger;
import org.slf4j.LoggerFactory;
import org.springframework.context.annotation.ComponentScan;
import org.springframework.stereotype.Controller;
import org.springframework.web.bind.annotation.RequestMapping;
import org.springframework.web.bind.annotation.RequestMethod;
import org.springframework.web.bind.annotation.ResponseBody;
import org.springframework.web.bind.annotation.RestController;
import org.springframework.web.servlet.ModelAndView;

@Controller
/*@ComponentScan*/
@RequestMapping("/test")
public class TestController {

 private final Logger log = LoggerFactory.getLogger(this.getClass());

 @RequestMapping(value = "queryMaterialType", method = RequestMethod.POST)
 public Object test(){
 log.info("--------------->>打印日志");
 return "hellow world";
 }

 //@RestController,返回json数据
 //@Controller,返回login.jsp页面
 @RequestMapping(value = "/login", method = RequestMethod.GET)
 public String login(HttpServletRequest request,HttpServletResponse response){

 return "login";
 }

 //无论是@RestController还是@Controller都不影响返回页面
 @RequestMapping(value = "/loginPage", method = RequestMethod.GET)
 public ModelAndView loginPage(HttpServletRequest request,HttpServletResponse response){
 ModelAndView mav = new ModelAndView();
 mav.setViewName("login");

 return mav;
 }
}
补充知识:springBoot前后分离项目,通过ModelAndView返回给app或前台静态页面
1.先做静态页模板aaa.html,放到springboot项目的根目录下,如下如中,新建一个templates的文件夹,将静态页放到这里面就可以了
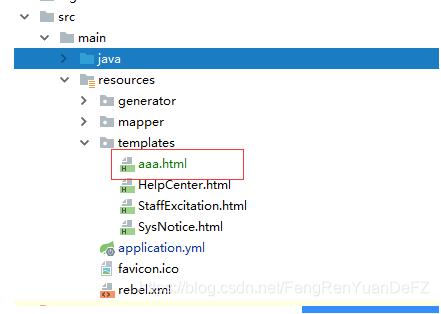
静态页代码为
<!DOCTYPE html SYSTEM "http://www.thymeleaf.org/dtd/xhtml1-strict-thymeleaf-spring4-4.dtd">
<html xmlns="http://www.w3.org/1999/xhtml" xmlns:th="http://www.thymeleaf.org">
<head>
  <meta http-equiv="Content-Type" content="text/html; charset=utf-8"/>
  <meta http-equiv="X-UA-Compatible" content="IE=EmulateIE7">
  <meta name="viewport" content="width=device-width, initial-scale=0.0, user-scalable=no, minimum-scale=1.0, maximum-scale=1.0">
  <meta content="yes" name="apple-mobile-web-app-capable">
  <meta content="black" name="apple-mobile-web-app-status-bar-style">
  <meta content="telephone=no" name="format-detection">
  <title>标题</title>
  <style type="text/css">
    body {
      margin-left: 0px;
      margin-top: 0px;
      margin-right: 0px;
      margin-bottom: 0px;
      background: #f3f3f3;
      font-family: "Microsoft YaHei ", "微软雅黑", "arial";
    }

    h1 {
      height: 1px;
      width: 100%;
      margin: 10px 0;
      background: #f1f1f1;
    }

    img {
      width: 100%;
      height: auto;
    }

    .bodys {
      width: 100%;
      height: auto;
      overflow: Hidden;
      padding-top: 10px;
      padding-bottom: 50px;
      background: #fff;
    }

    .head {
      width: 96%;
      min-height: 30px;
      padding: 18px 2% 2px 2%;
      line-height: 25px;
      text-align: left;
      font-size: 20px;
      font-weight: bold;
      color: #111;
    }

    .time {
      width: 96%;
      height: 20px;
      line-height: 20px;
      font-size: 11px;
      text-align: left;
      padding: 0 2%;
      color: #999;
    }

    .info {
      width: 96%;
      height: auto;
      padding: 10px 2%;
      line-height: 25px;
      text-align: left;
      font-size: 15px;
    }
  </style>
</head>

<body>
<div class="bodys">
  <div class="head" th:text="${itle}">未知</div>
  <div class="time" th:text="${addDate}">未知</div>
  <h1></h1>
  <div class="info" th:utext="${content}">未知</div>
</div>
</body>
</html>
2.然后主要是 controller层,业务逻辑根据自己的需求来
@RequestMapping("/html")
@Controller
public class AppCommonHtmlController {

  @RequestMapping(value = "/ceshi", method = RequestMethod.GET)
  public ModelAndView getCeishi(“根据自己业务传入需要的参数”) {
    ModelAndView modelAndView=new ModelAndView();
    //根据自己的业务,和静态页中的参数对应上就行,也可以放入实体类,和静态页面对应就行了
    modelAndView.addObject("title",“标题”);
    modelAndView.addObject("addDate",“添加时间”);
    modelAndView.addObject("content",“内容”);
    //存入静态页的名称,就可以把处理好的静态页返回给app或前台
    modelAndView.setViewName("aaa");
    return modelAndView;
  }
}
然后浏览器输入:http://localhost:8888/项目名/html/ceshi
该方法多适用于app端,需要根据不同的情况得到不一样内容的静态页展示到手机上,就可以通过这种方法,做一个静态页的模板,通过el表达式给模板不同的内容,然后app端可以通过访问的ip直接获取到静态页
下面的方法也可以,效果同上面一样
静态页代码
<!DOCTYPE html SYSTEM "http://www.thymeleaf.org/dtd/xhtml1-strict-thymeleaf-spring4-4.dtd">
<html xmlns="http://www.w3.org/1999/xhtml" xmlns:th="http://www.thymeleaf.org">
<head>
  <meta http-equiv="Content-Type" content="text/html; charset=utf-8"/>
  <meta http-equiv="X-UA-Compatible" content="IE=EmulateIE7">
  <meta name="viewport" content="width=device-width, initial-scale=0.0, user-scalable=no, minimum-scale=1.0, maximum-scale=1.0">
  <meta content="yes" name="apple-mobile-web-app-capable">
  <meta content="black" name="apple-mobile-web-app-status-bar-style">
  <meta content="telephone=no" name="format-detection">
  <title>静态页</title>
  <style type="text/css">
    body {
      margin-left: 0px;
      margin-top: 0px;
      margin-right: 0px;
      margin-bottom: 0px;
      background: #f3f3f3;
      font-family: "Microsoft YaHei ", "微软雅黑", "arial";
    }

    h1 {
      height: 1px;
      width: 100%;
      margin: 10px 0;
      background: #f1f1f1;
    }

    img {
      width: 100%;
      height: auto;
    }

    .bodys {
      width: 100%;
      height: auto;
      overflow: Hidden;
      padding-top: 10px;
      padding-bottom: 50px;
      background: #fff;
    }

    .head {
      width: 96%;
      min-height: 30px;
      padding: 18px 2% 2px 2%;
      line-height: 25px;
      text-align: left;
      font-size: 20px;
      font-weight: bold;
      color: #111;
    }

    .time {
      width: 96%;
      height: 20px;
      line-height: 20px;
      font-size: 11px;
      text-align: left;
      padding: 0 2%;
      color: #999;
    }

    .info {
      width: 96%;
      height: auto;
      padding: 10px 2%;
      line-height: 25px;
      text-align: left;
      font-size: 15px;
    }
  </style>
</head>

<body>
<div class="bodys">
  <div class="head" th:text="${bbb.noticeTitle}">未知</div>
  <div class="time" th:text="${bbb.publishDate}">未知</div>
  <h1></h1>
  <div class="info" th:utext="${bbb.noticeContent}">未知</div>
</div>
</body>
</html>
controller代码
  @RequestMapping(value = "/ceshi", method = RequestMethod.GET)
  public String getCeishi(“业务逻辑需要的入参”, Model model) {
    SimpleDateFormat sdf = new SimpleDateFormat("yyyy-MM-dd HH:mm:ss");
    JSONObject jsonObject = JSONObject.fromObject(“需要传到静态页的动态数据”);
    jsonObject.remove("publishDate");//时间,具体作用不清楚,个人猜测是原本数据格式不支持,需要转换一下,所以要先删除后重新赋值
    jsonObject.put("publishDate", sdf.format(notice.getPublishDate()));//时间重新赋值
    model.addAttribute("bbb", jsonObject);//将转换好的数据存入model中
    return "aaa"; //对应好静态页的名称return出去就可以了
  }
以上这篇springboot返回modelandview页面的实例就是小编分享给大家的全部内容了,希望能给大家一个参考,也希望大家多多支持自学编程网。

- 本文固定链接: https://zxbcw.cn/post/197950/
- 转载请注明:必须在正文中标注并保留原文链接
- QQ群: PHP高手阵营官方总群(344148542)
- QQ群: Yii2.0开发(304864863)