
Hystrix概述
Hystrix:断路器,容错管理工具,旨在通过熔断机制控制服务和第三方库的节点,从而对延迟和故障提供更强大的容错能力。
hystrix可以实现降级和熔断:
- 降级
调用远程服务失败(宕机、500错、超时),可以降级执行当前服务中的一段代码,向客户端返回结果
快速失败
- 熔断
当访问量过大,出现大量失败,可以做过热保护,断开远程服务不再调用
限流
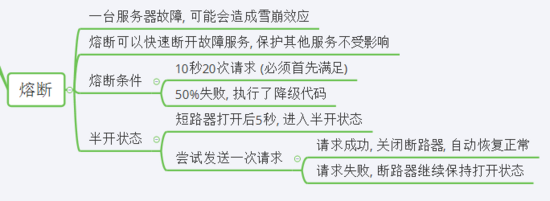
防止故障传播、雪崩效应
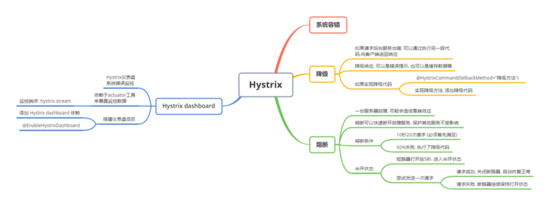
在微服务系统中,服务之间进行依赖,避免有调用其中服务失败,而引起其他服务大范围宕机,造成雪崩效应,hystrix熔断可在满足熔断条件(默认10秒20次以上请求,同时50%失败)后执行降级。快速断开故障服务,保护其他服务不受影响。
降级

第一步:sp06添加hystrix依赖
<dependency>
  <groupId>org.springframework.cloud</groupId>
  <artifactId>spring-cloud-starter-netflix-hystrix</artifactId>
</dependency>
第二步:主程序添加 @EnableCircuitBreaker 启用 hystrix 断路器
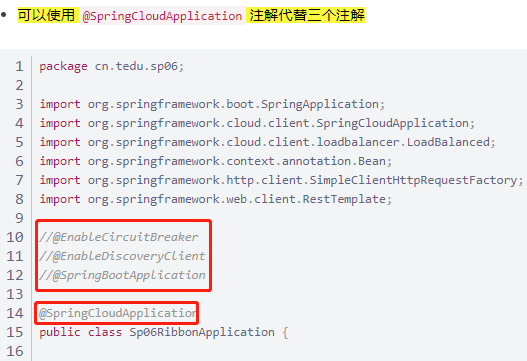
package cn.tedu.sp06;
import org.springframework.boot.SpringApplication;
import org.springframework.boot.autoconfigure.SpringBootApplication;
import org.springframework.cloud.client.circuitbreaker.EnableCircuitBreaker;
import org.springframework.cloud.client.loadbalancer.LoadBalanced;
import org.springframework.context.annotation.Bean;
import org.springframework.http.client.SimpleClientHttpRequestFactory;
import org.springframework.web.client.RestTemplate;
@EnableCircuitBreaker
@SpringBootApplication
public class Sp06RibbonApplication {
  public static void main(String[] args) {
   SpringApplication.run(Sp06RibbonApplication.class, args);
  }
  /**
 * 创建RestTemplate实例
 * 放入spring容器
 * @LoadBalanced-对RestTemplate进行增强,封装RestTemplate,添加负载均衡功能
 */
 @LoadBalanced
 @Bean public RestTemplate restTemplate(){
   //设置调用超时时间,超时后认为调用失败
 SimpleClientHttpRequestFactory f =
      new SimpleClientHttpRequestFactory();
   f.setConnectTimeout(1000);//建立连接等待时间
 f.setReadTimeout(1000);//连接建立后,发送请求后,等待接收响应的时间
 return new RestTemplate(f);
  }
}
第三步:RibbonController 中添加降级方法
- 为每个方法添加降级方法,例如
getItems()添加降级方法getItemsFB() - 添加
@HystrixCommand注解,指定降级方法名
package cn.tedu.sp06.controller;
import cn.tedu.sp01.pojo.Item;
import cn.tedu.sp01.pojo.Order;
import cn.tedu.sp01.pojo.User;
import cn.tedu.web.util.JsonResult;
import com.netflix.hystrix.contrib.javanica.annotation.HystrixCommand;
import lombok.extern.slf4j.Slf4j;
import org.springframework.beans.factory.annotation.Autowired;
import org.springframework.web.bind.annotation.*;
import org.springframework.web.client.RestTemplate;
import java.util.List;
@RestController
@Slf4j
public class RibbonController {
@Autowired
private RestTemplate rt;
@GetMapping("/item-service/{orderId}")
@HystrixCommand(fallbackMethod = "getItemsFB") //指定降级方法的方法名
public JsonResult<List<Item>> getItems(@PathVariable String orderId){
return rt.getForObject("http://item-service/{1}", JsonResult.class,orderId);
}
@PostMapping("/item-service/decreaseNumber")
@HystrixCommand(fallbackMethod = "decreaseNumberFB") //指定降级方法的方法名
public JsonResult<?> decreaseNumber(@PathVariable List<Item> items){
return rt.postForObject("http://item-service/decreaseNumber",items, JsonResult.class);
}
@GetMapping("/user-service/{userId}")
@HystrixCommand(fallbackMethod = "getUserFB") //指定降级方法的方法名
public JsonResult<User> getUser(@PathVariable Integer userId) {
return rt.getForObject("http://user-service/{1}", JsonResult.class, userId);
}
@GetMapping("/user-service/{userId}/score")
@HystrixCommand(fallbackMethod = "addScoreFB") //指定降级方法的方法名
public JsonResult addScore(
@PathVariable Integer userId, Integer score) {
return rt.getForObject("http://user-service/{1}/score?score={2}", JsonResult.class, userId, score);
}
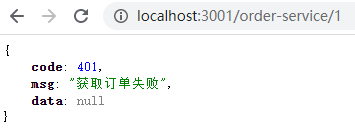
@GetMapping("/order-service/{orderId}")
@HystrixCommand(fallbackMethod = "getOrderFB") //指定降级方法的方法名
public JsonResult<Order> getOrder(@PathVariable String orderId) {
return rt.getForObject("http://order-service/{1}", JsonResult.class, orderId);
}
@GetMapping("/order-service")
@HystrixCommand(fallbackMethod = "addOrderFB") //指定降级方法的方法名
public JsonResult addOrder() {
return rt.getForObject("http://order-service/", JsonResult.class);
}
//降级方法的参数和返回值,需要和原始方法一致,方法名任意
public JsonResult<List<Item>> getItemsFB(String orderId) {
return JsonResult.err("获取订单商品列表失败");
}
public JsonResult decreaseNumberFB(List<Item> items) {
return JsonResult.err("更新商品库存失败");
}
public JsonResult<User> getUserFB(Integer userId) {
return JsonResult.err("获取用户信息失败");
}
public JsonResult addScoreFB(Integer userId, Integer score) {
return JsonResult.err("增加用户积分失败");
}
public JsonResult<Order> getOrderFB(String orderId) {
return JsonResult.err("获取订单失败");
}
public JsonResult addOrderFB() {
return JsonResult.err("添加订单失败");
}
}
第四步:启动eureka、item和hystrix服务器进行测试
http://localhost:3001/item-service/35
hystrix超时设置:
超时时间设置应该超过ribbon重试时间,否则重试失效。
hystrix.command.default.execution.isolation.thread.timeoutInMilliseconds
hystrix等待超时后, 会执行降级代码, 快速向客户端返回降级结果, 默认超时时间是1000毫秒。
可在yml中设置超时时间:
hystrix:
 command:
  default:
   execution:
    isolation:
     thread:
      timeoutInMilliseconds: 6000
熔断
主程序添加 @EnableCircuitBreaker 启用 hystrix 断路器,熔断自动打开。
Hystrix故障监控-Hystrix Dashboard断路器仪表盘
Hystrix使用springboot提供的actuator健康管理,监控各个端点。
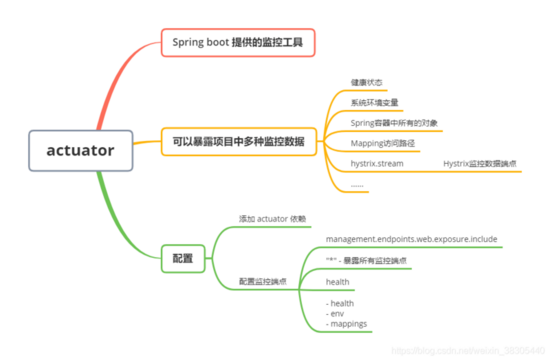
actuator中的hystrix.stream可以监控hystrix断路器各端点日志。

第一步:sp06的pom中添加actuator依赖
<dependency>
  <groupId>org.springframework.boot</groupId>
  <artifactId>spring-boot-starter-actuator</artifactId>
  <version>2.4.0</version>
</dependency>
第二步:在yml中配置健康监控的内容
# "*"暴露所有监控端点
management:
 endpoints:
  web:
   exposure:
    include: "*"
第三步:测试actuator健康监控
http://localhost:3001/actuator/ 搭建Hystrix Dashboard仪表盘:
仪表盘项目是一个完全独立的项目。
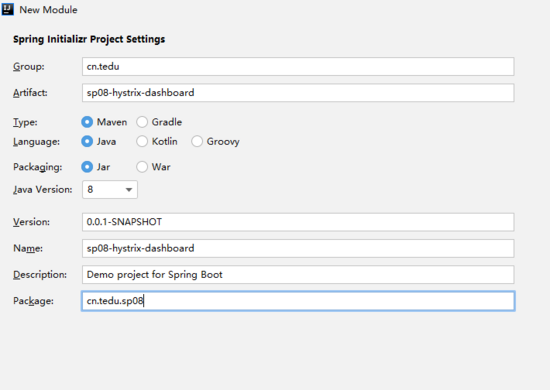
第一步:创建springboot项目sp08-htstrix-dashboard
第二步:添加hystrix dashboard依赖
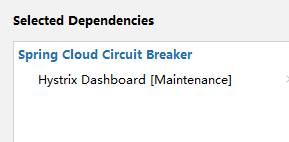
<dependency>
  <groupId>org.springframework.cloud</groupId>
  <artifactId>spring-cloud-starter-netflix-hystrix-dashboard</artifactId>
</dependency>
第三步:主程序上添加@EnableHystrixDashboard注解
package cn.tedu.sp08;
import org.springframework.boot.SpringApplication;
import org.springframework.boot.autoconfigure.SpringBootApplication;
import org.springframework.cloud.netflix.hystrix.dashboard.EnableHystrixDashboard;
@EnableHystrixDashboard
@SpringBootApplication
public class Sp08HystrixDashboardApplication {
  public static void main(String[] args) {
   SpringApplication.run(Sp08HystrixDashboardApplication.class, args);
  }
}
第四步:配置允许给那些服务器开启权限
hystrix:
 dashboard:
  proxy-stream-allow-list: localhost
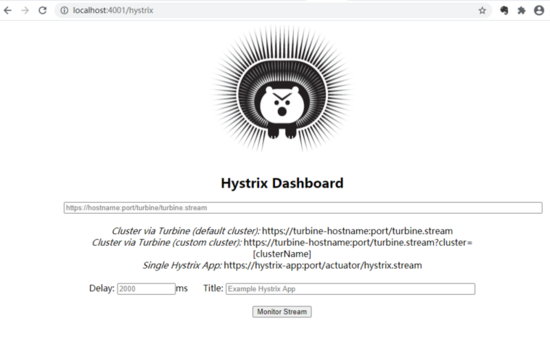
第五步:监控查看
http://localhost:4001/hystrix/
第六步:查看hystrix stream监控数据端点
输入hystrix监控地址
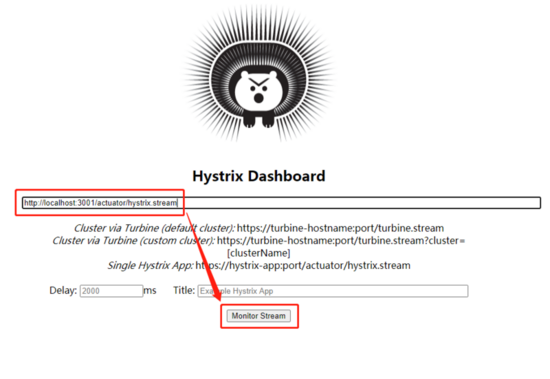
访问item/user/order服务器,查看仪表盘。
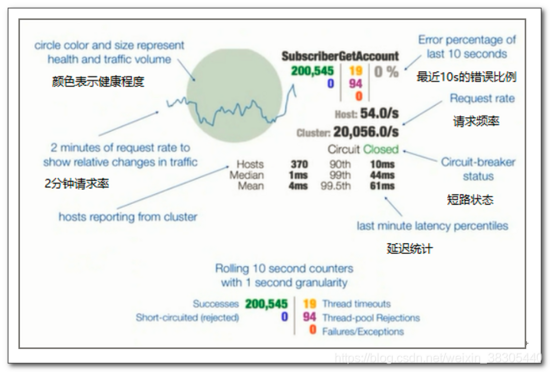
第六步:使用ab进行并发访问测试
使用 apache 的并发访问测试工具 ab进行访问测试。
打开ab工具/bin文件目录--cmd--输入命令:
ab -n 20000 -c 50 http://localhost:3001/item-service/35
并发50,发送20000个请求,查看仪表盘。
到此这篇关于一文读懂Spring Cloud-Hystrix的文章就介绍到这了,更多相关Spring Cloud Hystrix内容请搜索自学编程网以前的文章或继续浏览下面的相关文章希望大家以后多多支持自学编程网!

- 本文固定链接: https://zxbcw.cn/post/206722/
- 转载请注明:必须在正文中标注并保留原文链接
- QQ群: PHP高手阵营官方总群(344148542)
- QQ群: Yii2.0开发(304864863)