
引入pom
<?xml version="1.0" encoding="UTF-8"?>
<project xmlns="http://maven.apache.org/POM/4.0.0" xmlns:xsi="http://www.w3.org/2001/XMLSchema-instance"
	xsi:schemaLocation="http://maven.apache.org/POM/4.0.0 https://maven.apache.org/xsd/maven-4.0.0.xsd">
	<modelVersion>4.0.0</modelVersion>
	<parent>
		<groupId>org.springframework.boot</groupId>
		<artifactId>spring-boot-starter-parent</artifactId>
		<version>2.4.5</version>
		<relativePath/> <!-- lookup parent from repository -->
	</parent>
	<groupId>com.wxy</groupId>
	<artifactId>test-rabbitmq</artifactId>
	<version>0.0.1-SNAPSHOT</version>
	<name>test-rabbitmq</name>
	<description>Demo project for Spring Boot</description>
	<properties>
		<java.version>1.8</java.version>
	</properties>
	<dependencies>
		<dependency>
			<groupId>org.springframework.boot</groupId>
			<artifactId>spring-boot-starter-amqp</artifactId>
		</dependency>
		<dependency>
			<groupId>org.springframework.boot</groupId>
			<artifactId>spring-boot-starter-web</artifactId>
		</dependency>

		<dependency>
			<groupId>org.springframework.boot</groupId>
			<artifactId>spring-boot-starter-test</artifactId>
			<scope>test</scope>
		</dependency>
		<dependency>
			<groupId>org.springframework.amqp</groupId>
			<artifactId>spring-rabbit-test</artifactId>
			<scope>test</scope>
		</dependency>
        <dependency>
            <groupId>junit</groupId>
            <artifactId>junit</artifactId>
            <scope>test</scope>
        </dependency>
    </dependencies>

	<build>
		<plugins>
			<plugin>
				<groupId>org.springframework.boot</groupId>
				<artifactId>spring-boot-maven-plugin</artifactId>
			</plugin>
		</plugins>
	</build>

</project>
测试
package com.wxy.rabbit;

import org.junit.jupiter.api.Test;
import org.junit.runner.RunWith;
import org.springframework.amqp.rabbit.core.RabbitTemplate;
import org.springframework.beans.factory.annotation.Autowired;
import org.springframework.boot.test.context.SpringBootTest;
import org.springframework.test.context.junit4.SpringRunner;

import java.util.Arrays;
import java.util.HashMap;
import java.util.Map;

@RunWith(SpringRunner.class)
@SpringBootTest
class TestRabbitmqApplicationTests {

	@Autowired
	RabbitTemplate rabbitTemplate;

	@Test
	public  void sendmessage() {
		String exchange  = "exchange.direct";
		String routingkey  = "wxy.news";
		//object为消息发送的消息体,可以自动实现消息的序列化
		Map<String,Object> msg = new HashMap<>();
		msg.put("msg","使用mq发送消息");
		msg.put("data", Arrays.asList("helloword",123456,true));
		rabbitTemplate.convertAndSend(exchange, routingkey,msg);
	}


	@Test
	public  void receive() {
		Object object  = rabbitTemplate.receiveAndConvert("wxy.news");
		System.out.println(object);
	}

}
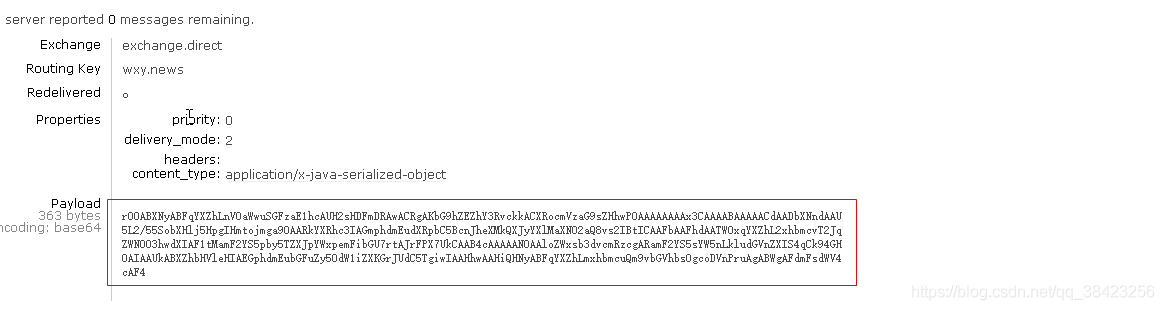
默认消息转换类型
 ###############在RabbitTemplate默认使用的是SimpleMessageConverter#######
  private MessageConverter messageConverter = new SimpleMessageConverter();


  ###############源码:使用SerializationUtils.deserialize###############
   public Object fromMessage(Message message) throws MessageConversionException {
        Object content = null;
        MessageProperties properties = message.getMessageProperties();
        if (properties != null) {
            String contentType = properties.getContentType();
            if (contentType != null && contentType.startsWith("text")) {
                String encoding = properties.getContentEncoding();
                if (encoding == null) {
                    encoding = this.defaultCharset;
                }

                try {
                    content = new String(message.getBody(), encoding);
                } catch (UnsupportedEncodingException var8) {
                    throw new MessageConversionException("failed to convert text-based Message content", var8);
                }
            } else if (contentType != null && contentType.equals("application/x-java-serialized-object")) {
                try {
                    content = SerializationUtils.deserialize(this.createObjectInputStream(new ByteArrayInputStream(message.getBody()), this.codebaseUrl));
                } catch (IllegalArgumentException | IllegalStateException | IOException var7) {
                    throw new MessageConversionException("failed to convert serialized Message content", var7);
                }
            }
        }
将默认消息类型转化成自定义json格式
第一:上面SimpleMessageConverter是org.springframework.amqp.support.converter包下MessageConverter接口的一个实现类

第二:查看该接口MessageConverter下支持哪些消息转化
ctrl+H查看该接口中的所有实现类

第三步:找到json相关的convert

RabbitTemplateConfigurer中定义if (this.messageConverter != null)则使用配置的messageConverter
 ################## if (this.messageConverter != null)则使用配置的messageConverter
public void configure(RabbitTemplate template, ConnectionFactory connectionFactory) {
        PropertyMapper map = PropertyMapper.get();
        template.setConnectionFactory(connectionFactory);
        if (this.messageConverter != null) {
            template.setMessageConverter(this.messageConverter);
        }

        template.setMandatory(this.determineMandatoryFlag());
        Template templateProperties = this.rabbitProperties.getTemplate();
        if (templateProperties.getRetry().isEnabled()) {
            template.setRetryTemplate((new RetryTemplateFactory(this.retryTemplateCustomizers)).createRetryTemplate(templateProperties.getRetry(), Target.SENDER));
        }

        templateProperties.getClass();
        map.from(templateProperties::getReceiveTimeout).whenNonNull().as(Duration::toMillis).to(template::setReceiveTimeout);
        templateProperties.getClass();
        map.from(templateProperties::getReplyTimeout).whenNonNull().as(Duration::toMillis).to(template::setReplyTimeout);
        templateProperties.getClass();
        map.from(templateProperties::getExchange).to(template::setExchange);
        templateProperties.getClass();
        map.from(templateProperties::getRoutingKey).to(template::setRoutingKey);
        templateProperties.getClass();
        map.from(templateProperties::getDefaultReceiveQueue).whenNonNull().to(template::setDefaultReceiveQueue);
    }
配置一个messageConversert(org.springframework.amqp.support.converter包中的)
package com.wxy.rabbit.config;

import org.springframework.amqp.support.converter.Jackson2JsonMessageConverter;
import org.springframework.amqp.support.converter.MessageConverter;
import org.springframework.context.annotation.Bean;
import org.springframework.context.annotation.Configuration;

@Configuration
public class MessageConverConfig {

    @Bean
    public MessageConverter getMessageConvert(){
        return  new Jackson2JsonMessageConverter();
    }
}
再次发送消息体json格式

使用注解@RabbitListener监听
监听多个队列
@RabbitListener(queues = {"wxy.news","wxy.emps"})
监听单个队列
@RabbitListener(queues = "wxy.news")
package com.wxy.rabbit.service;

import org.springframework.amqp.core.Message;
import org.springframework.amqp.rabbit.annotation.RabbitListener;
import org.springframework.stereotype.Service;

@Service
public class RabbitMqReceiveService {

    @RabbitListener(queues = {"wxy.news","wxy.emps"})
    public void  getReceiveMessage(){
        System.out.println("监听到性的消息");
    }


    @RabbitListener(queues =  {"wxy.news","wxy.emps"})
    public void  getReceiveMessageHead(Message message){
        System.out.println(message.getBody());
        System.out.println( message.getMessageProperties());
    }

}
在程序中创建队列,交换器,并进行绑定
@Test
	public  void create() {
		//创建一个点对点的交换器
		amqpAdmin.declareExchange(new DirectExchange("amqpexchange.direct"));
		//创建一个队列
		// String name,:队列名称
		// boolean durable :持久化
		amqpAdmin.declareQueue(new Queue("amqp.queue",true));
		//绑定
		//String destination, Binding.DestinationType destinationType, String exchange, String routingKey
		//  @Nullable Map<String, Object> arguments
		amqpAdmin.declareBinding(new Binding("amqp.queue", Binding.DestinationType.QUEUE,
				"amqpexchange.direct","wxy.news", null));

	}
到此这篇关于springBoot整合rabbitMQ的方法详解的文章就介绍到这了,更多相关springBoot整合rabbitMQ内容请搜索自学编程网以前的文章或继续浏览下面的相关文章希望大家以后多多支持自学编程网!

- 本文固定链接: https://zxbcw.cn/post/210092/
- 转载请注明:必须在正文中标注并保留原文链接
- QQ群: PHP高手阵营官方总群(344148542)
- QQ群: Yii2.0开发(304864863)