
员工管理系统
1、准备工作
资料下载
内含源码 + 笔记 + web素材
源码下载地址:
http://xiazai.jb51.net/202105/yuanma/javaguanli_jb51.rar
笔记
素材

源码
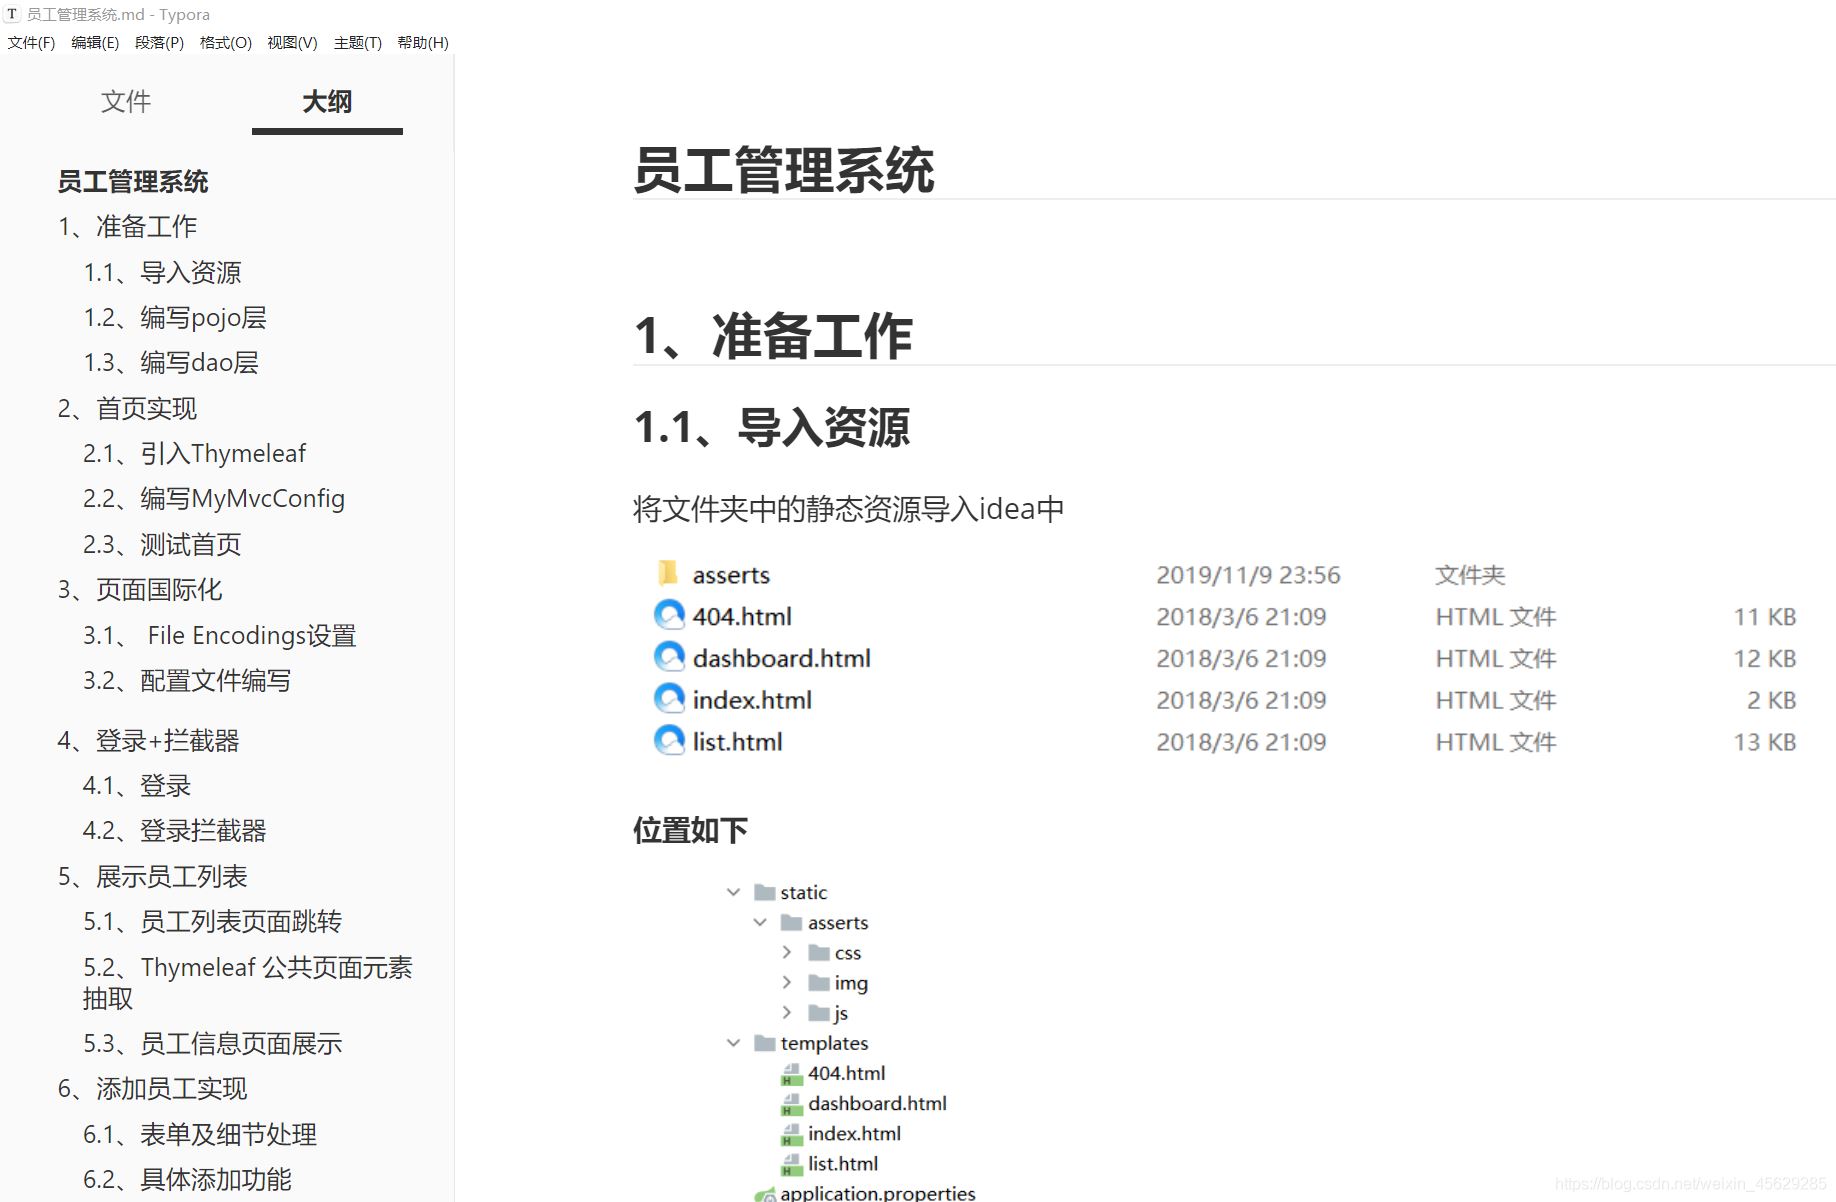
1.1、导入资源
将文件夹中的静态资源导入idea中
![[外链图片转存失败,源站可能有防盗链机制,建议将图片保存下来直接上传(img-FK4du48Q-1620304585032)(C:/Users/Administrator/AppData/Roaming/Typora/typora-user-images/image-20210503093036786.jpg)]](/uploads/202106/22/16243504355.jpg)
位置如下

1.2、编写pojo层
员工表
//员工表
@Data
@NoArgsConstructor
public class Employee {

    private Integer id;
    private String lastName;
    private String email;
    private Integer gender; //性别 0 女, 1,男
    private Department department;
    private Date birth;

    public Employee(Integer id, String lastName, String email, Integer gender, Department department) {
        this.id = id;
        this.lastName = lastName;
        this.email = email;
        this.gender = gender;
        this.department = department;
        this.birth = new Date();
    }
}
部门表
//部门表
@Data
@AllArgsConstructor
@NoArgsConstructor
public class Department {
    private int id;  //部门id
    private String departmentName;  //部门名字
}
添加lombok依赖
 <!--lombok-->
        <dependency>
            <groupId>org.projectlombok</groupId>
            <artifactId>lombok</artifactId>
        </dependency>
1.3、编写dao层
这里我们模拟数据库,springboot和数据库的连接在后序课程中。
部门dao
package com.kuang.dao;

import com.kuang.pojo.Department;
import org.springframework.stereotype.Repository;

import java.util.Collection;
import java.util.HashMap;
import java.util.Map;

//部门dao
@Repository
public class DepartmentDao {

    //模拟数据库中的数据

    private static Map<Integer, Department>departments = null;

    static {
        departments = new HashMap<Integer, Department>(); //创建一个部门表

        departments.put(101,new Department(101,"教学部"));
        departments.put(102,new Department(102,"市场部"));
        departments.put(103,new Department(103,"教研部"));
        departments.put(104,new Department(104,"运营部"));
        departments.put(105,new Department(105,"后勤部"));
    }

    //获取所有的部门信息
    public Collection<Department> getDepartments(){
        return departments.values();
    }
    //通过id得到部门
    public Department getDepartmentById(Integer id){
        return departments.get(id);
    }
}
员工dao
package com.kuang.dao;

import com.kuang.pojo.Department;
import com.kuang.pojo.Employee;
import org.springframework.beans.factory.annotation.Autowired;
import org.springframework.stereotype.Repository;

import java.util.Collection;
import java.util.HashMap;
import java.util.Map;

//员工dao
@Repository //被string托管
public class EmployeeDao {

    //模拟数据库中的数据
    private static Map<Integer, Employee> employees= null;
    //员工所属的部门
    @Autowired
    private DepartmentDao departmentDao;
    static {
        employees = new HashMap<Integer,Employee>(); //创建一个部门表

        employees.put(1001,new Employee(  1001,"AA","1622840727@qq.com",1,new Department(101,"教学部")));
        employees.put(1002,new Employee(  1002,"BB","2622840727@qq.com",0,new Department(102,"市场部")));
        employees.put(1003,new Employee(  1003,"CC","4622840727@qq.com",1,new Department(103,"教研部")));
        employees.put(1004,new Employee(  1004,"DD","5628440727@qq.com",0,new Department(104,"运营部")));
        employees.put(1005,new Employee(  1005,"FF","6022840727@qq.com",1,new Department(105,"后勤部")));
    }
    //主键自增
    private static Integer ininId = 1006;
    //增加一个员工
    public void save(Employee employee){
        if(employee.getId() == null){
            employee.setId(ininId++);
        }
        employee.setDepartment(departmentDao.getDepartmentById(employee.getDepartment().getId()));
        employees.put(employee.getId(),employee);
    }
    //查询全部的员工
    public Collection<Employee>getALL(){
         return employees.values();
    }

    //通过id查询员工
    public Employee getEmployeeById(Integer id){
        return employees.get(id);
    }

    //删除一个员通过id
    public void delete(Integer id){
        employees.remove(id);
    }
}
2、首页实现
2.1、引入Thymeleaf
pom.xml导入依赖
<dependency>
    <groupId>org.thymeleaf</groupId>
    <artifactId>thymeleaf-spring5</artifactId>
</dependency>
<dependency>
    <groupId>org.thymeleaf.extras</groupId>
    <artifactId>thymeleaf-extras-java8time</artifactId>
</dependency>
2.2、编写MyMvcConfig
package com.kuang.config;

import org.springframework.context.annotation.Configuration;
import org.springframework.web.servlet.config.annotation.ViewControllerRegistry;
import org.springframework.web.servlet.config.annotation.WebMvcConfigurer;

//扩展使用SpringMVC
@Configuration
public class MyMvcConfig implements WebMvcConfigurer {
    @Override
    public void addViewControllers(ViewControllerRegistry registry) {
        registry.addViewController("/").setViewName("index");
        registry.addViewController("/index.html").setViewName("index");
    }
}
更改静态资源路径
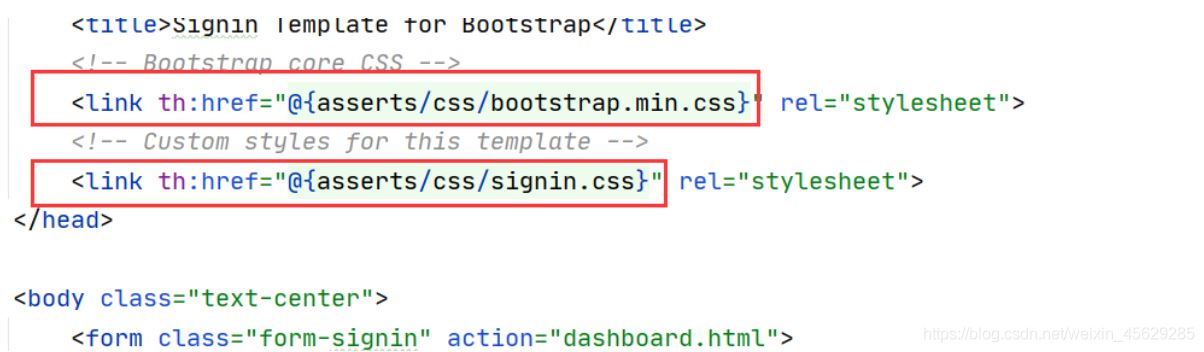
所有的静态资源都需要使用thymeleaf接管:@{}
application.properties 修改
# 关闭模板引擎的缓存
spring.thymeleaf.cache=false

server.servlet.context-path=/kuang
2.3、测试首页
输入路径
http://localhost:8080/kuang/index.html
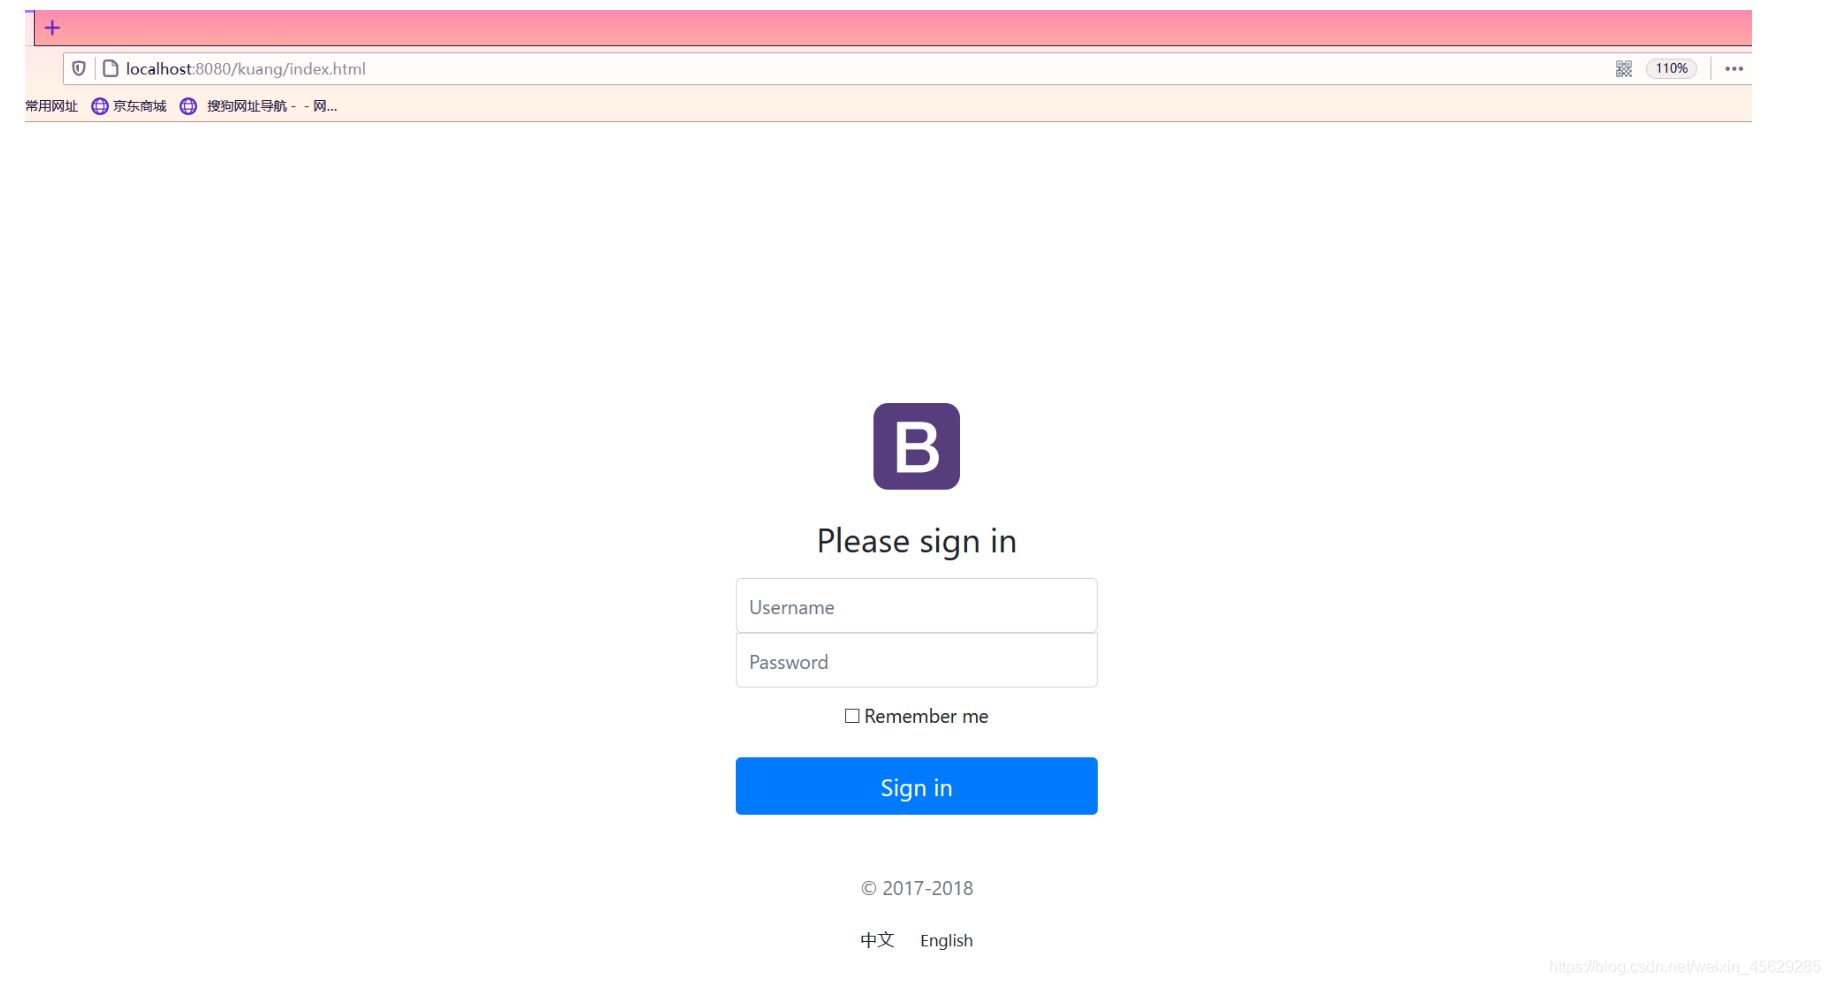
测试成功!
3、页面国际化
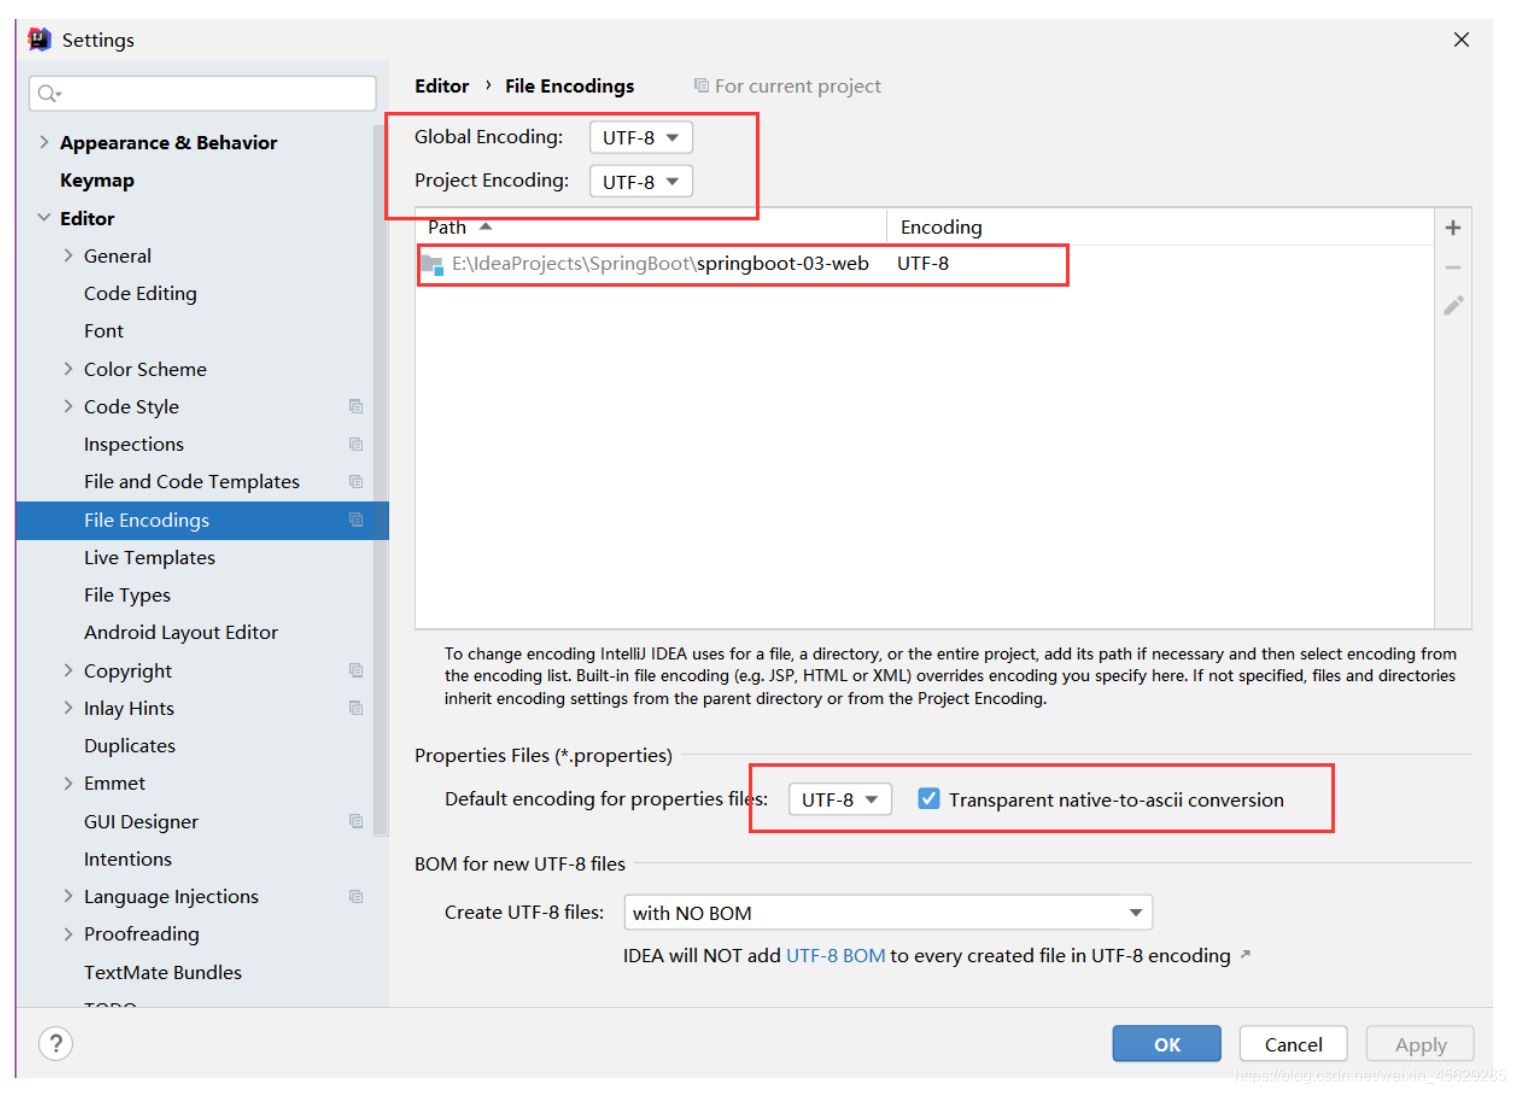
3.1、 File Encodings设置
先在IDEA中统一设置properties的编码问题!
编写国际化配置文件,抽取页面需要显示的国际化页面消息。我们可以去登录页面查看一下,哪些内容
我们需要编写国际化的配置!
3.2、配置文件编写
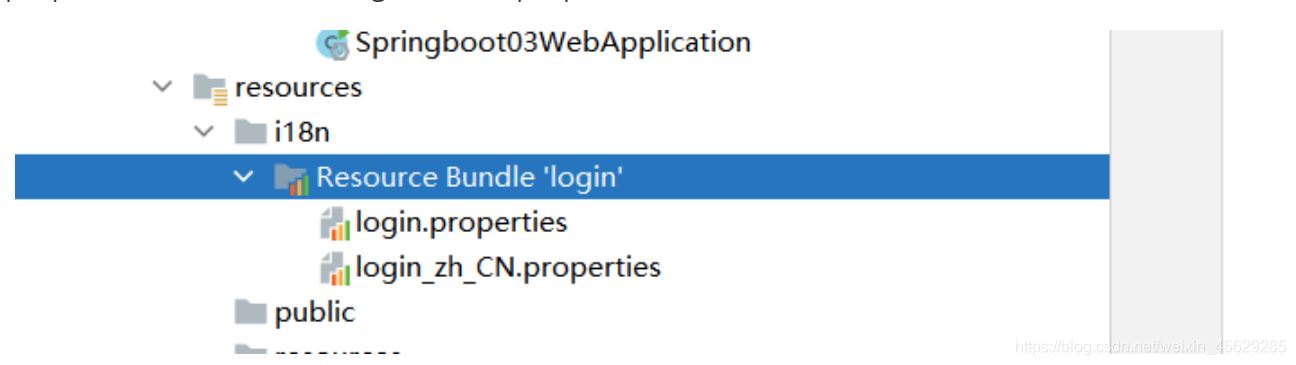
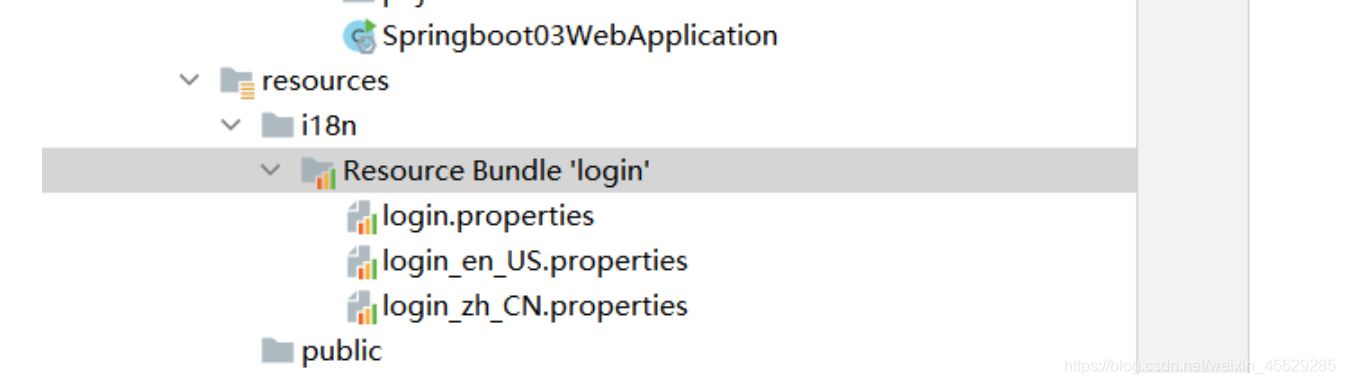
1、我们在resources资源文件下新建一个i18n目录,存放国际化配置文件
2、建立一个login.properties文件,还有一个login_zh_CN.properties;发现IDEA自动识别了我们要做国际化操作;文件夹变了!
3、我们可以在这上面去新建一个文件;
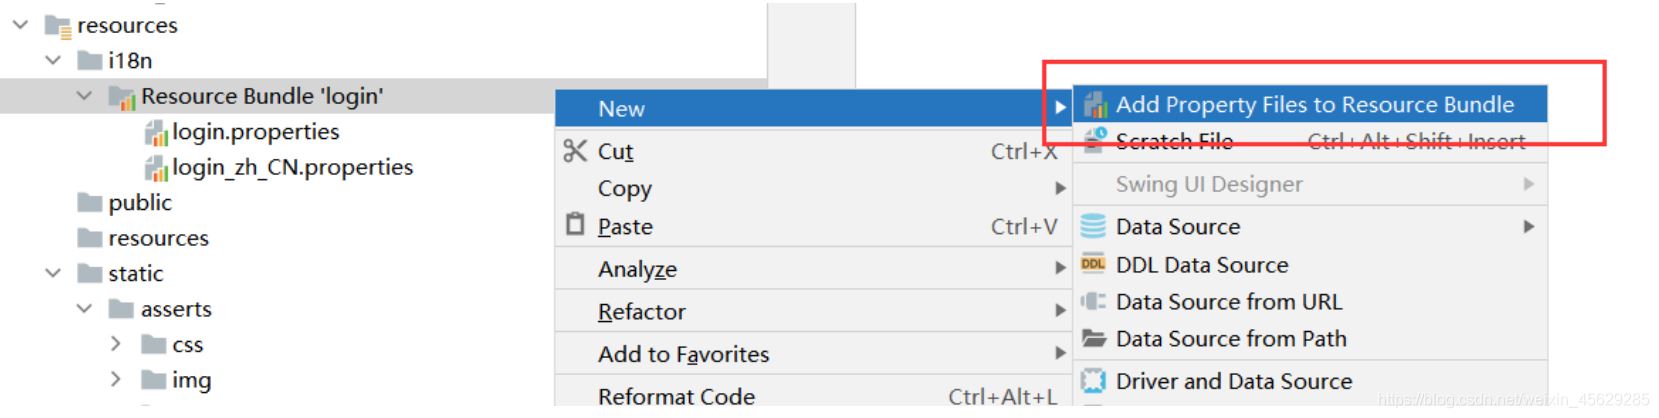
弹出如下页面:我们再添加一个英文的;
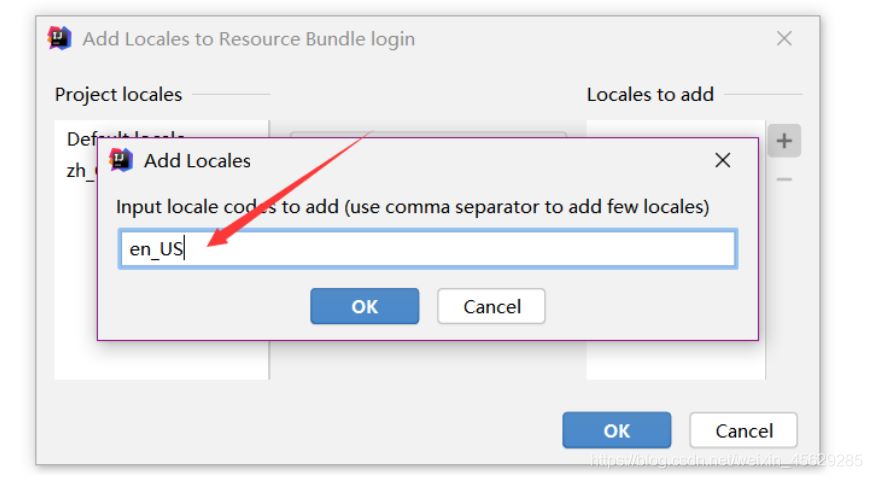
这样就快捷多了!
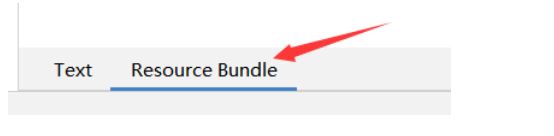
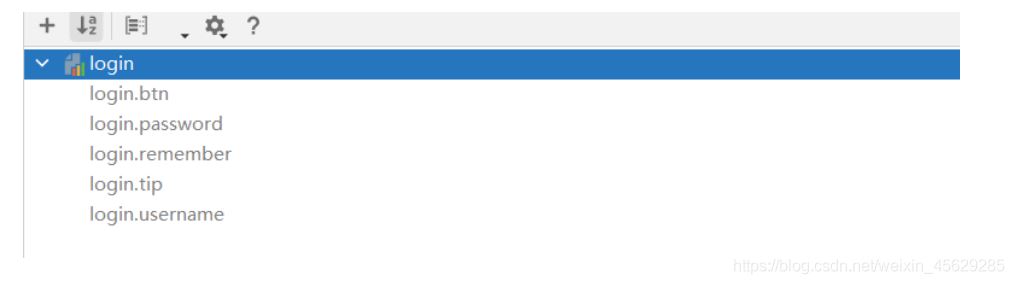
4、接下来,我们就来编写配置,我们可以看到idea下面有另外一个视图;
这个视图我们点击 + 号就可以直接添加属性了;我们新建一个login.tip,可以看到边上有三个文件框可以输入
在这里插入图片描述
我们添加一下首页的内容!
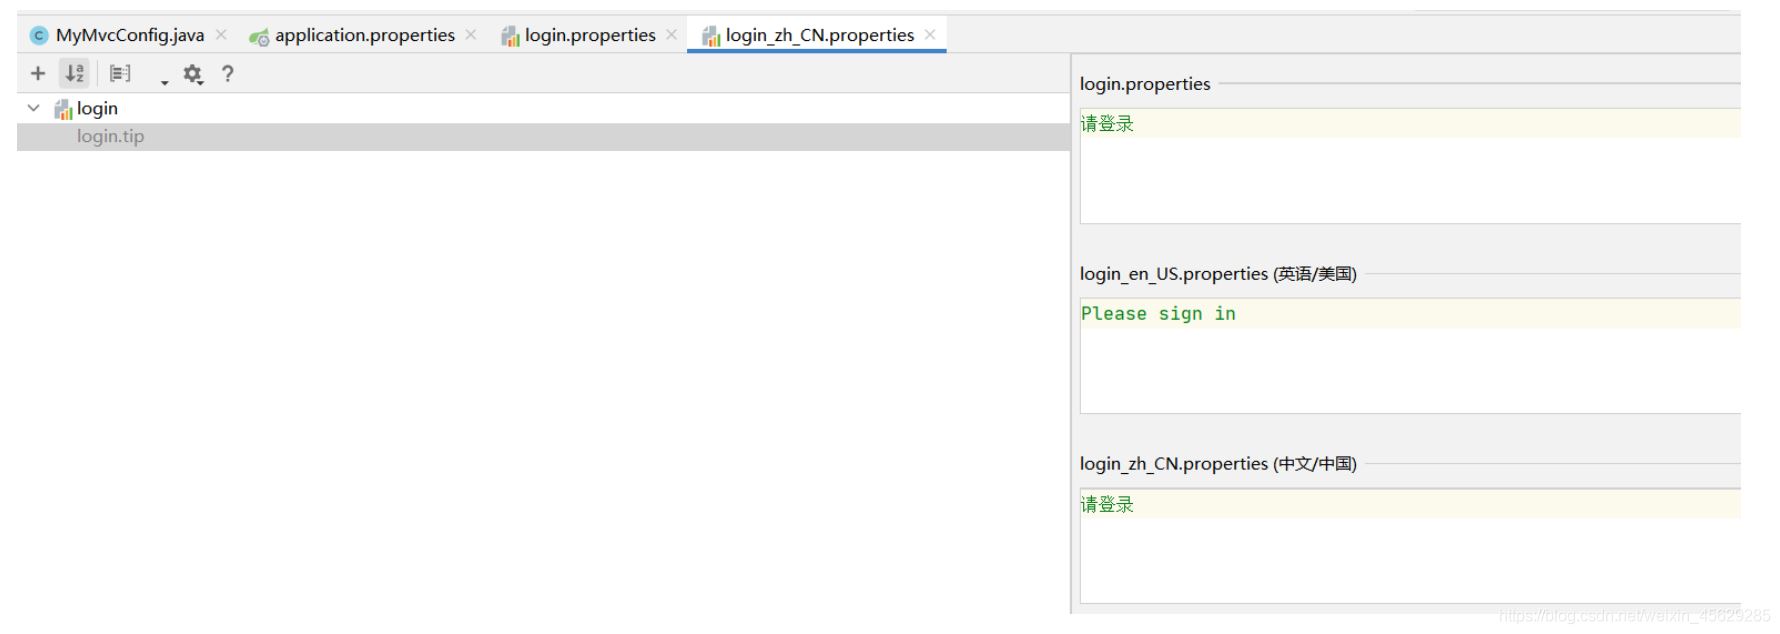
然后依次添加其他页面内容即可!
然后去查看我们的配置文件;
login.properties :默认
login.btn=登录
login.password=密码
login.remember=记住我
login.tip=请登录
login.username=用户名
英文:
login.btn=Sign in
login.password=Password
login.remember=Remember me
login.tip=Please sign in
login.username=Username
中文:
login.btn=登录
login.password=密码
login.remember=记住我
login.tip=请登录
login.username=用户名
OK,配置文件步骤搞定!
配置文件生效探究
我们去看一下SpringBoot对国际化的自动配置!这里又涉及到一个类:MessageSourceAutoConfiguration
里面有一个方法,这里发现SpringBoot已经自动配置好了管理我们国际化资源文件的组件 ResourceBundleMessageSource;
// 获取 properties 传递过来的值进行判断
@Bean
public MessageSource messageSource(MessageSourceProperties properties) {
    ResourceBundleMessageSource messageSource = new ResourceBundleMessageSource();
    if (StringUtils.hasText(properties.getBasename())) {
        // 设置国际化文件的基础名(去掉语言国家代码的)
        messageSource.setBasenames(
            StringUtils.commaDelimitedListToStringArray(
                                       StringUtils.trimAllWhitespace(properties.getBasename())));
    }
    if (properties.getEncoding() != null) {
        messageSource.setDefaultEncoding(properties.getEncoding().name());
    }
    messageSource.setFallbackToSystemLocale(properties.isFallbackToSystemLocale());
    Duration cacheDuration = properties.getCacheDuration();
    if (cacheDuration != null) {
        messageSource.setCacheMillis(cacheDuration.toMillis());
    }
    messageSource.setAlwaysUseMessageFormat(properties.isAlwaysUseMessageFormat());
    messageSource.setUseCodeAsDefaultMessage(properties.isUseCodeAsDefaultMessage());
    return messageSource;
}
我们真实的情况是放在了i18n目录下,所以我们要去配置这个messages的路径;
spring.messages.basename=i18n.login
配置页面国际化值
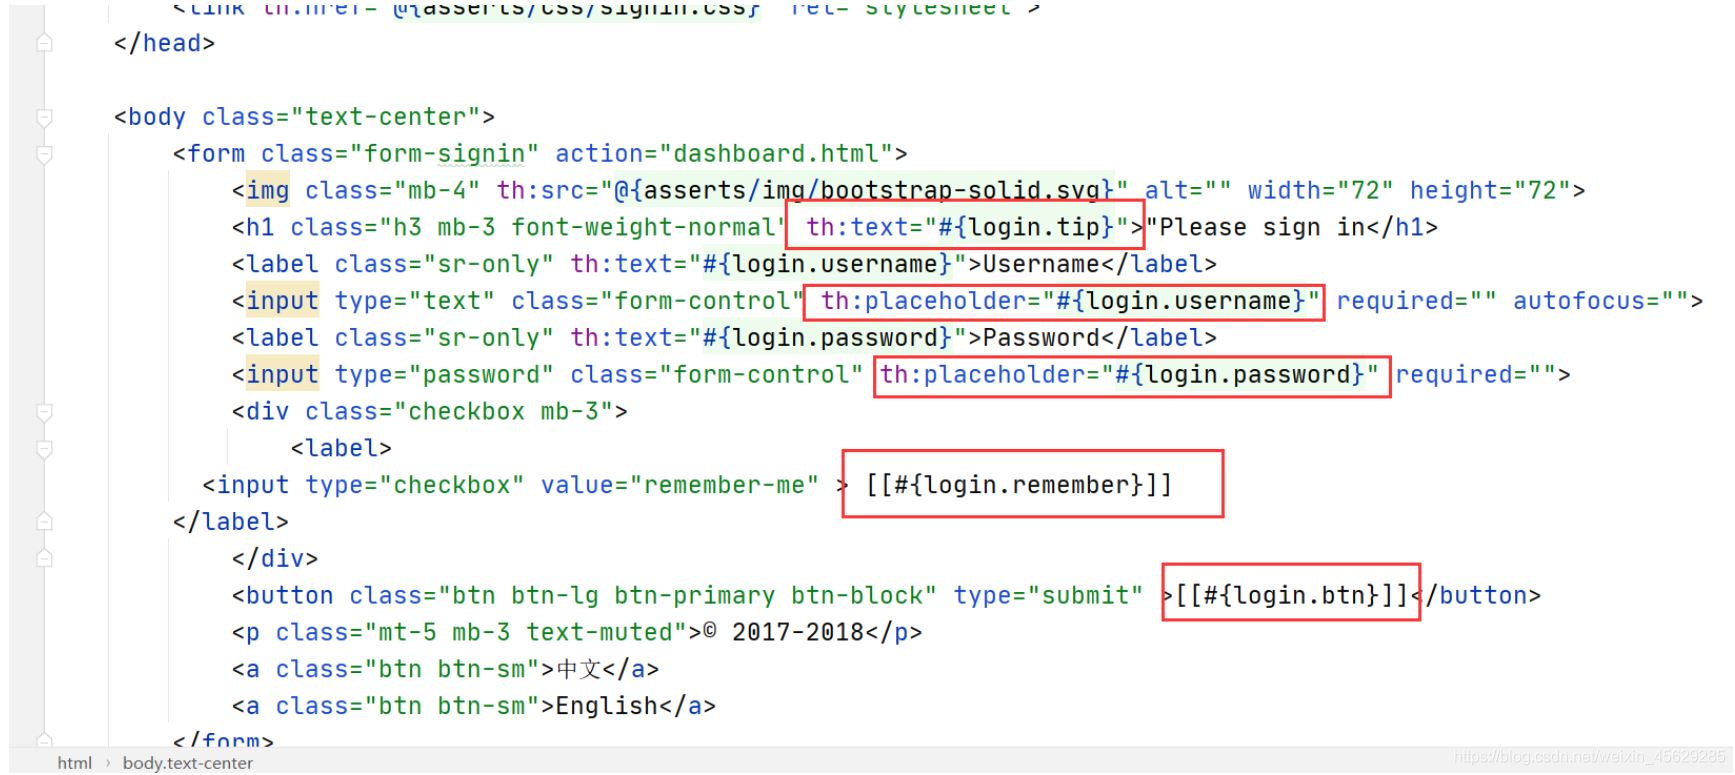
去页面获取国际化的值,查看Thymeleaf的文档,找到message取值操作为:#{…}。我们去页面测试下:
IDEA还有提示,非常智能的!
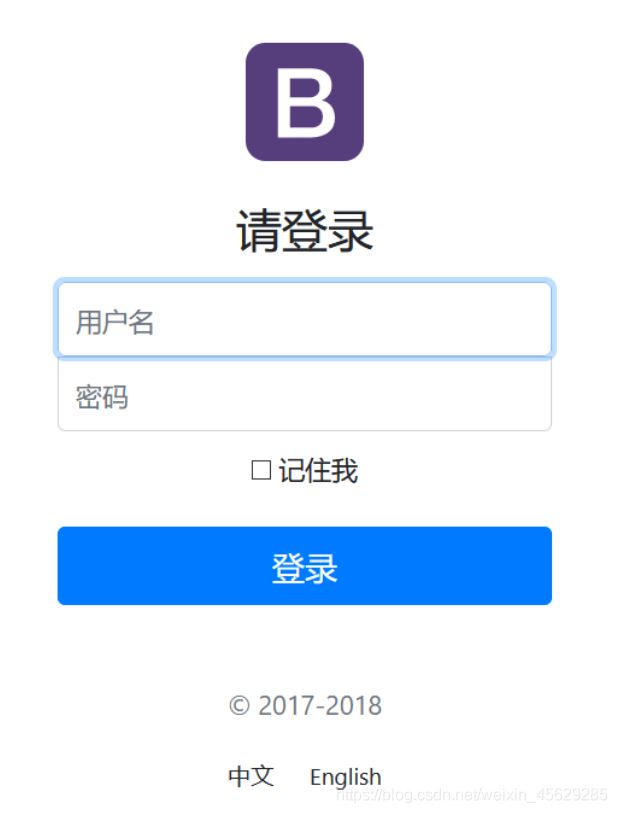
我们可以去启动项目,访问一下,发现已经自动识别为中文的了!
但是我们想要更好!可以根据按钮自动切换中文英文!
配置国际化解析
在Spring中有一个国际化的Locale (区域信息对象);里面有一个叫做LocaleResolver (获取区域信息对象)的解析器!
我们去我们webmvc自动配置文件,寻找一下!看到SpringBoot默认配置:
@Bean
@ConditionalOnMissingBean
@ConditionalOnProperty(prefix = "spring.mvc", name = "locale")
public LocaleResolver localeResolver() {
   // 容器中没有就自己配,有的话就用用户配置的
   if (this.mvcProperties.getLocaleResolver() == WebMvcProperties.LocaleResolver.FIXED) {
       return new FixedLocaleResolver(this.mvcProperties.getLocale());
   }
   // 接收头国际化分解
   AcceptHeaderLocaleResolver localeResolver = new AcceptHeaderLocaleResolver();
   localeResolver.setDefaultLocale(this.mvcProperties.getLocale());
   return localeResolver;
}
AcceptHeaderLocaleResolver 这个类中有一个方法
public Locale resolveLocale(HttpServletRequest request) {
    Locale defaultLocale = this.getDefaultLocale();
    // 默认的就是根据请求头带来的区域信息获取Locale进行国际化
    if (defaultLocale != null && request.getHeader("Accept-Language") == null) {
        return defaultLocale;
    } else {
        Locale requestLocale = request.getLocale();
        List<Locale> supportedLocales = this.getSupportedLocales();
        if (!supportedLocales.isEmpty() && !supportedLocales.contains(requestLocale)) {
            Locale supportedLocale = this.findSupportedLocale(request, supportedLocales);
            if (supportedLocale != null) {
                return supportedLocale;
            } else {
                return defaultLocale != null ? defaultLocale : requestLocale;
            }
        } else {
            return requestLocale;
        }
    }
}
那假如我们现在想点击链接让我们的国际化资源生效,就需要让我们自己的Locale生效!
我们去自己写一个自己的LocaleResolver,可以在链接上携带区域信息!
修改一下前端页面的跳转连接:
<!-- 这里传入参数不需要使用 ?使用 (key=value)-->
<a class="btn btn-sm" th:href="@{/index.html(l='zh_CN')}" rel="external nofollow" >中文</a>
<a class="btn btn-sm" th:href="@{/index.html(l='en_US')}" rel="external nofollow" >English</a>
我们去写一个处理的组件类!
package com.kuang.component;

import org.springframework.util.StringUtils;
import org.springframework.web.servlet.LocaleResolver;

import javax.servlet.http.HttpServletRequest;
import javax.servlet.http.HttpServletResponse;
import java.util.Locale;

//可以在链接上携带区域信息
public class MyLocaleResolver implements LocaleResolver {

    //解析请求
    @Override
    public Locale resolveLocale(HttpServletRequest request) {

        String language = request.getParameter("l");
        Locale locale = Locale.getDefault(); // 如果没有获取到就使用系统默认的
        //如果请求链接不为空
        if (!StringUtils.isEmpty(language)){
            //分割请求参数
            String[] split = language.split("_");
            //国家,地区
            locale = new Locale(split[0],split[1]);
        }
        return locale;
    }

    @Override
    public void setLocale(HttpServletRequest httpServletRequest, HttpServletResponse httpServletResponse, Locale locale) {

    }
}
为了让我们的区域化信息能够生效,我们需要再配置一下这个组件!在我们自己的MvcConofig下添加bean;
@Bean
public LocaleResolver localeResolver(){
    return new MyLocaleResolver();
}
我们重启项目,来访问一下,发现点击按钮可以实现成功切换!搞定收工!
注意点
4、登录+拦截器
4.1、登录
禁用模板缓存
说明:页面存在缓存,所以我们需要禁用模板引擎的缓存
#禁用模板缓存
spring.thymeleaf.cache=false
模板引擎修改后,想要实时生效!页面修改完毕后,IDEA小技巧 : Ctrl + F9 重新编译!即可生效!
登录
我们这里就先不连接数据库了,输入任意用户名都可以登录成功!
1、我们把登录页面的表单提交地址写一个controller!
<form class="form-signin" th:action="@{/user/login}" method="post">
 //这里面的所有表单标签都需要加上一个name属性

</form>
2、去编写对应的controller
@Controller
public class LoginController {
    @RequestMapping("/user/login")
    public String login(
            @RequestParam("username") String username ,
            @RequestParam("password") String password,
            Model model){
        //具体的业务
        if(!StringUtils.isEmpty(username)&&"123456".equals(password)){
            return "redirect:/main.html";
        }
        else{
            //告诉用户,你登录失败
            model.addAttribute("msg","用户名或者密码错误!");
            return "index";
        }
    }
}
OK ,测试登录成功!
3、登录失败的话,我们需要将后台信息输出到前台,可以在首页标题下面加上判断
<!--判断是否显示,使用if, ${}可以使用工具类,可以看thymeleaf的中文文档-->
<p style="color: red" th:text="${msg}" th:if="${not #strings.isEmpty(msg)}">
</p>
重启登录失败测试:

优化,登录成功后,由于是转发,链接不变,我们可以重定向到首页!
4、我们再添加一个视图控制映射,在我们的自己的MyMvcConfifig中:
registry.addViewController("/main.html").setViewName("dashboard");
5、将 Controller 的代码改为重定向;
//登录成功!防止表单重复提交,我们重定向
return "redirect:/main.html";
重启测试,重定向成功!后台主页正常显示!
4.2、登录拦截器
但是又发现新的问题,我们可以直接登录到后台主页,不用登录也可以实现!怎么处理这个问题呢?我
们可以使用拦截器机制,实现登录检查!
1、在LoginController添加serssion
session.setAttribute("loginUser",username);
2、自定义一个拦截器:
//自定义拦截器
public class LoginHandlerInterceptor implements HandlerInterceptor {
    @Override
    public boolean preHandle(HttpServletRequest request, HttpServletResponse response, Object handler) throws Exception {
        //获取 loginUser 信息进行判断
        Object user = request.getSession().getAttribute("loginUser");
        if(user == null){//未登录,返回登录页面
            request.setAttribute("msg","没有权限,请先登录");
            request.getRequestDispatcher("/index.html").forward(request,response);
            return false;
        }else{
            //登录,放行
            return true;
        }
    }
}
3、然后将拦截器注册到我们的SpringMVC配置类当中!
@Override
    public void addInterceptors(InterceptorRegistry registry) {
        // 注册拦截器,及拦截请求和要剔除哪些请求!
        // 我们还需要过滤静态资源文件,否则样式显示不出来
        registry.addInterceptor(new LoginHandlerInterceptor())
                .addPathPatterns("/**")
                .excludePathPatterns("/index.html","/user/login","/","/css/*","/img/**","/js/**");
}
4、我们然后在后台主页,获取用户登录的信息
<!--后台主页显示登录用户的信息-->
[[${session.loginUser}]] <!--$取EL表达式-->
然后我们登录测试拦截!完美!
5、展示员工列表
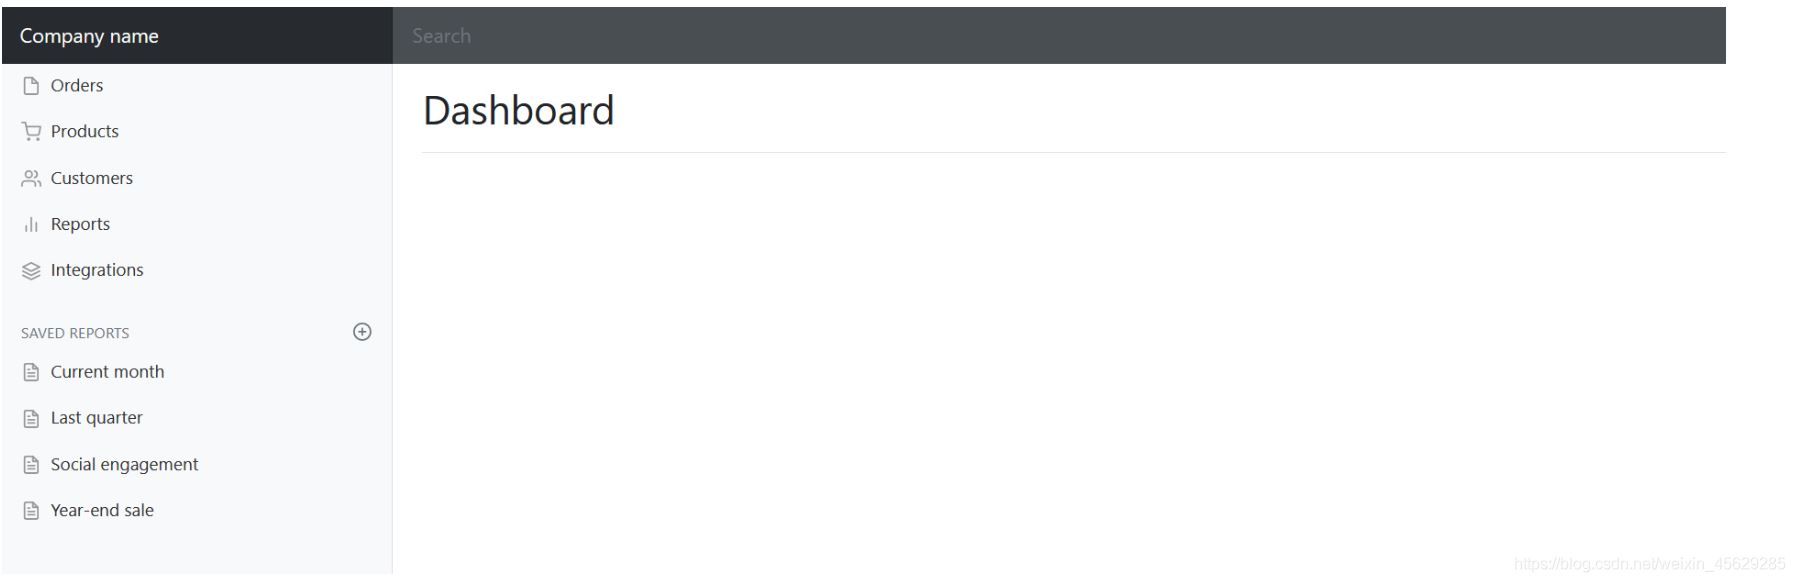
5.1、员工列表页面跳转
我们在主页点击Customers,就显示列表页面;我们去修改下
1、将首页的侧边栏Customers改为员工管理
2、a链接添加请求
<a class="nav-link" th:href="@{/emps}" rel="external nofollow" rel="external nofollow" >员工管理</a>
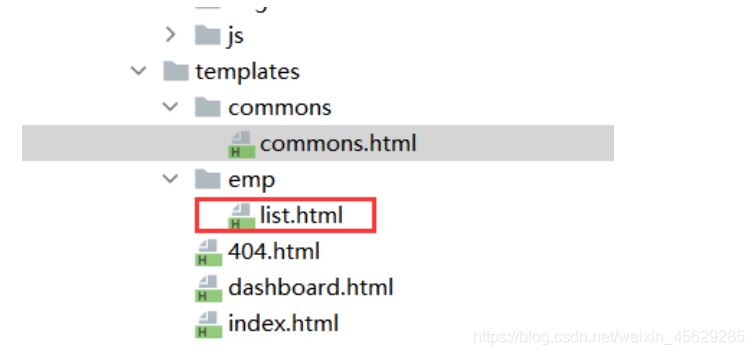
3、将list放在emp文件夹下
4、编写处理请求的controller
//员工列表
@Controller
public class EmployeeController {

    @Autowired
    EmployeeDao employeeDao;

    @RequestMapping("/emps")
    public String list(Model model){
        Collection<Employee> employees = employeeDao.getALL();
        model.addAttribute("emps",employees);
        return "emp/list";
    }
}
我们启动项目,测试一下看是否能够跳转,测试OK!我们只需要将数据渲染进去即可!
但是发现了一个问题,侧边栏和顶部都相同,我们是不是应该将它抽取出来呢?
5.2、Thymeleaf公共页面元素抽取
步骤:
1、抽取公共片段 th:fragment 定义模板名
2、引入公共片段 th:insert 插入模板名
实现:
1、我们来抽取一下,使用list列表做演示!我们要抽取头部nav标签,我们在dashboard中将nav部分定
义一个模板名;
<!--顶部导航栏-->
<nav class="navbar navbar-dark sticky-top bg-dark flex-md-nowrap p-0" th:fragment="topbar">
    <a class="navbar-brand col-sm-3 col-md-2 mr-0" href="http://getbootstrap.com/docs/4.0/examples/dashboard/#" rel="external nofollow"  rel="external nofollow" >[[${session.loginUser}]]</a> <!--$取EL表达式-->
    <input class="form-control form-control-dark w-100" type="text" placeholder="Search" aria-label="Search">
    <ul class="navbar-nav px-3">
        <li class="nav-item text-nowrap">
            <a class="nav-link" href="http://getbootstrap.com/docs/4.0/examples/dashboard/#" rel="external nofollow"  rel="external nofollow" >注销</a>
        </li>
    </ul>
</nav>
2、然后我们在list页面中去引入,可以删掉原来的nav
<!--引入抽取的topbar-->
<!--模板名 : 会使用thymeleaf的前后缀配置规则进行解析 使用~{模板::标签名}-->
<!--顶部导航栏-->
<div th:insert="~{dashboard::topbar}"></div>
3、启动再次测试,可以看到已经成功加载过来了!
说明:
除了使用insert插入,还可以使用replace替换,或者include包含,三种方式会有一些小区别,可以见名
知义;
我们使用replace替换,可以解决div多余的问题,可以查看thymeleaf的文档学习
侧边栏也是同理,当做练手,可以也同步一下!
定义模板:
<!--侧边栏-->
<nav th:fragment="sitebar" class="col-md-2 d-none d-md-block bg-light sidebar">
然后我们在list页面中去引入:
<!--顶部导航栏-->
<div th:replace="~{commons/commons::topbar}"></div>
<!--侧边栏-->
<div th:replace="~{commons/commons::sidebar}"></div>
启动再试试,看效果!
![[外链图片转存失败,源站可能有防盗链机制,建议将图片保存下来直接上传(img-MYb7uR0O-1620304585041)(%E5%91%98%E5%B7%A5%E7%AE%A1%E7%90%86%E7%B3%BB%E7%BB%9F.assets/image-20210504080516865.jpg)]](/uploads/202106/22/162435043823.jpg)
我们发现一个小问题,侧边栏激活的问题,它总是激活第一个;按理来说,这应该是动态的才对!
为了重用更清晰,我们建立一个commons文件夹,专门存放公共页面;
![[外链图片转存失败,源站可能有防盗链机制,建议将图片保存下来直接上传(img-oOhXpYuM-1620304585042)(%E5%91%98%E5%B7%A5%E7%AE%A1%E7%90%86%E7%B3%BB%E7%BB%9F.assets/image-20210504080721577.jpg)]](/uploads/202106/22/162435043824.jpg)
我们去页面中引入一下
<a th:class="${active=='list.html'?'nav-link active':'nav-link'}" th:href="@{/index.html}" rel="external nofollow" >
    <svg xmlns="http://www.w3.org/2000/svg" width="24" height="24" viewBox="0 0 24 24" fill="none" stroke="currentColor" stroke-width="2" stroke-linecap="round" stroke-linejoin="round" class="feather feather-home">
        <path d="M3 9l9-7 9 7v11a2 2 0 0 1-2 2H5a2 2 0 0 1-2-2z"></path>
        <polyline points="9 22 9 12 15 12 15 22"></polyline>
    </svg>
    首页 <span class="sr-only">(current)</span>
</a>

<a th:class="${active=='list.html'?'nav-link active':'nav-link'}" th:href="@{/emps}" rel="external nofollow"  rel="external nofollow" >
    <svg xmlns="http://www.w3.org/2000/svg" width="24" height="24" viewBox="0 0 24 24" fill="none" stroke="currentColor" stroke-width="2" stroke-linecap="round" stroke-linejoin="round" class="feather feather-shopping-cart">
        <circle cx="9" cy="21" r="1"></circle>
        <circle cx="20" cy="21" r="1"></circle>
        <path d="M1 1h4l2.68 13.39a2 2 0 0 0 2 1.61h9.72a2 2 0 0 0 2-1.61L23 6H6"></path>
    </svg>
    员工管理
</a>
我们先测试一下,保证所有的页面没有出问题!ok!
侧边栏激活问题:
1、将首页的超链接地址改到项目中
2、我们在a标签中加一个判断,使用class改变标签的值;
<div th:replace="~{commons/commons::topbar(active='main.html')}"></div>
<div th:replace="~{commons/commons::sidebar(active='list.html')}"></div>
3、修改请求链接
<thead>
    <tr>
        <th>id</th>
        <th>lastName</th>
        <th>email</th>
        <th>gender</th>
        <th>department</th>
        <th>birth</th>
    </tr>
</thead>
<tbody>
    <tr th:each="emp:${emps}">
        <td th:text="${emp.getId()}"></td>
        <td th:text="${emp.getLastName()}"></td>
        <td th:text="${emp.getEmail()}"></td>
        <td th:text="${emp.getGender()==0?'女':'男'}"></td>
        <td th:text="${emp.department.getDepartmentName()}"></td>
        <td th:text="${#dates.format(emp.getBirth(),'yyyy-MM-dd HH:mm:ss')}"></td>
        <td>
            <button class="btn btn-sm btn-primary">编辑</button>
            <button class="btn btn-sm btn-danger">删除</button>
        </td>
    </tr>
</tbody>
4、我们刷新页面,去测试一下,OK,动态激活搞定!
5.3、员工信息页面展示
现在我们来遍历我们的员工信息!顺便美化一些页面,增加添加,修改,删除的按钮!
<h2><a class="btn btn-sm btn-success" th:href="@{/emp}" rel="external nofollow" >添加员工</a></h2>
![[外链图片转存失败,源站可能有防盗链机制,建议将图片保存下来直接上传(img-3zTWfpyn-1620304585042)(%E5%91%98%E5%B7%A5%E7%AE%A1%E7%90%86%E7%B3%BB%E7%BB%9F.assets/image-20210504081556725.jpg)]](/uploads/202106/22/162435043825.jpg)
OK,显示全部员工OK!
6、添加员工实现
6.1、表单及细节处理
1、将添加员工信息改为超链接
//to员工添加页面
@GetMapping("/emp")
public String toAddPage(){
    return "emp/add";
}
2、编写对应的controller
<form th:action="@{/emp}" method="post" >
    <div class="form-group" ><label>LastName</label>
        <input class="form-control" placeholder="kuangshen" type="text" name="lastName">
    </div>
    <div class="form-group" ><label>Email</label>
        <input class="form-control" placeholder="24736743@qq.com" type="email" name="email">
    </div>
    <div class="form-group"><label>Gender</label><br/>
        <div class="form-check form-check-inline">
            <input class="form-check-input" name="gender" type="radio" value="1">
            <label class="form-check-label">男</label>
        </div>
        <div class="form-check form-check-inline">
            <input class="form-check-input" name="gender" type="radio" value="0">
            <label class="form-check-label">女</label>
        </div>
    </div>
    <div class="form-group" ><label>department</label>
        <select class="form-control" name="department.id">
            <option th:each="dept:${departments}" th:text="${dept.getDepartmentName()}" th:value="${dept.getId()}"></option>
        </select>
    </div>
    <div class="form-group" >
        <label >Birth</label>
        <input class="form-control" placeholder="kuangstudy" type="text" name="birth">
    </div>
    <button class="btn btn-primary" type="submit">添加</button>
</form>
3、添加前端页面;复制list页面,修改即可
bootstrap官网文档 : https://v4.bootcss.com/docs/4.0/components/forms/
我们去可以里面找自己喜欢的样式!我这里给大家提供了编辑好的:
@GetMapping("/emp")
public String toAddPage(Model model){
    //查询所有的部门信息
    Collection<Department> departments = departmentDao.getDepartments();
    model.addAttribute("departments",departments);
    return "emp/add";
}
4、部门信息下拉框应该选择的是我们提供的数据,所以我们要修改一下前端和后端
Controller
<select class="form-control" name="department.id">
    <option th:each="dept:${departments}" th:text="${dept.getDepartmentName()}" th:value="${dept.getId()}"></option>
</select>
前端
<form th:action="@{/emp}" method="post"> 1
OK,修改了controller,重启项目测试!
6.2、具体添加功能
1、修改add页面form表单提交地址和方式
<form th:action="@{/emp}" method="post">
2、编写controller;
//员工添加功能
//接收前端传递的参数,自动封装成为对象[要求前端传递的参数名,和属性名一致]
@PostMapping ("/emp")
public String addEmp(Employee employee){
    //保存员工的信息
    System.out.println(employee);
    employeeDao.save(employee);
    // 回到员工列表页面,可以使用redirect或者forward,就不会被视图解析器解析
    return "redirect:/emps";
}
![[外链图片转存失败,源站可能有防盗链机制,建议将图片保存下来直接上传(img-b6fVRToh-1620304585042)(%E5%91%98%E5%B7%A5%E7%AE%A1%E7%90%86%E7%B3%BB%E7%BB%9F.assets/image-20210504161017922.jpg)]](/uploads/202106/22/162435043926.jpg)
回忆:重定向和转发以及 /的问题?
时间格式问题

生日我们提交的是一个日期 , 我们第一次使用的 / 正常提交成功了,后面使用 - 就错误了,所以这里面
应该存在一个日期格式化的问题;
SpringMVC会将页面提交的值转换为指定的类型,默认日期是按照 / 的方式提交 ; 比如将2019/01/01
转换为一个date对象。
那思考一个问题?我们能不能修改这个默认的格式呢?
这个在配置类中,所以我们可以自定义的去修改这个时间格式化问题,我们在我们的配置文件中修改一
下;
spring.mvc.date-format=yyyy-MM-dd
这样的话,我们现在就支持 - 的格式了,但是又不支持 / 了 , 2333吧
测试OK!
7、修改员工信息
逻辑分析:
我们要实现员工修改功能,需要实现两步;
1、点击修改按钮,去到编辑页面,我们可以直接使用添加员工的页面实现
2、显示原数据,修改完毕后跳回列表页面!
实现
1、我们去实现一下,首先修改跳转链接的位置;
<a class="btn btn-sm btn-primary" th:href="@{/emp/}+${emp.getId()}" rel="external nofollow" >编辑</a>
2、编写对应的controller
//员工修改页面
@GetMapping("/emp/{id}")
public String toUpdateEmp(@PathVariable("id") Integer id,Model model){
    Employee employee = employeeDao.getEmployeeById(id);
    model.addAttribute("emp",employee);

    //查询所有的部门信息
    Collection<Department> departments = departmentDao.getDepartments();
    model.addAttribute("departments",departments);
    return "emp/update";
}
3、我们需要在这里将add页面复制一份,改为update页面;需要修改页面,将我们后台查询数据回显
<form th:action="@{/emp}" method="post" >
    <input type="hidden" name="id" th:value="${emp.getId()}">
    <div class="form-group" ><label>LastName</label>
        <input th:value="${emp.getLastName()}" class="form-control" placeholder="kuangshen" type="text" name="lastName">
    </div>
    <div class="form-group" ><label>Email</label>
        <input th:value="${emp.getEmail()}" class="form-control" placeholder="24736743@qq.com" type="email" name="email">
    </div>
    <div class="form-group"><label>Gender</label><br/>
        <div class="form-check form-check-inline">
            <input th:checked="${emp.getGender()==1}" class="form-check-input" name="gender" type="radio" value="1">
            <label class="form-check-label">男</label>
        </div>
        <div class="form-check form-check-inline">
            <input th:checked="${emp.getGender()==0}" class="form-check-input" name="gender" type="radio" value="0">
            <label class="form-check-label">女</label>
        </div>
    </div>
    <div class="form-group" ><label>department</label>
        <select class="form-control" name="department.id">
            <option th:selected="${dept.id==emp.getDepartment().getId()}" th:each="dept:${departments}" th:text="${dept.getDepartmentName()}" th:value="${dept.getId()}"></option>
        </select>
    </div>
    <div class="form-group" >
        <label >Birth</label>
        <input th:value="${#dates.format(emp.birth,'yyyy-MM-dd HH:mm')}" class="form-control" placeholder="2021-02-02" type="text" name="birth">
    </div>
    <button class="btn btn-primary" type="submit">修改</button>
</form>
数据回显OK!
8、删除员工实现
1、list页面,编写提交地址
<a class="btn btn-sm btn-danger" th:href="@{/delEmp/}+${emp.getId()}" rel="external nofollow" >删除</a>
2、编写Controller
//删除员工
@GetMapping("/delEmp/{id}")
public String delEmp(@PathVariable("id") Integer id){
    employeeDao.delete(id);
    return "redirect:/emps";
}
测试OK!
9、404及注销
404
我们只需要在模板目录下添加一个error文件夹,文件夹中存放我们相应的错误页面;
比如404.html 或者 4xx.html 等等,SpringBoot就会帮我们自动使用了!

测试使用!
注销
1、注销请求
<a class="nav-link" th:href="@{/user/logout}" rel="external nofollow" >注销</a>
2、对应的controller

```java
   @RequestMapping("/user/logout")
    public String logout(HttpSession session){
        session.invalidate();
        return "redirect:/index.html";
    }
到此这篇关于Spring Boot 员工管理系统超详细教程(源码分享)的文章就介绍到这了,更多相关Spring Boot 员工管理系统内容请搜索自学编程网以前的文章或继续浏览下面的相关文章希望大家以后多多支持自学编程网!

- 本文固定链接: https://zxbcw.cn/post/211766/
- 转载请注明:必须在正文中标注并保留原文链接
- QQ群: PHP高手阵营官方总群(344148542)
- QQ群: Yii2.0开发(304864863)