
1、@Value注解简介
Spring框架提供的@Value注解可以将外部的值动态注入到Bean中,@Value注解使用在字段、构造器参数和方法参数上。
@Value可以指定属性取值的表达式,支持通过#{}使用SpringEL来取值,也支持使用${}来将属性来源中(Properties文件、本地环境变量、系统属性等)的值注入到Bean的属性中。
此注解值的注入发生在AutowiredAnnotationBeanPostProcessor类中。
@Value注解实现以下几种情况:
(1)注入普通字符;
(2)注入操作系统属性;
(3)注入表达式运算结果;
(4)注入其他Bean的属性;
(5)注入文件内容;
(6)注入网址内容;
(7)注入属性文件。
2、@PropertySource注解简介
@PropertySource注解可以加载指定的属性文件(*.properties)到 Spring 的 Environment 中。可以配合 @Value 和 @ConfigurationProperties 使用。语法格式如下:
@PropertySource(value = "classpath:com/pjb/el/user.properties",encoding = "UTF-8")
public class UserInfo
{
}
【实例】使用@Value注解与@PropertySource注解加载配置文件。
(1)创建用户信息属性文件(user.properties)
user.userId=1
user.userName=pan_junbiao的博客
user.blogUrl=https://blog.csdn.net/pan_junbiao
user.remark=您好,欢迎访问 pan_junbiao的博客
(2)创建用户信息实体类(UserInfo.java)
使用@PropertySource注解加载配置文件信息,然后使用@Value注解注入属性值。
package com.pjb.el;
import org.springframework.beans.factory.annotation.Value;
import org.springframework.context.annotation.PropertySource;
import org.springframework.stereotype.Component;

/**
 * 用户信息实体类
 * @author pan_junbiao
 **/
@Component
@PropertySource(value = "classpath:com/pjb/el/user.properties",encoding = "UTF-8")
public class UserInfo
{
    //用户ID
    @Value("${user.userId}")
    private int userId;

    //用户姓名
    @Value("${user.userName}")
    private String userName;

    //博客地址
    @Value("${user.blogUrl}")
    private String blogUrl;

    //备注
    @Value("${user.remark}")
    private String remark;

    //省略getter与setter方法...
}
(3)运行
public static void main(String[] args)
{
AnnotationConfigApplicationContext context = new AnnotationConfigApplicationContext(ElConfig.class);
UserInfo userInfo = context.getBean(UserInfo.class);
//打印用户信息
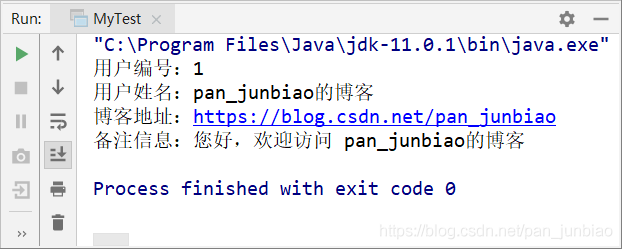
System.out.println("用户编号:" + userInfo.getUserId());
System.out.println("用户姓名:" + userInfo.getUserName());
System.out.println("博客地址:" + userInfo.getBlogUrl());
System.out.println("备注信息:" + userInfo.getRemark());
}
执行结果:
3、综合实例
【实例】使用@Value注解实现多种情况值的注入和@PropertySource注解加载配置文件。
(1)添加相关的jar包
添加Spring支持及commons-io依赖,pom.xml文件的配置如下:
<properties>
    <project.build.sourceEncoding>UTF-8</project.build.sourceEncoding>
    <spring.version>5.2.3.RELEASE</spring.version>
</properties>

<dependencies>
    <!-- Spring框架 -->
    <dependency>
        <groupId>org.springframework</groupId>
        <artifactId>spring-core</artifactId>
        <version>${spring.version}</version>
    </dependency>
    <dependency>
        <groupId>org.springframework</groupId>
        <artifactId>spring-context</artifactId>
        <version>${spring.version}</version>
    </dependency>

    <!-- commons-io依赖 -->
    <dependency>
        <groupId>commons-io</groupId>
        <artifactId>commons-io</artifactId>
        <version>2.6</version>
    </dependency>
</dependencies>
添加 commons-io.jar 可以简化文件相关操作,本实例中使用 commons-io 将 file 转换成字符串。
(2)创建资源文件
在resources资源目录下创建名称为info.txt的文本文件,文件内容为:您好,欢迎访问 pan_junbiao的博客。
在resources资源目录下创建数据库连接配置文件db.properties,该文件配置如下:
jdbc.driver=com.mysql.cj.jdbc.Driver
jdbc.url=jdbc:mysql://localhost:3306/db_admin
jdbc.username=root
jdbc.password=123456
(3)需被注入的Bean
创建名为OtherUser.java的用户信息类。
package com.pjb.el;
import org.springframework.beans.factory.annotation.Value;
import org.springframework.stereotype.Component;

/**
 * 用户信息类
 * @author pan_junbiao
 **/
@Component
public class OtherUser
{
    //用户名称
    @Value("pan_junbiao的博客")
    private String userName;

    //博客地址
    @Value("https://blog.csdn.net/pan_junbiao")
    private String blogUrl;

    public String getUserName()
    {
        return userName;
    }

    public void setUserName(String userName)
    {
        this.userName = userName;
    }

    public String getBlogUrl()
    {
        return blogUrl;
    }

    public void setBlogUrl(String blogUrl)
    {
        this.blogUrl = blogUrl;
    }
}
(4)配置类
创建名为ElConfig.java的配置类。
package com.pjb.el;
import org.apache.commons.io.IOUtils;
import org.springframework.beans.factory.annotation.Autowired;
import org.springframework.beans.factory.annotation.Value;
import org.springframework.context.annotation.Bean;
import org.springframework.context.annotation.ComponentScan;
import org.springframework.context.annotation.Configuration;
import org.springframework.context.annotation.PropertySource;
import org.springframework.context.support.PropertySourcesPlaceholderConfigurer;
import org.springframework.core.env.Environment;
import org.springframework.core.io.Resource;
/**
* 配置类
* @author pan_junbiao
**/
@Configuration
@ComponentScan("com.pjb.el")
@PropertySource("classpath:db.properties")
public class ElConfig
{
/**
* 注入普通字符串
*/
@Value("您好,欢迎访问 pan_junbiao的博客")
private String comment;
/**
* 注入操作系统属性
*/
@Value("#{systemProperties['os.name']}")
private String osName;
/**
* 注入表达式运算结果
*/
@Value("#{ T(java.lang.Math).random() * 100.0 }")
private double randomNumber;
/**
* 注入其他Bean的属性
*/
@Value("#{otherUser.userName}")
private String fromUserName;
@Value("#{otherUser.blogUrl}")
private String fromBlogUrl;
/**
* 注入文件资源
*/
@Value("classpath:info.txt")
private Resource testFile;
/**
* 注入网址资源
*/
@Value("https://blog.csdn.net/pan_junbiao")
private Resource testUrl;
/**
* 注入配置文件
*/
@Value("${jdbc.driver}")
private String jdbc_driver;
@Value("${jdbc.url}")
private String jdbc_url;
@Value("${jdbc.username}")
private String jdbc_username;
@Value("${jdbc.password}")
private String jdbc_password;
@Autowired
private Environment environment;
@Bean
public static PropertySourcesPlaceholderConfigurer propertyConfigurer()
{
return new PropertySourcesPlaceholderConfigurer();
}
public void outputResource()
{
try
{
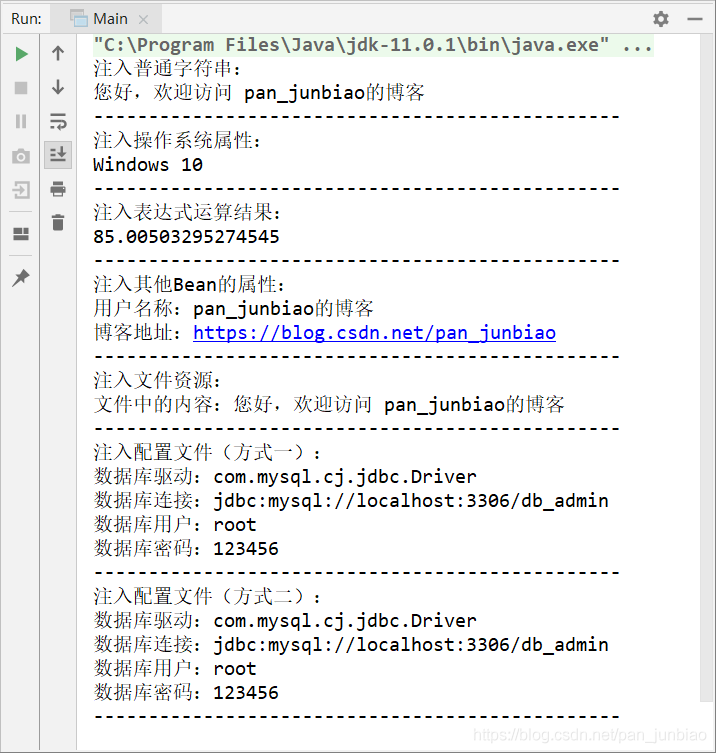
System.out.println("注入普通字符串:");
System.out.println(comment);
System.out.println("------------------------------------------------");
System.out.println("注入操作系统属性:");
System.out.println(osName);
System.out.println("------------------------------------------------");
System.out.println("注入表达式运算结果:");
System.out.println(randomNumber);
System.out.println("------------------------------------------------");
System.out.println("注入其他Bean的属性:");
System.out.println("用户名称:" + fromUserName);
System.out.println("博客地址:"+ fromBlogUrl);
System.out.println("------------------------------------------------");
System.out.println("注入文件资源:");
System.out.println("文件中的内容:" + IOUtils.toString(testFile.getInputStream()));
System.out.println("------------------------------------------------");
System.out.println("注入配置文件(方式一):");
System.out.println("数据库驱动:" + jdbc_driver);
System.out.println("数据库连接:" + jdbc_url);
System.out.println("数据库用户:" + jdbc_username);
System.out.println("数据库密码:" + jdbc_password);
System.out.println("------------------------------------------------");
System.out.println("注入配置文件(方式二):");
System.out.println("数据库驱动:" + environment.getProperty("jdbc.driver"));
System.out.println("数据库连接:" + environment.getProperty("jdbc.url"));
System.out.println("数据库用户:" + environment.getProperty("jdbc.username"));
System.out.println("数据库密码:" + environment.getProperty("jdbc.password"));
System.out.println("------------------------------------------------");
}
catch (Exception ex)
{
ex.printStackTrace();
}
}
}
注入配置配件需要使用@PropertySource注解指定文件地址,若使用@Value注解,则要配置一个PropertySourcesPlaceholderConfigurer的Bean。注意,@Value("${jdbc.driver}")使用的是“${}”而不是“#{}”。
注入Properties还可以从Environment中获得。
(5)运行
package com.pjb.el;
import org.springframework.context.annotation.AnnotationConfigApplicationContext;

/**
 * 运行类
 * @author pan_junbiao
 **/
public class Main
{
    public static void main(String[] args)
    {
        AnnotationConfigApplicationContext context = new AnnotationConfigApplicationContext(ElConfig.class);
        ElConfig resourceService = context.getBean(ElConfig.class);
        resourceService.outputResource();
        context.close();
    }
}
执行结果:
spring中@value注解需要注意
首先
@value需要参数,这里参数可以是两种形式:
@Value(“#{configProperties[‘t1.msgname']}”)
或者
@Value(“${t1.msgname}”);
其次
下面我们来看看如何使用这两形式,在配置上有什么区别:
1、@Value(“#{configProperties[‘t1.msgname']}”)这种形式的配置中有“configProperties”,其实它指定的是配置文件的加载对象:配置如下:
classpath:/config/t1.properties
这样配置就可完成对属性的具体注入了;
2、@Value("${t1.msgname}")这种形式不需要指定具体加载对象,这时候需要一个关键的对象来完成PreferencesPlaceholderConfigurer,这个对象的配置可以利用上面配置1中的配置,也可以自己直接自定配置文件路径。
如果使用配置1中的配置,可以写成如下情况:
<bean id="propertyConfigurer" class="org.springframework.beans.factory.config.PreferencesPlaceholderConfigurer">
    <property name="properties" ref="configProperties"/>
</bean>
如果直接指定配置文件的话,可以写成如下情况:
<bean id="propertyConfigurer" class="org.springframework.beans.factory.config.PreferencesPlaceholderConfigurer">
    <property name="location">
    <value>config/t1.properties</value>
    </property>
</bean>**重点内容**
以上为个人经验,希望能给大家一个参考,也希望大家多多支持自学编程网。

- 本文固定链接: https://zxbcw.cn/post/214867/
- 转载请注明:必须在正文中标注并保留原文链接
- QQ群: PHP高手阵营官方总群(344148542)
- QQ群: Yii2.0开发(304864863)