
设计并开发一个开放平台。
一、设计:

网关可以 与认证授权服务合在一起,也可以分开。
二、开发与实现:
用Oauth2技术对访问受保护的资源的客户端进行认证与授权。
Oauth2技术应用的关键是:
1)服务器对OAuth2客户端进行认证与授权。
2)Token的发放。
3)通过access_token访问受OAuth2保护的资源。
选用的关键技术:Springboot, Spring-security, Spring-security-oauth2。
提供一个简化版,用户、token数据保存在内存中,用户与客户端的认证授权服务、资源服务,都是在同一个工程中。现实项目中,技术架构通常上将用户与客户端的认证授权服务设计在一个子系统(工程)中,而资源服务设计为另一个子系统(工程)。
1、Spring-security对用户身份进行认证授权:
主要作用是对用户身份通过用户名与密码的方式进行认证并且授权。
package com.banling.oauth2server.config;
import org.springframework.beans.factory.annotation.Autowired;
import org.springframework.context.annotation.Bean;
import org.springframework.context.annotation.Configuration;
import org.springframework.security.authentication.AuthenticationManager;
import org.springframework.security.config.annotation.authentication.builders.AuthenticationManagerBuilder;
import org.springframework.security.config.annotation.web.builders.HttpSecurity;
import org.springframework.security.config.annotation.web.configuration.EnableWebSecurity;
import org.springframework.security.config.annotation.web.configuration.WebSecurityConfigurerAdapter;
import org.springframework.security.web.util.matcher.AntPathRequestMatcher;
@Configuration
@EnableWebSecurity
public class SecurityConfig extends WebSecurityConfigurerAdapter{

	@Autowired
    public void globalUserDetails(AuthenticationManagerBuilder auth) throws Exception {
    	//用户信息保存在内存中
		//在鉴定角色roler时,会默认加上ROLLER_前缀
        auth.inMemoryAuthentication().withUser("user").password("user").roles("USER").and()
        	.withUser("test").password("test").roles("TEST");
    }

	@Override
    protected void configure(HttpSecurity http) throws Exception {
		http.formLogin() //登记界面,默认是permit All
		.and()
		.authorizeRequests().antMatchers("/","/home").permitAll() //不用身份认证可以访问
		.and()
		.authorizeRequests().anyRequest().authenticated() //其它的请求要求必须有身份认证
        .and()
        .csrf() //防止CSRF(跨站请求伪造)配置
        .requireCsrfProtectionMatcher(new AntPathRequestMatcher("/oauth/authorize")).disable();
    }

	@Override
    @Bean
    public AuthenticationManager authenticationManagerBean() throws Exception {
        return super.authenticationManagerBean();
    }
}
配置用户信息,保存在内存中。也可以自定义将用户数据保存在数据库中,实现UserDetailsService接口,进行认证与授权,略。
配置访问哪些URL需要授权。必须配置authorizeRequests(),否则启动报错,说是没有启用security技术。
注意,在这里的身份进行认证与授权没有涉及到OAuth的技术:
当访问要授权的URL时,请求会被DelegatingFilterProxy拦截,如果还没有授权,请求就会被重定向到登录界面。在登录成功(身份认证并授权)后,请求被重定向至之前访问的URL。
2、OAuth2的授权服务:
主要作用是OAuth2的客户端进行认证与授权。
package com.banling.oauth2server.config;
import org.springframework.beans.factory.annotation.Autowired;
import org.springframework.context.annotation.Bean;
import org.springframework.context.annotation.Configuration;
import org.springframework.security.authentication.AuthenticationManager;
import org.springframework.security.oauth2.config.annotation.configurers.ClientDetailsServiceConfigurer;
import org.springframework.security.oauth2.config.annotation.web.configuration.AuthorizationServerConfigurerAdapter;
import org.springframework.security.oauth2.config.annotation.web.configuration.EnableAuthorizationServer;
import org.springframework.security.oauth2.config.annotation.web.configurers.AuthorizationServerEndpointsConfigurer;
import org.springframework.security.oauth2.config.annotation.web.configurers.AuthorizationServerSecurityConfigurer;
import org.springframework.security.oauth2.provider.approval.ApprovalStore;
import org.springframework.security.oauth2.provider.approval.TokenApprovalStore;
import org.springframework.security.oauth2.provider.token.TokenStore;
import org.springframework.security.oauth2.provider.token.store.InMemoryTokenStore;
@Configuration
@EnableAuthorizationServer
public class AuthServerConfig extends AuthorizationServerConfigurerAdapter{

	@Autowired
	private TokenStore tokenStore;

	@Autowired
    private AuthenticationManager authenticationManager;

	@Autowired
	private ApprovalStore approvalStore;

	@Override
    public void configure(ClientDetailsServiceConfigurer clients) throws Exception {
        //添加客户端信息
        //使用内存存储OAuth客户端信息
        clients.inMemory()
                // client_id
                .withClient("client")
                // client_secret
                .secret("secret")
                // 该client允许的授权类型,不同的类型,则获得token的方式不一样。
                .authorizedGrantTypes("authorization_code","implicit","refresh_token")
                .resourceIds("resourceId")
                //回调uri,在authorization_code与implicit授权方式时,用以接收服务器的返回信息
                .redirectUris("http://localhost:8090/")
                // 允许的授权范围
                .scopes("app","test");
    }

	@Override
    public void configure(AuthorizationServerEndpointsConfigurer endpoints) throws Exception {
		//reuseRefreshTokens设置为false时,每次通过refresh_token获得access_token时,也会刷新refresh_token;也就是说,会返回全新的access_token与refresh_token。
		//默认值是true,只返回新的access_token,refresh_token不变。
        endpoints.tokenStore(tokenStore).approvalStore(approvalStore).reuseRefreshTokens(false)
                .authenticationManager(authenticationManager);
    }

	@Override
    public void configure(AuthorizationServerSecurityConfigurer security) throws Exception {
        security.realm("OAuth2-Sample")
        	.allowFormAuthenticationForClients()
        	.tokenKeyAccess("permitAll()")
        	.checkTokenAccess("isAuthenticated()");
    }

	@Bean
	public TokenStore tokenStore() {
		//token保存在内存中(也可以保存在数据库、Redis中)。
		//如果保存在中间件(数据库、Redis),那么资源服务器与认证服务器可以不在同一个工程中。
		//注意:如果不保存access_token,则没法通过access_token取得用户信息
		return new InMemoryTokenStore();
	}

	@Bean
	public ApprovalStore approvalStore() throws Exception {
		TokenApprovalStore store = new TokenApprovalStore();
		store.setTokenStore(tokenStore);
		return store;
	}
}
配置OAuth2的客户端信息:clientId、client_secret、authorization_type、redirect_url等。本例是将数据保存在内存中。也可以保存在数据库中,实现ClientDetailsService接口,进行认证与授权,略。
TokenStore是access_token的存储单元,可以保存在内存、数据库、Redis中。本例是保存在内存中。
3、OAuth2的资源服务:
主要作用是配置资源受保护的OAuth2策略。
package com.banling.oauth2server.config;
import org.springframework.beans.factory.annotation.Autowired;
import org.springframework.context.annotation.Configuration;
import org.springframework.security.config.annotation.web.builders.HttpSecurity;
import org.springframework.security.config.http.SessionCreationPolicy;
import org.springframework.security.oauth2.config.annotation.web.configuration.EnableResourceServer;
import org.springframework.security.oauth2.config.annotation.web.configuration.ResourceServerConfigurerAdapter;
import org.springframework.security.oauth2.config.annotation.web.configurers.ResourceServerSecurityConfigurer;
import org.springframework.security.oauth2.provider.token.TokenStore;
@Configuration
@EnableResourceServer
public class ResServerConfig extends ResourceServerConfigurerAdapter{

	@Autowired
	private TokenStore tokenStore;

	@Override
    public void configure(ResourceServerSecurityConfigurer resources) throws Exception {
        resources
                .tokenStore(tokenStore)
                .resourceId("resourceId");
    }

    @Override
    public void configure(HttpSecurity http) throws Exception {
    	/*
    	 注意:
    	 1、必须先加上: .requestMatchers().antMatchers(...),表示对资源进行保护,也就是说,在访问前要进行OAuth认证。
    	 2、接着:访问受保护的资源时,要具有哪里权限。
    	 ------------------------------------
    	 否则,请求只是被Security的拦截器拦截,请求根本到不了OAuth2的拦截器。
    	 同时,还要注意先配置:security.oauth2.resource.filter-order=3,否则通过access_token取不到用户信息。
    	 ------------------------------------
    	 requestMatchers()部分说明:
    	 Invoking requestMatchers() will not override previous invocations of ::
    	 mvcMatcher(String)}, requestMatchers(), antMatcher(String), regexMatcher(String), and requestMatcher(RequestMatcher).
    	 */

        http
        	// Since we want the protected resources to be accessible in the UI as well we need
			// session creation to be allowed (it's disabled by default in 2.0.6)
        	//另外,如果不设置,那么在通过浏览器访问被保护的任何资源时,每次是不同的SessionID,并且将每次请求的历史都记录在OAuth2Authentication的details的中
			.sessionManagement().sessionCreationPolicy(SessionCreationPolicy.IF_REQUIRED)
			.and()
       		.requestMatchers()
           .antMatchers("/user","/res/**")
           .and()
           .authorizeRequests()
           .antMatchers("/user","/res/**")
           .authenticated();
    }
}
配置哪些URL资源是受OAuth2保护的。注意,必须配置sessionManagement(),否则访问受护资源请求不会被OAuth2的拦截器ClientCredentialsTokenEndpointFilter与OAuth2AuthenticationProcessingFilter拦截,也就是说,没有配置的话,资源没有受到OAuth2的保护。
4、受OAuth2保存的资源:
1)获取OAuth2客户端的信息
package com.banling.oauth2server.web;
import java.security.Principal;
import org.springframework.web.bind.annotation.RequestMapping;
import org.springframework.web.bind.annotation.RestController;

@RestController
public class UserController {

	@RequestMapping("/user")
	public Principal user(Principal principal) {
		//principal在经过security拦截后,是org.springframework.security.authentication.UsernamePasswordAuthenticationToken
		//在经OAuth2拦截后,是OAuth2Authentication
	    return principal;
	}
}
2)其它受保护的资源
package com.banling.oauth2server.web;
import java.security.Principal;
import org.springframework.web.bind.annotation.RequestMapping;
import org.springframework.web.bind.annotation.RestController;
/**
* 作为OAuth2的资源服务时,不能在Controller(或者RestController)注解上写上URL,因为这样不会被识别,会报404错误。<br>
*<br> {
*<br> "timestamp": 1544580859138,
*<br> "status": 404,
*<br> "error": "Not Found",
*<br> "message": "No message available",
*<br> "path": "/res/getMsg"
*<br> }
*<br>
*
*
*/
@RestController()//作为资源服务时,不能带上url,@RestController("/res")是错的,无法识别。只能在方法上注解全路径
public class ResController {
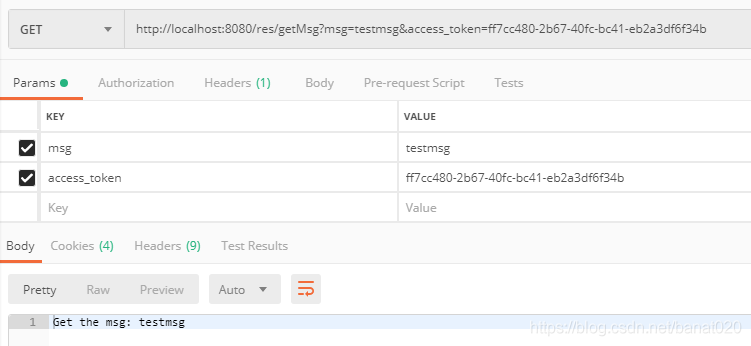
@RequestMapping("/res/getMsg")
public String getMsg(String msg,Principal principal) {//principal中封装了客户端(用户,也就是clientDetails,区别于Security的UserDetails,其实clientDetails中也封装了UserDetails),不是必须的参数,除非你想得到用户信息,才加上principal。
return "Get the msg: "+msg;
}
}
5、application.properties配置:
security.oauth2.resource.filter-order=3 必须配置,否则对受护资源请求不会被OAuth2的拦截器拦截。
6、测试
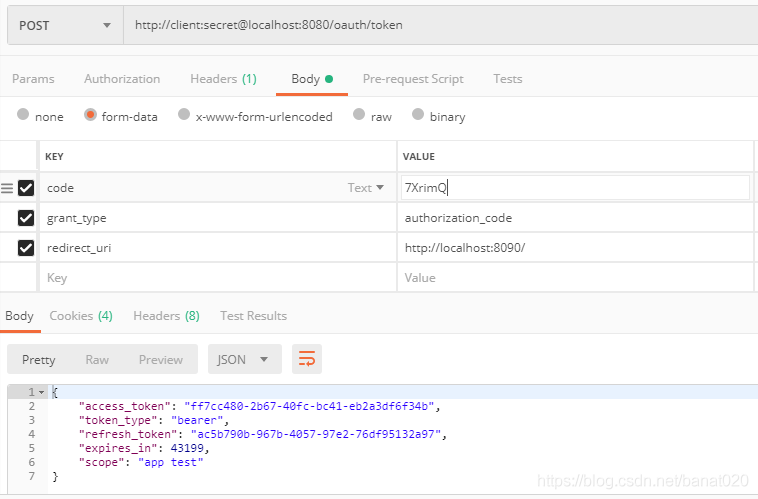
1)authorization_code方式获取code,然后再通过code获取access_token(和refresh_token)。
在浏览输入:
http://localhost:8080/oauth/authorize?client_id=client&response_type=code&redirect_uri=http://localhost:8090/
在登录界面输入用户名与密码user/user,提交。
提交后服务重定向 至scope的授权界面:
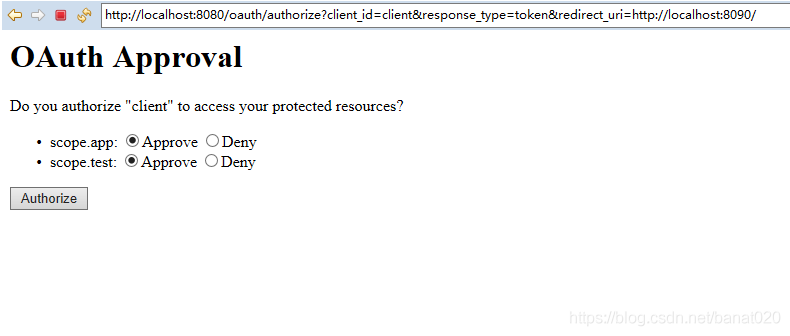
授权后,在回调uri中可以得从code:

用postman工具,设置header的值,通过code获取access_token与fresh_token:
2)implict方式接获取access_token。
浏览器中输入:
http://localhost:8080/oauth/authorize?client_id=client&response_type=token&redirect_uri=http://localhost:8090/
可以直接获得access_token。

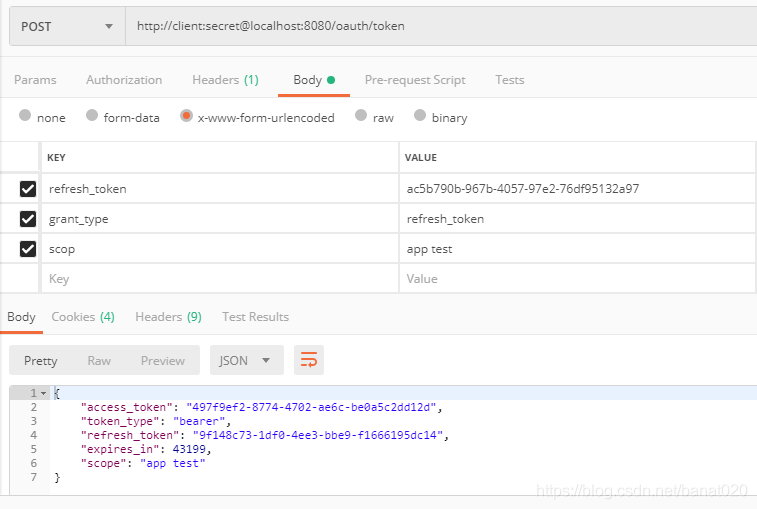
3)通过refresh_token获取access_token与refresh_token。
用postman工具测试,根据refresh_token获取新的access_token与fresh_token。
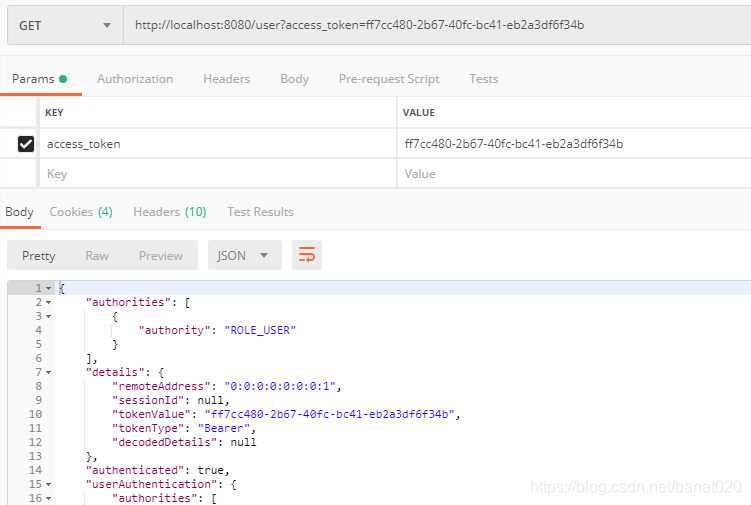
4)获取OAuth2客户端的信息。
可以通过get方式,也可以通过设置header获取。
get方式,看url字符串:
设置header的方式:

5)访问其它受保护的资源
github上的源码: https://github.com/banat020/OAuth2-server
以上为个人经验,希望能给大家一个参考,也希望大家多多支持自学编程网。

- 本文固定链接: https://zxbcw.cn/post/215594/
- 转载请注明:必须在正文中标注并保留原文链接
- QQ群: PHP高手阵营官方总群(344148542)
- QQ群: Yii2.0开发(304864863)