一、总览
计算机程序 = 数据 + 算法。
并发编程的一切根本原因是为了保证数据的正确性,线程的效率性。
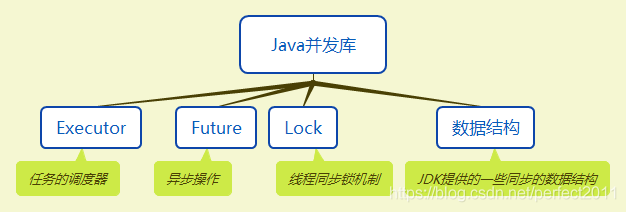
Java并发库共分为四个大的部分,如下图

Executor 和 future 是为了保证线程的效率性
Lock 和数据结构 是为了维持数据的一致性。
Java并发编程的时候,思考顺序为,
对自己的数据要么加锁。要么使用提供的数据结构,保证数据的安全性
调度线程的时候使用Executor更好的调度。
二、Executor总览

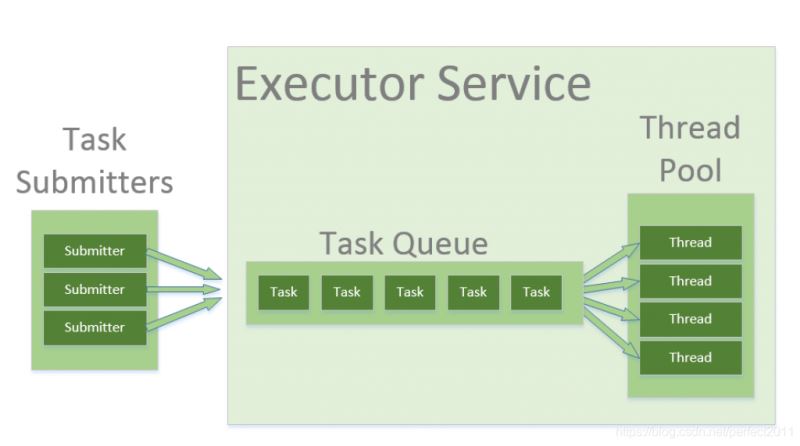
Executor 提供一种将任务提交与每个任务将如何运行的机制(包括线程使用的细节、调度等)分离开来的方法。
相当于manager,老板让manager去执行一件任务,具体的是谁执行,什么时候执行,就不管了。
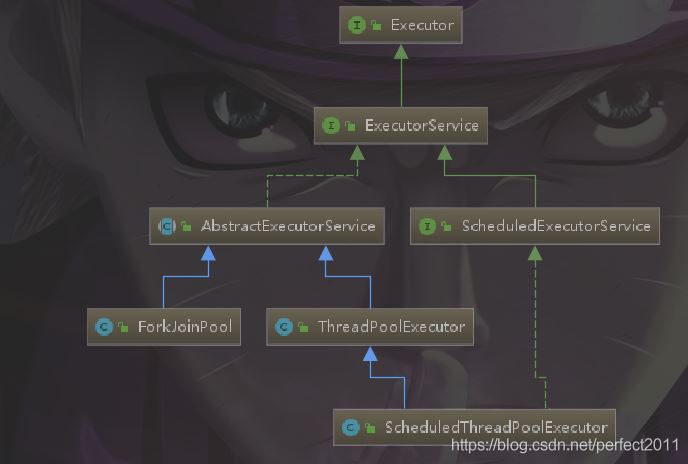
看上图的继承关系,介绍几个

内置的线程池基本上都在这里
newScheduledThreadPool 定时执行的线程池
newCachedThreadPool 缓存使用过的线程
newFixedThreadPool 固定数量的线程池
newWorkStealingPool 将大任务分解为小任务的线程池

三、继承结构
构造函数
包含一个定时的service
public static ScheduledExecutorService newSingleThreadScheduledExecutor() {
    return new DelegatedScheduledExecutorService
        (new ScheduledThreadPoolExecutor(1));
}
static class DelegatedScheduledExecutorService
        extends DelegatedExecutorService
        implements ScheduledExecutorService {
    private final ScheduledExecutorService e;
    DelegatedScheduledExecutorService(ScheduledExecutorService executor) {
        super(executor);
        e = executor;
    }
四、怎么保证只有一个线程
定时执行的时候调用这个方法,调用过程如下,注意看其中的注释,由上往下的调用顺序
public ScheduledFuture<?> scheduleWithFixedDelay(Runnable command,
                                                 long initialDelay,
                                                 long delay,
                                                 TimeUnit unit) {
    if (command == null || unit == null)
        throw new NullPointerException();
    if (delay <= 0)
        throw new IllegalArgumentException();
    ScheduledFutureTask<Void> sft =
        new ScheduledFutureTask<Void>(command,
                                      null,
                                      triggerTime(initialDelay, unit),
                                      unit.toNanos(-delay));
    RunnableScheduledFuture<Void> t = decorateTask(command, sft);
    sft.outerTask = t;
    //  延迟执行
    delayedExecute(t);
    return t;
}
private void delayedExecute(RunnableScheduledFuture<?> task) {
    if (isShutdown())
        reject(task);
    else {
        // 加入任务队列
        super.getQueue().add(task);
        if (isShutdown() &&
            !canRunInCurrentRunState(task.isPeriodic()) &&
            remove(task))
            task.cancel(false);
        else
            // 确保执行
            ensurePrestart();
    }
}
// 如果worker数量小于corePoolSize,创建新的线程,其他情况不处理
void ensurePrestart() {
    int wc = workerCountOf(ctl.get());
    if (wc < corePoolSize)
        addWorker(null, true);
    else if (wc == 0)
        addWorker(null, false);
}
五、怎么保证时间可以定时执行
public ScheduledFuture<?> schedule(Runnable command,
                                   long delay,
                                   TimeUnit unit) {
    if (command == null || unit == null)
        throw new NullPointerException();
    RunnableScheduledFuture<?> t = decorateTask(command,
        new ScheduledFutureTask<Void>(command, null,
                                      triggerTime(delay, unit)));
    delayedExecute(t);
    return t;
}
在每次执行的时候会把下一次执行的时间放进任务中
private long triggerTime(long delay, TimeUnit unit) {
    return triggerTime(unit.toNanos((delay < 0) ? 0 : delay));
}
/**
 * Returns the trigger time of a delayed action.
 */
long triggerTime(long delay) {
    return now() +
        ((delay < (Long.MAX_VALUE >> 1)) ? delay : overflowFree(delay));
}
FutureTask 定时是通过LockSupport.parkNanos(this, nanos);LockSupport.park(this);
private int awaitDone(boolean timed, long nanos)
    throws InterruptedException {
    final long deadline = timed ? System.nanoTime() + nanos : 0L;
    WaitNode q = null;
    boolean queued = false;
    for (;;) {
        if (Thread.interrupted()) {
            removeWaiter(q);
            throw new InterruptedException();
        }
        int s = state;
        if (s > COMPLETING) {
            if (q != null)
                q.thread = null;
            return s;
        }
        else if (s == COMPLETING) // cannot time out yet
            Thread.yield();
        else if (q == null)
            q = new WaitNode();
        else if (!queued)
            queued = UNSAFE.compareAndSwapObject(this, waitersOffset,
                                                 q.next = waiters, q);
        else if (timed) {
            nanos = deadline - System.nanoTime();
            if (nanos <= 0L) {
                removeWaiter(q);
                return state;
            }
            //注意这里
            LockSupport.parkNanos(this, nanos);
        }
        else //注意这里
            LockSupport.park(this);
    }
}
总结:Executor是通过将任务放在队列中,生成的futureTask。然后将生成的任务在队列中排序,将时间最近的需要出发的任务做检查。如果时间不到,就阻塞线程到下次出发时间。
注意:newSingleThreadScheduledExecutor只会有一个线程,不管你提交多少任务,这些任务会顺序执行,如果发生异常会取消下面的任务,线程池也不会关闭,注意捕捉异常
六、使用
ScheduledExecutorService single = Executors.newSingleThreadScheduledExecutor();
Runnable runnable1 = () -> {
    try {
        Thread.sleep(4000);
        System.out.println("11111111111111");
    } catch (InterruptedException e) {
        e.printStackTrace();
    }
};
Runnable runnable2 = () -> {
    try {
        Thread.sleep(4000);
        System.out.println("222");
    } catch (InterruptedException e) {
        e.printStackTrace();
    }
};
single.scheduleWithFixedDelay(runnable1,0,1, TimeUnit.SECONDS);
single.scheduleWithFixedDelay(runnable2,0,2, TimeUnit.SECONDS);
11111111111111 222 11111111111111 222 11111111111111
在项目中要注意关闭线程池
actionService = Executors.newSingleThreadScheduledExecutor();
        actionService.scheduleWithFixedDelay(() -> {
            try {
                Thread.currentThread().setName("robotActionService");
                Integer robotId = robotQueue.poll();
                if (robotId == null) {
                    //    关闭线程池
                    actionService.shutdown();
                } else {
                    int aiLv = robots.get(robotId);
                    if (actionQueueMap.containsKey(aiLv)) {
                        ActionQueue actionQueue = actionQueueMap.get(aiLv);
                        actionQueue.doAction(robotId);
                    }
                }
            } catch (Exception e) {
                //    捕捉异常
                LOG.error("",e);
            }
        }, 1, 1, TimeUnit.SECONDS);
总结
本篇文章就到这里了,希望能给你带来帮助,也希望您能够多多关注自学编程网的更多内容!

- 本文固定链接: https://zxbcw.cn/post/217463/
- 转载请注明:必须在正文中标注并保留原文链接
- QQ群: PHP高手阵营官方总群(344148542)
- QQ群: Yii2.0开发(304864863)
