
一、简介
在分布式系统中,由于服务数量巨多,为了方便服务配置文件统一管理,实时更新,所以需要分布式配置中心组件。
在Spring Cloud中,有分布式配置中心组件spring cloud config ,它支持配置服务放在配置服务的内存中(即本地),也支持放在远程Git仓库中。
在spring cloud config 组件中,分两个角色,一是config server,二是config client。
二、配置
2.1 Spring Cloud Config Server项目
1 pom.xml中导入Config Server需要的包
        <dependency>
            <groupId>org.springframework.cloud</groupId>
            <artifactId>spring-cloud-config-server</artifactId>
        </dependency>
2 在Application类中添加@EnableConfigServer注解
package com.sunbufu;
import org.springframework.boot.SpringApplication;
import org.springframework.boot.autoconfigure.SpringBootApplication;
import org.springframework.cloud.config.server.EnableConfigServer;
@EnableConfigServer
@SpringBootApplication
public class ConfigServerApplication {
    public static void main(String[] args) {
        SpringApplication.run(ConfigServerApplication.class, args);
    }
}
3 修改配置文件application.yml,指定本地客户端配置文件的路径
spring:
  profiles:
    active: native
  cloud:
    config:
      server:
        native:
          searchLocations: F:/conf
4 准备客户端配置文件
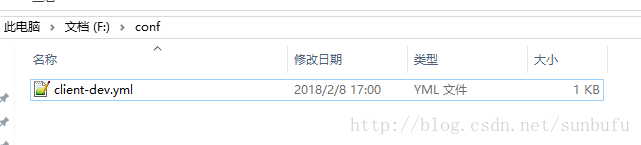
client-dev.yml文件的内容:
server:
  #设置成0,表示任意未被占用的端口
  port: 8081
nickName: world
2.2 Spring Cloud Config Client项目
1 pom.xml中导入Config Client需要的包(注意,此处跟Config Server的配置不同)
        <dependency>
            <groupId>org.springframework.cloud</groupId>
            <artifactId>spring-cloud-starter-config</artifactId>
        </dependency>
2 在src/main/resources中,新建bootstrap.yml文件
bootstrap文件会在application文件之前加载,一般是不会变的。
spring:
  application:
    name: client
  cloud:
    config:
      uri: http://127.0.0.1:8888
      profile: dev
      label: master
资源文件映射如下:
/{application}/{profile}[/{label}]
/{application}-{profile}.yml
/{label}/{application}-{profile}.yml
/{application}-{profile}.properties
/{label}/{application}-{profile}.properties
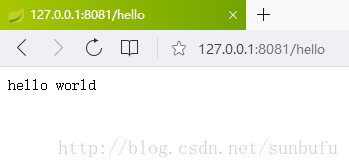
3 新建HelloController用来显示读取到的配置
package com.sunbufu.controller;
import org.springframework.beans.factory.annotation.Value;
import org.springframework.web.bind.annotation.RequestMapping;
import org.springframework.web.bind.annotation.RestController;
@RestController
public class HelloController {
    @Value("${nickName}")
    private String nickName;
    @RequestMapping("/hello")
    public String hello() {
        return "hello " + nickName;
    }
}
三、总结
源码地址 :https://github.com/sunbufu/sunbufu-cloud
总觉的使用svn或者git不如直接修改配置文件方便,特此记录下来。
spring cloud config本地读取配置文件
1、创建maven项目,引入spring boot 起步依赖
<?xml version="1.0" encoding="UTF-8"?>
<project xmlns="http://maven.apache.org/POM/4.0.0" xmlns:xsi="http://www.w3.org/2001/XMLSchema-instance"
         xsi:schemaLocation="http://maven.apache.org/POM/4.0.0 https://maven.apache.org/xsd/maven-4.0.0.xsd">
    <modelVersion>4.0.0</modelVersion>
    <parent>
        <groupId>org.springframework.boot</groupId>
        <artifactId>spring-boot-starter-parent</artifactId>
        <version>2.1.7.RELEASE</version>
        <relativePath/> <!-- lookup parent from repository -->
    </parent>
    <groupId>com.wxz</groupId>
    <artifactId>cloud-config-demo3</artifactId>
    <version>0.0.1-SNAPSHOT</version>
    <name>cloud-config-demo3</name>
    <description>Demo project for Spring Boot</description>
    <properties>
        <java.version>1.8</java.version>
    </properties>
    <dependencies>
        <dependency>
            <groupId>org.springframework.boot</groupId>
            <artifactId>spring-boot-starter</artifactId>
        </dependency>
        <dependency>
            <groupId>org.springframework.boot</groupId>
            <artifactId>spring-boot-starter-test</artifactId>
            <scope>test</scope>
        </dependency>
    </dependencies>
    <dependencyManagement>
        <dependencies>
            <dependency>
                <groupId>org.springframework.cloud</groupId>
                <artifactId>spring-cloud-dependencies</artifactId>
                <version>${spring-cloud.version}</version>
                <type>pom</type>
                <scope>import</scope>
            </dependency>
        </dependencies>
    </dependencyManagement>
    <build>
        <plugins>
            <plugin>
                <groupId>org.springframework.boot</groupId>
                <artifactId>spring-boot-maven-plugin</artifactId>
            </plugin>
        </plugins>
    </build>
</project>
新建config-server 模块,引入依赖
<?xml version="1.0" encoding="UTF-8"?>
<project xmlns="http://maven.apache.org/POM/4.0.0" xmlns:xsi="http://www.w3.org/2001/XMLSchema-instance"
         xsi:schemaLocation="http://maven.apache.org/POM/4.0.0 https://maven.apache.org/xsd/maven-4.0.0.xsd">
    <modelVersion>4.0.0</modelVersion>
    <parent>
        <groupId>com.wxz</groupId>
        <artifactId>cloud-config-demo3</artifactId>
        <version>0.0.1-SNAPSHOT</version>
        <relativePath/> <!-- lookup parent from repository -->
    </parent>
    <groupId>com.wxz</groupId>
    <artifactId>config-server</artifactId>
    <version>0.0.1-SNAPSHOT</version>
    <name>config-server</name>
    <description>Demo project for Spring Boot</description>
    <properties>
        <java.version>1.8</java.version>
    </properties>
    <dependencies>
        <dependency>
            <groupId>org.springframework.boot</groupId>
            <artifactId>spring-boot-starter</artifactId>
        </dependency>
        <dependency>
            <groupId>org.springframework.cloud</groupId>
            <artifactId>spring-cloud-config-server</artifactId>
            <version>2.1.2.RELEASE</version>
        </dependency>
        <dependency>
            <groupId>org.springframework.boot</groupId>
            <artifactId>spring-boot-starter-test</artifactId>
            <scope>test</scope>
        </dependency>
    </dependencies>
    <build>
        <plugins>
            <plugin>
                <groupId>org.springframework.boot</groupId>
                <artifactId>spring-boot-maven-plugin</artifactId>
            </plugin>
        </plugins>
    </build>
</project>
2、配置文件:
spring:
  cloud:
    config:
      server:
        native:
          search-locations: classpath:/shared
  profiles:
    active: native
  application:
    name: config-server
server:
  port: 8769
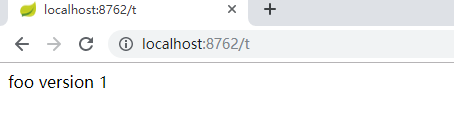
在resources下新建目录shared,里面新建文件config-client-dev
server:
  port: 8762
foo: foo version 1
在启动类添加
@EnableConfigServer
新建config-client模块
<?xml version="1.0" encoding="UTF-8"?>
<project xmlns="http://maven.apache.org/POM/4.0.0" xmlns:xsi="http://www.w3.org/2001/XMLSchema-instance"
         xsi:schemaLocation="http://maven.apache.org/POM/4.0.0 https://maven.apache.org/xsd/maven-4.0.0.xsd">
    <modelVersion>4.0.0</modelVersion>
    <parent>
        <groupId>com.wxz</groupId>
        <artifactId>cloud-config-demo3</artifactId>
        <version>0.0.1-SNAPSHOT</version>
        <relativePath/> <!-- lookup parent from repository -->
    </parent>
    <groupId>com.wxz</groupId>
    <artifactId>config-client</artifactId>
    <version>0.0.1-SNAPSHOT</version>
    <name>config-client</name>
    <description>Demo project for Spring Boot</description>
    <properties>
        <java.version>1.8</java.version>
    </properties>
    <dependencies>
        <dependency>
            <groupId>org.springframework.boot</groupId>
            <artifactId>spring-boot-starter-web</artifactId>
        </dependency>
        <dependency>
            <groupId>org.springframework.cloud</groupId>
            <artifactId>spring-cloud-starter-config</artifactId>
            <version>2.1.2.RELEASE</version>
        </dependency>
        <dependency>
            <groupId>org.springframework.boot</groupId>
            <artifactId>spring-boot-starter-test</artifactId>
            <scope>test</scope>
        </dependency>
    </dependencies>
    <build>
        <plugins>
            <plugin>
                <groupId>org.springframework.boot</groupId>
                <artifactId>spring-boot-maven-plugin</artifactId>
            </plugin>
        </plugins>
    </build>
</project>
新建配置文件bootstrap.yml(bootstrap比application具有优先的读取顺序)
spring:
  cloud:
    config:
      uri: http://localhost:8769
      fail-fast: true
  application:
    name: config-client
  profiles:
    active: dev
新建一个controller进行测试:
package com.wxz.configclient.controller;
import org.springframework.beans.factory.annotation.Value;
import org.springframework.web.bind.annotation.GetMapping;
import org.springframework.web.bind.annotation.RestController;
/**
 * @author Wangxingze
 * @date 2019-08-26 12:58
 */
@RestController
public class Test {
    @Value("${foo}")
    public String  foo;
    @GetMapping("/t")
    public String t(){
        return foo;
    }
}
依次启动server client,启动时可以看到读取了配置文件和启动黛安克,访问:
注意:spring boot 和cloud的版本以及config依赖的版本
<groupId>org.springframework.boot</groupId>
        <artifactId>spring-boot-starter-parent</artifactId>
        <version>2.1.7.RELEASE</version>
        <relativePath/> <!-- lookup parent from repository -->
我这里好像没有指定spring cloud 的版本呀
config的相关依赖使用:<version>2.1.2.RELEASE</version>
以上为个人经验,希望能给大家一个参考,也希望大家多多支持自学编程网。

- 本文固定链接: https://zxbcw.cn/post/217573/
- 转载请注明:必须在正文中标注并保留原文链接
- QQ群: PHP高手阵营官方总群(344148542)
- QQ群: Yii2.0开发(304864863)